1 INTERFACCIA OH/SW Il dispositivo permette di interfacciare
Anuncio

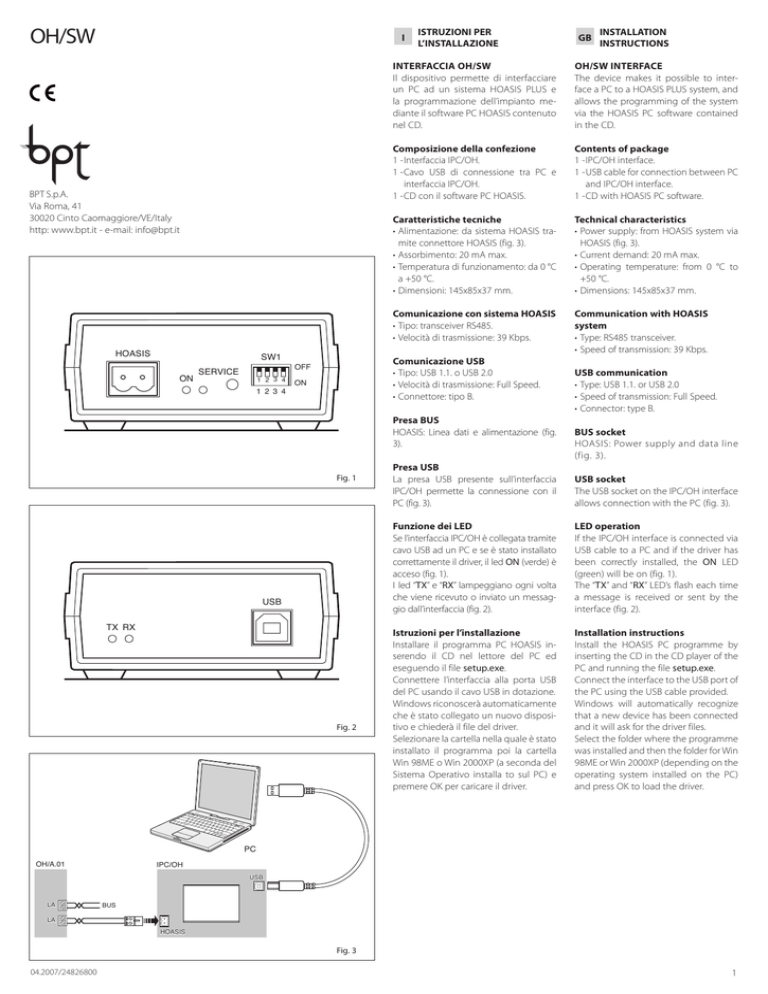
OH/SW I BPT S.p.A. Via Roma, 41 30020 Cinto Caomaggiore/VE/Italy http: www.bpt.it - e-mail: info@bpt.it HOASIS SW1 ON 1 2 3 4 ON 1 2 3 4 USB TX RX Fig. 2 INSTALLATION INSTRUCTIONS OH/SW INTERFACE The device makes it possible to interface a PC to a HOASIS PLUS system, and allows the programming of the system via the HOASIS PC software contained in the CD. Composizione della confezione 1 - Interfaccia IPC/OH. 1 - Cavo USB di connessione tra PC e interfaccia IPC/OH. 1 - CD con il software PC HOASIS. Contents of package 1 - IPC/OH interface. 1 - USB cable for connection between PC and IPC/OH interface. 1 - CD with HOASIS PC software. Caratteristiche tecniche • Alimentazione: da sistema HOASIS tramite connettore HOASIS (fig. 3). • Assorbimento: 20 mA max. • Temperatura di funzionamento: da 0 °C a +50 °C. • Dimensioni: 145x85x37 mm. Technical characteristics • Power supply: from HOASIS system via HOASIS (fig. 3). • Current demand: 20 mA max. • Operating temperature: from 0 °C to +50 °C. • Dimensions: 145x85x37 mm. Comunicazione con sistema HOASIS • Tipo: transceiver RS485. • Velocità di trasmissione: 39 Kbps. Communication with HOASIS system • Type: RS485 transceiver. • Speed of transmission: 39 Kbps. Presa BUS HOASIS: Linea dati e alimentazione (fig. 3). Fig. 1 GB INTERFACCIA OH/SW Il dispositivo permette di interfacciare un PC ad un sistema HOASIS PLUS e la programmazione dell’impianto mediante il software PC HOASIS contenuto nel CD. Comunicazione USB • Tipo: USB 1.1. o USB 2.0 • Velocità di trasmissione: Full Speed. • Connettore: tipo B. OFF SERVICE ISTRUZIONI PER L’INSTALLAZIONE USB communication • Type: USB 1.1. or USB 2.0 • Speed of transmission: Full Speed. • Connector: type B. BUS socket HOASIS: Power supply and data line (fig. 3). Presa USB La presa USB presente sull’interfaccia IPC/OH permette la connessione con il PC (fig. 3). USB socket The USB socket on the IPC/OH interface allows connection with the PC (fig. 3). Funzione dei LED Se l’interfaccia IPC/OH è collegata tramite cavo USB ad un PC e se è stato installato correttamente il driver, il led ON (verde) è acceso (fig. 1). I led “TX” e “RX” lampeggiano ogni volta che viene ricevuto o inviato un messaggio dall’interfaccia (fig. 2). LED operation If the IPC/OH interface is connected via USB cable to a PC and if the driver has been correctly installed, the ON LED (green) will be on (fig. 1). The “TX” and “RX” LED’s flash each time a message is received or sent by the interface (fig. 2). Istruzioni per l’installazione Installare il programma PC HOASIS inserendo il CD nel lettore del PC ed eseguendo il file setup.exe. Connettere l’interfaccia alla porta USB del PC usando il cavo USB in dotazione. Windows riconoscerà automaticamente che è stato collegato un nuovo dispositivo e chiederà il file del driver. Selezionare la cartella nella quale è stato installato il programma poi la cartella Win 98ME o Win 2000XP (a seconda del Sistema Operativo installa to sul PC) e premere OK per caricare il driver. Installation instructions Install the HOASIS PC programme by inserting the CD in the CD player of the PC and running the file setup.exe. Connect the interface to the USB port of the PC using the USB cable provided. Windows will automatically recognize that a new device has been connected and it will ask for the driver files. Select the folder where the programme was installed and then the folder for Win 98ME or Win 2000XP (depending on the operating system installed on the PC) and press OK to load the driver. ® PC OH/A.01 IPC/OH USB LA BUS LA HOASIS Fig. 3 04.2007/24826800 1 D INSTALLATIONSANLEITUNG SCHNITTSTELLE IPC/OH Die Einrichtung ermöglicht das Anschliessen eines PC an ein HOASIS PLUS System und die Programmierung der Anlage mit einer PC HOASIS Software, die in der CD enthalten ist. Packungsinhalt 1 - Schnittstelle OH/SW. 1 - USB-Kabel zur Verbindung zwischen dem PC und der Schnittstelle OH/SW. 1 - CD mit der Software PC HOASIS. Technische Daten • Stromversorgung: durch das System HOASIS über den Verbinder HOASIS (Abb. 3). • Stromaufnahme: max. 20 mA • Betriebstemperatur: von 0 °C bis +50 °C. • Abmessungen: 145x85x37 mm. Datenaustausch mit dem System HOASIS • Typ: Transceiver RS485. • Übertragungsgeschwindigkeit: 39 kBps. USB-Datenaustausch • Typ: USB 1.1. oder USB 2.0 • Übertragungsgeschwindigkeit: Full Speed. • Verbinder: Typ B. BUS-Anschluss HOASIS: Daten- und Stromversorgungsleitung (Abb. 3). USB-Anschluss Der an der Schnittstelle OH/SW vorhandene USB-Anschluss ermöglicht die Verbindung mit dem PC (Abb. 3). Funktion der LED Wenn das Schnittstelle IPC/OH über das USB-Kabel an einen PC angeschlossen ist und wenn der Driver richtig installiert wurde, leuchtet die Led ON (grün) (Abb. 1). Die Leds “TX” und “RX” blinken immer dann, wenn eine Nachricht von der Schnittstelle empfangen oder gesendet wird (Abb. 2). Hinweise zur Installation Installieren Sie das Programm PC HOASIS durch Einlegen der CD in das entsprechende Laufwerk des PC und Ausführen der Datei setup.exe. Schließen Sie die Schnittstelle mit Hilfe des beiliegenden USB-Kabels an den USB-Anschluss des PC an. Windows erkennt automatisch, dass ein neues Gerät angeschlossen wurde und fordert die Driver-Datei. Wählen Sie das Verzeichnis, in dem das Programm installiert wurde, dann das Verzeichnis Win 98ME oder Win 2000XP (je nach dem auf Ihrem PC installierten Betriebssystem) und bestätigen Sie OK, um den Driver zu laden. F INSTRUCTIONS POUR L’INSTALLATION INTERFACE IPC/OH Le dispositif permet d’interfacer un PC à un système HOASIS PLUS et la programmation de l’installation moyennant le logiciel PC HOASIS contenu dans le CD. Contenu du paquet 1 - Interface IPC/OH. 1 - Câble de connexion USB entre l’ordinateur et l’interface IPC/OH. 1 - Logiciel PC HOASIS. Caractéristiques techniques • Alimentation: du système HOASIS par connecteur HOASIS (fig. 3). • Absorption: 20 mA max. • Température de fonctionnement: de 0 °C à +50 °C. • Dimensions: 145x85x37 mm. E INSTRUCCIONES PARA LA INSTALACION INTERFAZ IPC/OH El dispositivo permite interconectar un PC y un sistema HOASIS PLUS, así como programar la instalación mediante el software PC HOASIS contenido en el CD. Composición del paquete 1 - Interfaz IPC/OH. 1 - Cable USB de conexión entre PC e interfaz IPC/OH. 1 - CD con el software PC HOASIS. Características técnicas • Alimentación: desde sistema HOASIS por medio de conector HOASIS (fig. 3). • Absorción: 20 mA máx. • Temperatura de funcionamiento: de 0 °C a +50 °C. • Dimensiones: 145x85x37 mm. Communication avec système HOASIS • Type: émetteur-récepteur RS485. • Vitesse de transmission: 39 Kbps. Comunicación con sistema HOASIS • Tipo: transceiver RS485. • Velocidad de transmisión: 39 Kbps. Communication USB • Type: USB 1.1. ou USB 2.0 • Vitesse de transmission: Full Speed. • Connecteur: type B. Comunicación USB • Tipo: USB 1.1. o USB 2.0 • Velocidad de transmisión: Full Speed. • Conector: tipo B. Prise BUS HOASIS: Ligne de données et alimentation (fig. 3). Toma BUS HOASIS: Línea de datos y alimentación (fig. 3). Prise USB La prise USB présente sur l’interface IPC/OH permet la connexion au PC (fig. 3). Toma USB La toma USB presente en la interfaz IPC/OH permite la conexión con el PC (fig. 3). Fonction des LEDS Si l’interface IPC/OH est connecté à l’ordinateur par un câble USB et si le pilote est bien installé, le LED ON (vert) est allumé (fig. 1). Les voyants “TX” et “RX” clignotent à chaque fois que l’interface reçoit ou envoie un message (fig. 2). Función de los LED Si la interfaz IPC/OH está conectado por medio del cable USB a un PC y si se ha instalado correctamente el driver, el led ON (verde) estará encendido (fig. 1). Los leds “TX” y “RX” parpadearán cada vez que se envíe o reciba un mensaje desde la interfaz (fig. 2). Installation Installer le programme PC HOASIS en insérant le CD dans le lecteur de l’ordinateur, puis exécuter le fichier setup.exe. Connecter l’interface au port USB de l’ordinateur en utilisant le câble USB fourni dans l’emballage. Windows reconnaîtra automatiquement qu’un nouveau dispositif a été connecté et demandera le dossier du pilote. Sélectionner le dossier d’installation du programme, puis le dossier Win 98ME ou Win 2000XP (selon le système d’exploitation de votre ordinateur), puis appuyer sur OK pour charger le pilote. Instrucciones para la instalación Instalar el programa PC HOASIS introduciendo el CD en el lector del PC y ejecutando el file setup.exe. Conectar la interfaz al puerto USB del PC usando el cable USB que se entrega. Windows reconocerá automáticamente que se ha conectado un nuevo dispositivo y solicitará los archivos del driver. Seleccionar la carpeta en la que se ha instalado el programa y, a continuación, la carpeta Win 98ME o Win 2000XP (dependiendo del Sistema Operativo instalado en el PC) y pulsar OK para cargar el driver. P INSTRUÇÕES PARA A INSTALAÇÃO IINTERFACE IPC/OH O dispositivo permite de interligar um PC a um sistema HOASIS PLUS e a programação da instalação mediante o software PC HOASIS contido no CD. Composição da embalagem 1 - Interface IPC/OH. 1 - Cabo USB de conexão entre PC e interface IPC/OH. 1 - CD con software PC HOASIS. Características técnicas • Alimentação: por sistema HOASIS através de conector HOASIS (fig. 3). • Absorção: 20 mA max. • Temperatura de funcionamento: de 0 °C até +50 °C. • Dimensões: 145x85x37 mm. Comunicação com sistema HOASIS • Tipo: transceptor RS485. • Velocidade de transmissão: 39 Kbps. Comunicação USB • Tipo: USB 1.1. ou USB 2.0 • Velocidade de transmissão: Full Speed. • Conector: tipo B. Tomada BUS HOASIS: Linha de dados e alimentação (fig. 3). Tomada USB A tomada USB presente na interface IPC/OH permite a conexão com o PC (fig. 3). Função dos LED Se na interface OH/SW estiver interligado com o cabo USB a um PC e se tiver sido instalado correctamente o driver, o led ON (verde) se acende (fig. 1). Os leds “TX” e “RX” lampejam todas as vezes que for recebida ou enviada uma mensagem pela interface (fig. 2). Instruções para a instalação Instalar o programa PC HOASIS colocando o CD no leitor do PC e executando o ficheiro setup.exe. Conectar a interface à porta USB do PC usando o cabo USB fornecido. Windows reconhecerá automaticamente que foi ligado um novo dispositivo e pedirá o ficheiro do driver. Seleccionar a pasta na qual foi instalado o programa depois a pasta Win 98ME ou Win 2000XP (conforme o Sistema Operacional instalado no PC) e carregar OK para carregar o driver. 2
