anchor product line anchor retaining wall installation instructions
Anuncio

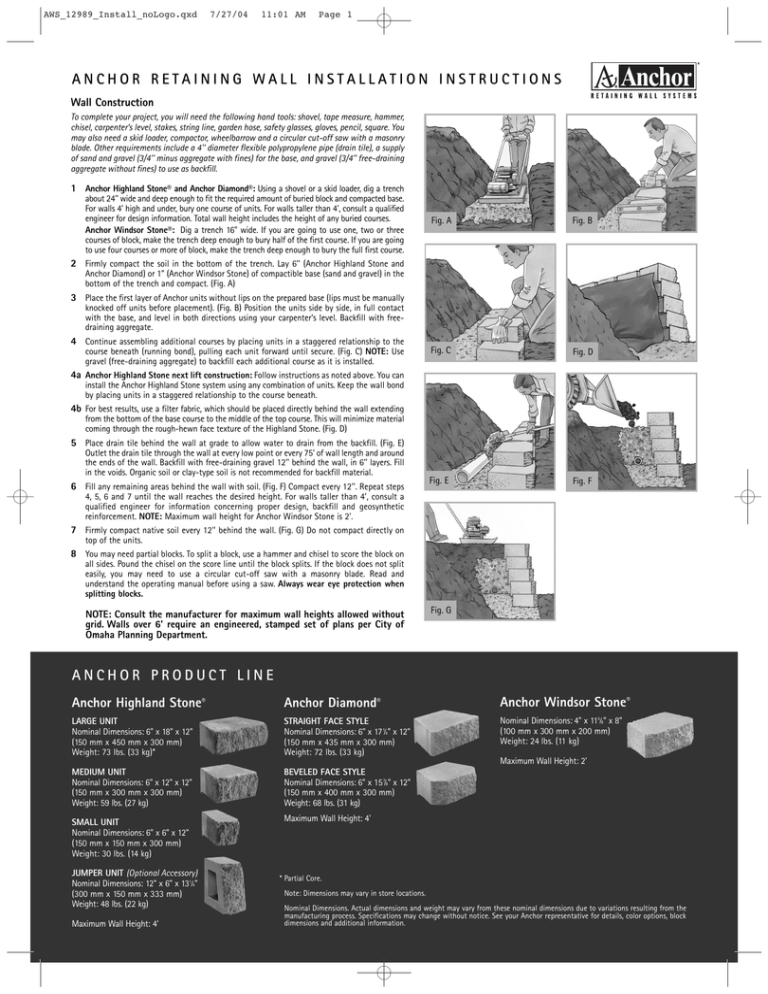
AWS_12989_Install_noLogo.qxd 7/27/04 11:01 AM Page 1 ANCHOR RETAINING WALL INSTALLATION INSTRUCTIONS Wall Construction To complete your project, you will need the following hand tools: shovel, tape measure, hammer, chisel, carpenter’s level, stakes, string line, garden hose, safety glasses, gloves, pencil, square. You may also need a skid loader, compactor, wheelbarrow and a circular cut-off saw with a masonry blade. Other requirements include a 4'' diameter flexible polypropylene pipe (drain tile), a supply of sand and gravel (3/4'' minus aggregate with fines) for the base, and gravel (3/4'' free-draining aggregate without fines) to use as backfill. 1 Anchor Highland Stone® and Anchor Diamond®: Using a shovel or a skid loader, dig a trench about 24'' wide and deep enough to fit the required amount of buried block and compacted base. For walls 4' high and under, bury one course of units. For walls taller than 4', consult a qualified engineer for design information. Total wall height includes the height of any buried courses. Anchor Windsor Stone®: Dig a trench 16" wide. If you are going to use one, two or three courses of block, make the trench deep enough to bury half of the first course. If you are going to use four courses or more of block, make the trench deep enough to bury the full first course. Fig. A Fig. B Fig. C Fig. D Fig. E Fig. F 2 Firmly compact the soil in the bottom of the trench. Lay 6'' (Anchor Highland Stone and Anchor Diamond) or 1" (Anchor Windsor Stone) of compactible base (sand and gravel) in the bottom of the trench and compact. (Fig. A) 3 Place the first layer of Anchor units without lips on the prepared base (lips must be manually knocked off units before placement). (Fig. B) Position the units side by side, in full contact with the base, and level in both directions using your carpenter’s level. Backfill with freedraining aggregate. 4 Continue assembling additional courses by placing units in a staggered relationship to the course beneath (running bond), pulling each unit forward until secure. (Fig. C) NOTE: Use gravel (free-draining aggregate) to backfill each additional course as it is installed. 4a Anchor Highland Stone next lift construction: Follow instructions as noted above. You can install the Anchor Highland Stone system using any combination of units. Keep the wall bond by placing units in a staggered relationship to the course beneath. 4b For best results, use a filter fabric, which should be placed directly behind the wall extending from the bottom of the base course to the middle of the top course. This will minimize material coming through the rough-hewn face texture of the Highland Stone. (Fig. D) 5 Place drain tile behind the wall at grade to allow water to drain from the backfill. (Fig. E) Outlet the drain tile through the wall at every low point or every 75' of wall length and around the ends of the wall. Backfill with free-draining gravel 12'' behind the wall, in 6'' layers. Fill in the voids. Organic soil or clay-type soil is not recommended for backfill material. 6 Fill any remaining areas behind the wall with soil. (Fig. F) Compact every 12''. Repeat steps 4, 5, 6 and 7 until the wall reaches the desired height. For walls taller than 4', consult a qualified engineer for information concerning proper design, backfill and geosynthetic reinforcement. NOTE: Maximum wall height for Anchor Windsor Stone is 2'. 7 Firmly compact native soil every 12'' behind the wall. (Fig. G) Do not compact directly on top of the units. 8 You may need partial blocks. To split a block, use a hammer and chisel to score the block on all sides. Pound the chisel on the score line until the block splits. If the block does not split easily, you may need to use a circular cut-off saw with a masonry blade. Read and understand the operating manual before using a saw. Always wear eye protection when splitting blocks. NOTE: Consult the manufacturer for maximum wall heights allowed without grid. Walls over 6' require an engineered, stamped set of plans per City of Omaha Planning Department. Fig. G ANCHOR PRODUCT LINE Anchor Highland Stone® Anchor Diamond® Anchor Windsor Stone® LARGE UNIT Nominal Dimensions: 6" x 18" x 12" (150 mm x 450 mm x 300 mm) Weight: 73 lbs. (33 kg)* STRAIGHT FACE STYLE Nominal Dimensions: 6" x 17 1⁄4" x 12" (150 mm x 435 mm x 300 mm) Weight: 72 lbs. (33 kg) Nominal Dimensions: 4" x 115⁄8" x 8" (100 mm x 300 mm x 200 mm) Weight: 24 lbs. (11 kg) MEDIUM UNIT Nominal Dimensions: 6" x 12" x 12" (150 mm x 300 mm x 300 mm) Weight: 59 lbs. (27 kg) BEVELED FACE STYLE Nominal Dimensions: 6" x 15 7⁄8" x 12" (150 mm x 400 mm x 300 mm) Weight: 68 lbs. (31 kg) SMALL UNIT Nominal Dimensions: 6" x 6" x 12" (150 mm x 150 mm x 300 mm) Weight: 30 lbs. (14 kg) Maximum Wall Height: 4' Maximum Wall Height: 2' JUMPER UNIT (Optional Accessory) Nominal Dimensions: 12" x 6" x 131⁄4" (300 mm x 150 mm x 333 mm) Weight: 48 lbs. (22 kg) Maximum Wall Height: 4' * Partial Core. Note: Dimensions may vary in store locations. Nominal Dimensions. Actual dimensions and weight may vary from these nominal dimensions due to variations resulting from the manufacturing process. Specifications may change without notice. See your Anchor representative for details, color options, block dimensions and additional information. AWS_12989_Install_sp_noLogo.qxd 7/27/04 11:00 AM Page 1 INSTRUCCIONES PARA INSTALACIÓN DEL MURO DE CONTENCIÓN ANCHOR Construcción del muro A fin de completar su proyecto, serán necesarias las siguientes herramientas de mano: pala, cinta métrica, martillo, cincel, nivel para carpintero, estacas, línea de cuerda, manguera de jardín, gafas de seguridad, guantes, lápiz, escuadra. Es posible que también necesite un cargador deslizante, una apisonadora, una carretilla y una sierra circular de corte con cuchilla para mampostería. Otros requerimientos incluyen un tubo de polipropileno flexible de 4"(100 mm) de diámetro (baldosa de desagüe), una provisión de arena y grava para la base (agregado de 3/4" [19,1mm] o menos con árido fino) y grava para usar como relleno (agregado de 3/4"[19,1mm] de drenaje libre sin árido fino). 1 2 3 4 Anchor Highland Stone® y Anchor Diamond®: Con una pala o un cargador deslizante, cave una zanja de aproximadamente 24" (610 mm) de ancho y suficientemente profunda para acomodar la cantidad requerida de bloques enterrados y la base apisonada. Para muros de 4' (1.2 m) de altura y menores, entierre una hilera de unidades. Para muros superiores a los 4' (1,2 m) de altura, obtenga información sobre diseño de un ingeniero calificado. La altura total del muro incluye la altura de las hileras enterradas. Anchor Windsor Stone®: Cave una zanja de 16"(400 mm) de ancho. Si va a usar una, dos o tres hileras de bloques, es necesario que la zanja sea suficientemente profunda como para enterrar la mitad de la primera hilera. Si va a usar cuatro hileras de bloques o más, es necesario que la zanja sea suficientemente profunda como para enterrar la primera hilera en su totalidad. Apisone firmemente la tierra de la base de la zanja. Coloque 6" (152 mm) (Anchor Highland Stone y Anchor Diamond) o 1" (25 mm) (Anchor Windsor Stone) de base compactable (arena y grava) en la base de la zanja y apisónela. (Figura A) Coloque la primera capa de las unidades Anchor sin rebordes sobre la base preparada (se deberán eliminar a mano los rebordes de las unidades antes de la colocación). (Figura B) Coloque las unidades una al lado de la otra, en contacto total con la base, y nivélelas en ambas direcciones con su nivel para carpintero. Rellene con agregado para drenaje libre. Continúe montando hileras adicionales acomodando las unidades en forma escalonada en relación a la hilera inferior (con los bordes alternados), jalando cada una de ellas hacia adelante para asegurarla. (Figura C) NOTA: Use grava (agregado para drenaje libre) para rellenar cada hilera adicional a medida que sea instalada. Figura. A Figura. B Figura. C Figura. D Figura. E Figura. F 4a Anchor Highland Stone nueva construcción prefabricada: Siga las instrucciones tal como se indicó anteriormente. Usted puede instalar el sistema Anchor Highland Stone utilizando las unidades en cualquier combinación. Mantenga la unión del muro colocando las unidades en forma escalonada en relación a la hilera inferior. 4b Para obtener mejores resultados, use una tela como filtro; colóquela exactamente detrás del muro, extendiéndola desde la parte inferior de la hilera de la base hasta la mitad de la hilera superior. Esto reducirá la cantidad del material que pasa a través de la superficie áspera de Highland Stone. (Figura D) 5 Coloque la baldosa de desagüe detrás del muro en un ángulo que permita que el agua drene del relleno. (Figura E) Haga que la teja de desagüe sobresalga del muro en cada punto bajo o cada 75' (185 m) de longitud del muro y alrededor de los extremos del muro. Rellene 12" (300 mm) detrás del muro con grava para drenaje libre, en capas de 6" (152 mm) Rellene los huecos. No se recomienda tierra orgánica ni tierra arcillosa como material de relleno. 6 Rellene con tierra las zonas restantes detrás del muro. (Figura F) Apisone cada 12'' (300 mm). Repita los pasos 4, 5, 6 y 7 hasta que el muro alcance la altura deseada. Para muros superiores a los 4' (1,2 m) de altura, obtenga de un ingeniero calificado información adecuada sobre diseño, rellenos y refuerzo geosintético. NOTA: La altura máxima para Anchor Windsor Stone es de 2' ( 600 mm) 7 Apisone bien la tierra original cada 12" (300m mm) detrás del muro. (Figura G) No apisone directamente sobre la parte superior de las unidades. 8 Es posible que necesite parte de un bloque. Para partir un bloque, use un martillo y un cincel para marcar el bloque en todos los costados. Golpee con el cincel sobre la línea marcada hasta partir el bloque. Si el bloque no se parte fácilmente, es posible que necesite usar una sierra circular de corte con cuchilla de mampostería. Es importante leer y comprender el manual de operaciones antes de usar una sierra. Siempre use su protector ocular al partir bloques. NOTA: CONSULTE CON EL FABRICANTE ACERCA DE LA ALTURA MÁXIMA PERMITIDA PARA MUROS SIN REJILLA. LOS MUROS QUE SUPERAN LOS 6' (1.80M) REQUIEREN UN CONJUNTO DE PLANOS, TIMBRADOS, CON CÁLCULOS DE INGENIERÍA, DE ACUERDO CON LAS REGULACIONES DEL CITY OF OMAHA PLANNING DEPARTMENT. Figura. G LÍNEA DE PRODUCTOS ANCHOR Anchor Highland Stone ® Anchor Diamond ® Anchor Windsor Stone® UNIDADES GRANDES Dimensiones nominales: 6" x 18" x 12" (150 mm x 450 mm x 300 mm) Peso: 73 lbs. (33 kg)* ESTILO DE CORTE DERECHO Dimensiones nominales: 6" x 17 1/4 " x 12" (150 mm x 435 mm x 300 mm) Peso: 72 lbs. (33 kg) ESTILO DE CORTE EN BISEL Dimensiones nominales: 4" x 11 5/8 " x 8" (100 mm x 300 mm x 200 mm) Peso: 24 lbs. (11 kg) UNIDADES MEDIANAS Dimensiones nominales: 6" x 12" x 12" (150 mm x 300 mm x 300 mm) Peso: 59 lbs. (27 kg) UNIDADES PEQUEÑAS Dimensiones nominales: 6" x 6" x 12" (150 mm x 150 mm x 300 mm) Peso: 30 lbs. (14 kg) UNIDADES DE CONEXIÓN ( Accesorio opcional) Dimensiones nominales: 12" x 6" x 13 1/4" (300 mm x 150 mm x 333 mm) Peso: 48 lbs. (22 kg) Altura máxima del muro: 4' Altura máxima del muro: 2' 8 Dimensiones nominales: 6" x 15 7/8 " x 12" (150 mm x 400 mm x 300 mm) Peso: 68 lbs. (31 kg) Altura máxima del muro: 4' * Núcleo parcial. Nota: Las dimensiones pueden variar en los sitios de venta. Dimensiones nominales Las dimensiones y el peso reales pueden ser distintos a las dimensiones nominales debido a variaciones resultantes del proceso de fabricación. Las especificaciones pueden variar sin previo aviso. Consulte a su representante Anchor sobre detalles, selección de colores, dimensiones de los bloques y cualquier otra información adicional.


