Instrucciones banderolas
Anuncio

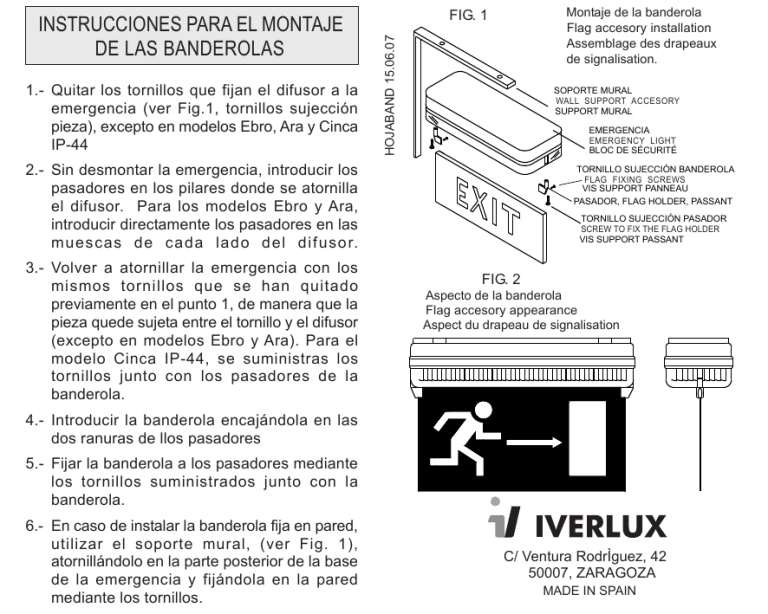
1.- Quitar los tornillos que fijan el difusor a la emergencia (ver Fig.1, tornillos sujección pieza), excepto en modelos Ebro, Ara y Cinca IP-44 Montaje de la banderola Flag accesory installation Assemblage des drapeaux de signalisation. FIG. 1 HOJABAND 15.06.07 INSTRUCCIONES PARA EL MONTAJE DE LAS BANDEROLAS SOPORTE MURAL WALL SUPPORT ACCESORY SUPPORT MURAL EMERGENCIA EMERGENCY LIGHT BLOC DE SÉCURITÉ 2.- Sin desmontar la emergencia, introducir los pasadores en los pilares donde se atornilla el difusor. Para los modelos Ebro y Ara, introducir directamente los pasadores en las muescas de cada lado del difusor. 3.- Volver a atornillar la emergencia con los mismos tornillos que se han quitado previamente en el punto 1, de manera que la pieza quede sujeta entre el tornillo y el difusor (excepto en modelos Ebro y Ara). Para el modelo Cinca IP-44, se suministras los tornillos junto con los pasadores de la banderola. TORNILLO SUJECCIÓN BANDEROLA FLAG FIXING SCREWS VIS SUPPORT PANNEAU PASADOR, FLAG HOLDER, PASSANT TORNILLO SUJECCIÓN PASADOR SCREW TO FIX THE FLAG HOLDER VIS SUPPORT PASSANT FIG. 2 Aspecto de la banderola Flag accesory appearance Aspect du drapeau de signalisation 4.- Introducir la banderola encajándola en las dos ranuras de llos pasadores 5.- Fijar la banderola a los pasadores mediante los tornillos suministrados junto con la banderola. 6.- En caso de instalar la banderola fija en pared, utilizar el soporte mural, (ver Fig. 1), atornillándolo en la parte posterior de la base de la emergencia y fijándola en la pared mediante los tornillos. C/ Ventura RodrÌguez, 42 50007, ZARAGOZA MADE IN SPAIN FLAG ACCESORY INSTALLATION INSTRUCTIONS 1.- Remove the screws which maintained the emergency light and the diffuser. (See Fig. 1, screw to fix the flag holders) except for models Ebro, Ara and Cinca IP-44. INSTRUCTIONS POUR L'ASSEMBLAGE DES DRAPEAUX DE SIGNALISATION. 1.- Enlever les vis qui fixent le diffuseur au bloc de sécurité (voir fig.1, vis support passant) sauf pour les modèles Ebro, Ara et Cinca IP44. 2.- Without dismantling the emergency light, introduce the flag holders in the holes where the diffuser has to be screwed. For the models Ebro and Ara, just introduce the flag holders in the notches on each side of the emergency light. 2.- Sans démonter le bloc de sécurité, introduire les passants dans les trous où se visse le diffuseur. Pour les modèles Ebro et Ara, introduire directement les passants dans les encoches de chaque côté du bloc de sécurité. 3.- Screw the diffuser again with the same screws removed in step 1, so that the flag holders be held between the diffuser and the screw (except for models Ebro and Ara). For the model Cinca IP-44, the screws are provided with the flag holders of the flag. 3.- Revisser le bloc de sécurité avec les mêmes vis qui avaient été enlevées précédemment dans le point 1 de façon à ce que le passant soit maintenu entre la vis et le diffuseur (sauf pour les modèles Ebro y Ara). Pour le modèle Cinca IP44, les vis sont fournies avec les passants du panneau. 4.- Introduce the flag sign into the slots of the flag holders. 5.- Fix the flag sign to the flag holders with the enclosed screws. 6.-In case of putting the flag accesory up to the wall, use the wall suppport (see Fig. 1), screwing it to the base of the emergency light and fixing the accesory to the wall sopport to the wall with the enclolsed screws. 4.- Introduire le panneau en le faisant glisser dans les rainures des passants. 5.- Fixer le panneau aux passants à l'aide des vis fournies. 6.- En cas d'installation du drapeau de signalisation au mur, utiliser le support mural (voir fig.1) en le vissant sur la base du bloc de sécurité et le fixer au mur à l'aide des vis fournies.


