PCS-10 Home Mechanic Repair Stand PCS-10 Home
Anuncio
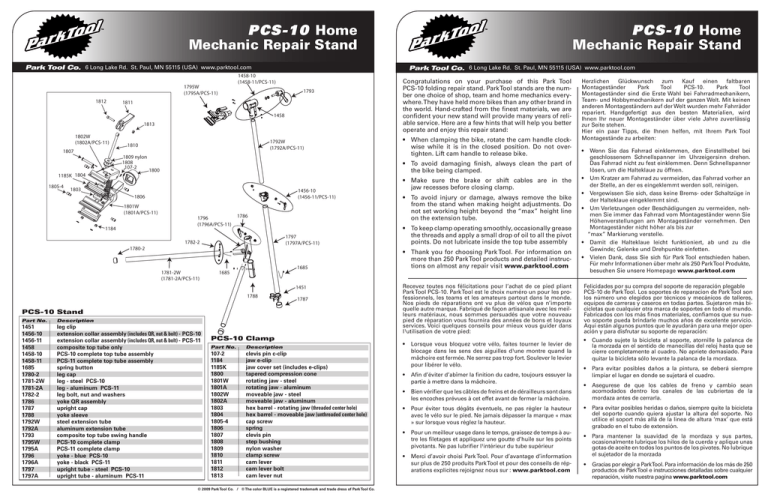
PCS-10 Home Mechanic Repair Stand Park Tool Co. 6 Long Lake Rd. St. Paul, MN 55115 (USA) www.parktool.com 1812 Park Tool Co. 6 Long Lake Rd. St. Paul, MN 55115 (USA) www.parktool.com 1458-10 (1458-11/PCS-11) 1795W (1795A/PCS-11) 1793 1811 1458 1813 1802W (1802A/PCS-11) 1807 1809 nylon 1808 107-2 1185K 1804 1805-4 1792W (1792A/PCS-11) 1810 1803 1456-10 (1456-11/PCS-11) 1806 1184 Congratulations on your purchase of this Park Tool PCS-10 folding repair stand. Park Tool stands are the number one choice of shop, team and home mechanics everywhere. They have held more bikes than any other brand in the world. Hand-crafted from the finest materials, we are confident your new stand will provide many years of reliable service. Here are a few hints that will help you better operate and enjoy this repair stand: • When clamping the bike, rotate the cam handle clockwise while it is in the closed position. Do not overtighten. Lift cam handle to release bike. • To avoid damaging finish, always clean the part of the bike being clamped. 1800 1801W (1801A/PCS-11) PCS-10 Home Mechanic Repair Stand 1796 (1796A/PCS-11) 1786 1782-2 1780-2 1781-2W (1781-2A/PCS-11) 1685 1797 (1797A/PCS-11) 1685 • Thank you for choosing Park Tool. For information on more than 250 Park Tool products and detailed instructions on almost any repair visit www.parktool.com 1787 PCS-10 Stand Part No. Description 1451 1456-10 1456-11 1458 1458-10 1458-11 1685 1780-2 1781-2W 1781-2A 1782-2 1786 1787 1788 1792W 1792A 1793 1795W 1795A 1796 1796A 1797 1797A leg clip extension collar assembly (includes QR, nut & bolt) - PCS-10 extension collar assembly (includes QR, nut & bolt) - PCS-11 composite top tube only PCS-10 complete top tube assembly PCS-11 complete top tube assembly spring button leg cap leg - steel PCS-10 leg - aluminum PCS-11 leg bolt, nut and washers yoke QR assembly upright cap yoke sleeve steel extension tube aluminum extension tube composite top tube swing handle PCS-10 complete clamp PCS-11 complete clamp yoke - blue PCS-10 yoke - black PCS-11 upright tube - steel PCS-10 upright tube - aluminum PCS-11 • To avoid injury or damage, always remove the bike from the stand when making height adjustments. Do not set working height beyond the “max” height line on the extension tube. • To keep clamp operating smoothly, occasionally grease the threads and apply a small drop of oil to all the pivot points. Do not lubricate inside the top tube assembly 1451 1788 • Make sure the brake or shift cables are in the jaw recesses before closing clamp. PCS-10 Clamp Part No. Description 107-2 1184 1185K 1800 1801W 1801A 1802W 1802A 1803 1804 1805-4 1806 1807 1808 1809 1810 1811 1812 1813 clevis pin c-clip jaw e-clip jaw cover set (includes e-clips) tapered compression cone rotating jaw - steel rotating jaw - aluminum moveable jaw - steel moveable jaw - aluminum hex barrel - rotating jaw (threaded center hole) hex barrel - moveable jaw (unthreaded center hole) cap screw spring clevis pin step bushing nylon washer clamp screw cam lever cam lever bolt cam lever nut © 2009 Park Tool Co. / ® The color BLUE is a registered trademark and trade dress of Park Tool Co. Recevez toutes nos félicitations pour l’achat de ce pied pliant Park Tool PCS-10. Park Tool est le choix numéro un pour les professionnels, les teams et les amateurs partout dans le monde. Nos pieds de réparations ont vu plus de vélos que n’importe quelle autre marque. Fabriqué de façon artisanale avec les meilleurs matériaux, nous sommes persuadés que votre nouveau pied de réparation vous fournira des années de bons et loyaux services. Voici quelques conseils pour mieux vous guider dans l¹utilisation de votre pied: • Lorsque vous bloquez votre vélo, faites tourner le levier de blocage dans les sens des aiguilles d¹une montre quand la mâchoire est fermée. Ne serrez pas trop fort. Soulever le levier pour libérer le vélo. • Afin d’éviter d’abîmer la finition du cadre, toujours essuyer la partie à mettre dans la mâchoire. • Bien vérifier que les câbles de freins et de dérailleurs sont dans les encoches prévues à cet effet avant de fermer la mâchoire. • Pour éviter tous dégâts éventuels, ne pas régler la hauteur avec le vélo sur le pied. Ne jamais dépasser la marque « max » sur lorsque vous réglez la hauteur. • Pour un meilleur usage dans le temps, graissez de temps à autre les filetages et appliquez une goutte d’huile sur les points pivotants. Ne pas lubrifier l¹intérieur du tube supérieur • Merci d’avoir choisi Park Tool. Pour d’avantage d’information sur plus de 250 produits Park Tool et pour des conseils de réparations explicites rejoignez nous sur : www.parktool.com Herzlichen Glückwunsch zum Kauf einen faltbaren Montageständer Park Tool PCS-10. Park Tool Montageständer sind die Erste Wahl bei Fahrradmechanikern, Team- und Hobbymechanikern auf der ganzen Welt. Mit keinen anderen Montageständern auf der Welt wurden mehr Fahrräder repariert. Handgefertigt aus den besten Materialien, wird Ihnen Ihr neuer Montageständer über viele Jahre zuverlässig zur Seite stehen. Hier ein paar Tipps, die Ihnen helfen, mit Ihrem Park Tool Montagestände zu arbeiten: • Wenn Sie das Fahrrad einklemmen, den Einstellhebel bei geschlossenem Schnellspanner im Uhrzeigersinn drehen. Das Fahrrad nicht zu fest einklemmen. Denn Schnellspanner lösen, um die Halteklaue zu öffnen. • Um Kratzer am Fahrrad zu vermeiden, das Fahrrad vorher an der Stelle, an der es eingeklemmt werden soll, reinigen. •Vergewissen Sie sich, dass keine Brems- oder Schaltzüge in der Halteklaue eingeklemmt sind. • Um Verletzungen oder Beschädigungen zu vermeiden, nehmen Sie immer das Fahrrad vom Montageständer wenn Sie Höhenverstellungen am Montageständer vornehmen. Den Montageständer nicht höher als bis zur “max” Markierung verstelle. • Damit die Halteklaue leicht funktioniert, ab und zu die Gewinde; Gelenke und Drehpunkte einfetten. •Vielen Dank, dass Sie sich für Park Tool entschieden haben. Für mehr Informationen über mehr als 250 Park Tool Produkte, besuchen Sie unsere Homepage www.parktool.com Felicidades por su compra del soporte de reparación plegable PCS-10 de Park Tool. Los soportes de reparacion de Park Tool son los número uno elegidos por técnicos y mecánicos de talleres, equipos de carreras y caseros en todas partes. Sujetaron más bicicletas que cualquier otra marca de soportes en todo el mundo. Fabricados con los más finos materiales, confiamos que su nuevo soporte pueda brindarle muchos años de excelente servicio. Aqui están algunos puntos que le ayudarán para una mejor operación y para disfrutar su soporte de reparación: • Cuando sujete la bicicleta al soporte, atornille la palanca de la morzada en el sentido de manecillas del reloj hasta que se cierre completamente al cuadro. No apriete demasiado. Para quitar la bicicleta sólo levante la palanca de la mordaza. • Para evitar posibles daños a la pintura, se deberá siempre limpiar el lugar en donde se sujetará el cuadro. • Asegurese de que los cables de freno y cambio sean acomodados dentro los canales de las cubriertas de la mordaza antes de cerrarla. • Para evitar posibles heridas o daños, siempre quite la bicicleta del soporte cuando quiera ajustar la altura del soporte. No utilice el soport más allá de la linea de altura ‘max’ que está grabado en el tubo de extensión. • Para mantener la suavidad de la mordaza y sus partes, ocasionalmente lubrique los hilos de la cuerda y aplique unas gotas de aceite en todos los puntos de los pivotes. No lubrique el sujetador de la morzada • Gracias por elegir a ParkTool. Para información de los más de 250 productos de Park Tool e instrucciones detalladas sobre cualquier reparación, visite nuestra pagina www.parktool.com Clamp Operation: unlock max 1 max Folding for Storage (reverse to unfold): 4 unlock 2 5 lock optional accessories: (not included) lock PTH-1// Paper Towel Holder 106// Tray 3 BAG-15// Travel & Storage Bag
