URC-3220-R - URC Support
Anuncio
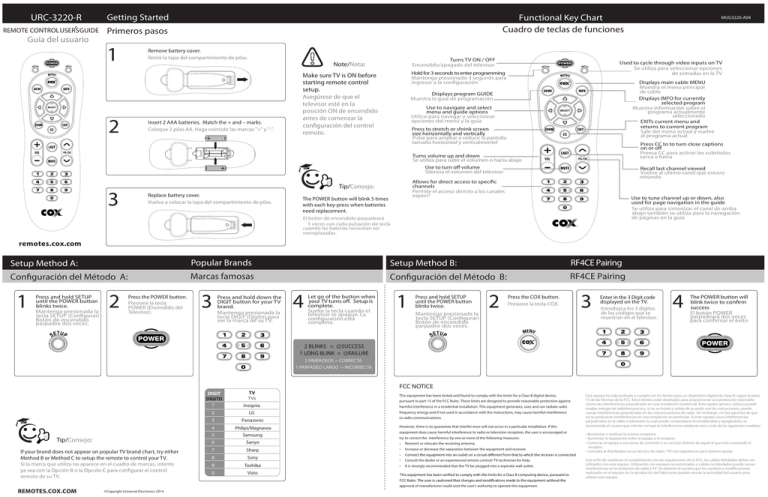
Getting Started URC-3220-R REMOTE CONTROLUSER’S GUIDE Primeros pasos Guía del usuario 1 2 Functional Key Chart Cuadro de teclas de funciones Remove battery cover. Retire la tapa del compartimiento de pilas. Turns TV ON / OFF Encendido/apagado del televisor Note/Nota: Insert 2 AAA batteries. Match the + and – marks. Coloque 2 pilas AA. Haga coincidir las marcas "+" y "-". Used to cycle through video inputs on TV Se utiliza para seleccionar opciones de entradas en la TV Hold for 3 seconds to enter programming Mantenga presionado 3 segunds para ingresar a la configuración Make sure TV is ON before starting remote control setup. Asegúrese de que el televisor esté en la posición ON de encendido antes de comenzar la Displays main cable MENU Muestra el menu principal de cable Displays INFO for currently selected program Muestra información sobre el programa actualmente seleccionado EXITs current menu and returns to current program Sale del menú actual y vuelve al programa actual Displays program GUIDE Muestra la guía de programación Use to navigate and select menu and guide options Utilice para navegar y seleccionar opciones del menú y la guía Press to stretch or shrink screen size horizontally and vertically Pulse para ampliar o reducir la pantalla tamaño horizontal y verticalmentel remoto. Press CC to to turn close captions on or off Prensa CC para activar los subtítulos cerca o fuera Turns volume up and down Se utiliza para subir el volumen o hacia abajo Use to turn off volume Silencia el volumen del televisor 3 Replace battery cover. Vuelva a colocar la tapa del compartimiento de pilas. Recall last channel viewed Vuelve al ultimo canal que estuvo mirando Allows for direct access to specific channels Permite el acceso directo a los canales especí? Tip/Consejo: The POWER button will blink 5 times with each key-press when batteries need replacement. MUG3220-A04 Use to tune channel up or down, also used for page navigation in the guide Se utiliza para sintonizar el canal de arriba abajo también se utiliza para la navegación de páginas en la guía El botón de encendido parpadeará 5 veces con cada pulsación de tecla cuando las baterías necesitan ser reemplazadas. remotes.cox.com Setup Method A: Popular Brands Setup Method B: RF4CE Pairing Configuración del Método A: Marcas famosas Configuración del Método B: RF4CE Pairing 1 Press and hold SETUP until the POWER button blinks twice. Mantenga presionada la tecla SETUP (Configurar) Botón de encendido parpadee dos veces. 2 Press the POWER button. Presione la tecla POWER (Encendido del Televisor). 3 Press and hold down the DIGIT button for your TV brand. Mantenga presionada la tecla DIGIT (Dígito) para ver la marca de su TV. 4 Let go of the button when your TV turns off. Setup is complete. Suelte la tecla cuando el televisor se apague. La configuración está completa. 1 Press and hold SETUP until the POWER button blinks twice. Mantenga presionada la tecla SETUP (Configurar) Botón de encendido parpadee dos veces. 2 Press the COX button. Presione la tecla COX. 3 Enter in the 3 Digit code displayed on the TV. Introduzca los 3 dígitos de los códigos que se muestran en el televisor. 4 The POWER button will blink twice to confirm success El botón POWER parpadeará dos veces para confirmar el éxito 2 PARPADEOS = CORRECTA 1 PARPADEO LARGO = INCORRECTA Tip/Consejo: If your brand does not appear on popular TV brand chart, try either Method B or Method C to setup the remote to control your TV. Si la marca que utiliza no aparece en el cuadro de marcas, intente remoto de su TV. REMOTES.COX.COM TV TVs DIGIT DÍGITO 1 Insignia 2 LG 3 Panasonic 4 Philips/Magnavox 5 Samsung 6 Sanyo 7 Sharp 8 Sony 9 Toshiba 0 Vizio FCC NOTICE This equipment has been tested and found to comply with the limits for a Class B digital device, pursuant to part 15 of the FCC Rules. These limits are designed to provide reasonable protection against harmful interference in a residential installation. This equipment generates, uses and can radiate radio frequency energy and if not used in accordance with the instructions, may cause harmful interference to radio communications. However, there is no guarantee that interfer ence will not occur in a particular installation. If this equipment does cause harmful interference to radio or television reception, the user is encouraged or try to correct the interference by one or more of the following measures: • Reorient or relocate the receiving antenna. • Increase or decrease the separation between the equipment and receiver. • Consult the dealer or an experienced remote control/ TV technician for help. • It is strongly recommended that the TV be plugged into a seperate wall outlet. T approval of manufacturer could void the user's authority to operate this equipment. ©Copyright Universal Electronics 2014 Este equipo ha sido probado y cumple con los límites para un dispositivo digital de clase B, según la parte 15 de las Normas de la FCC. Estos límites están diseñados para proporcionar una protección razonable contra las interferencias perjudiciales en una instalación residencial. Este equipo genera, utiliza y puede irradiar energía de radiofrecuencia y, si no se instala y utiliza de acuerdo con las instrucciones, puede causar interferencias perjudiciales en las comunicaciones de radio. Sin embargo, no hay garantía de que no se produzcan interferencias en una instalación en particular. Si este equipo causa interferencias perjudiciales en la radio o televisión, lo cual puede comprobarse encendiéndolo y apagándolo, se recomienda al usuario que intente corregir la interferencia mediante una o más de las siguientes medidas: • Reorientar o reubicar la antena receptora. • Aumentar la separación entre el equipo y el receptor. • Conectar el equipo a una toma de corriente o un circuito distinto de aquél al que está conectado el receptor. • Consulte al distribuidor oa un técnico de radio / TV con experiencia para obtener ayuda. Con el fin de mantener el cumplimiento con las regulaciones de la FCC, los cables blindados deben ser utilizados con este equipo. Utilización con equipos no autorizados o cables no blindados puede causar interferencias en la recepción de radio y TV. Se advierte al usuario que los cambios y modificaciones realizados en el equipo sin la aprobación del fabricante pueden anular la autoridad del usuario para utilizar este equipo. Setup Method B: Code Search Configuración del Método B: Búsqueda de código Codes: TV Códigos: TVs Acer Advent Affinity Aiwa Akai Note/Nota: Make sure TV is ON before starting remote control setup. 1 Press and hold SETUP until the POWER button blinks twice. Mantenga presionada la tecla SETUP (Configurar) botón de encendido parpadee dos veces. 2 3 Press the POWER button. Presione la tecla POWER (Encendido del Televisor). 4 Press and hold down the SELECT button. Mantenga presionada la tecla SELECT(Seleccionar). Let go of the SELECT button when TV turns off. Suelte la tecla SELECT (Seleccionar) cuando el dispositivo se apague o se encienda. Akawa American Action Akai AOC Apex Digital Ario Atvio Audiovox Aumark Auria Aventura Bell & Howell Berkshire Bradford Broksonic Celera Champion Changhong Citizen Clarion Coby Commercial Sol. Contec Craig Crown Curtis Setup Method C: Configuración del Método C: Direct Code Entry Entrada Directa de Código Curtis Mathis CXC Cytron Daewoo Digistar Disney Dumont Durabrand Note/Nota: Make sure TV is ON before starting remote control setup. 1 Press and hold SETUP until the POWER button blinks twice. Mantenga presionada la tecla SETUP (Confiugurar) botón de encendido parpadee dos veces. 2 Enter the 1st TV code for your brand from the code list to the right. Ingrese el 1er código de televisor para su marca de la lista de códigos. 3 Press the POWER button to test TV control. If the TV turns off, setup is complete. Presione el botón de encendido para probar el control para TV. Si el televisor se apaga, la configuración está completa. 4 repeat this process using the next code for your TV brand. Si el televisor no se apaga, repita este proceso utilizando el siguiente código para su marca de TV. Dynex Electrograph Electrohome Electron Elektra Element 1339, 4143 1570 3717, 3716, 3577 1362 1675, 1385, 1935, 0765 3391 0180 0180 1589, 1365, 2014, 2087, 1590 0765, 2397, 0748, 0890, 1217 2397 3683, 3636, 3654, 3657 1865, 0180, 1564, 1766, 1769, 1276, 2121, 0451 0060 2087, 2014 0171 0154 0047 0180 1935, 1892 0765 1362 0765 1935, 0060 0180 3478, 2315, 3627, 2344, 2306, 2314, 2345, 2338 0047 0180 0180 0180 3577, 2855, 2352, 2397, 3895, 1326 3636, 3382 0060, 0451, 0047, 0154 0180 1326 0451, 0661, 0154 1561 1892 0017 0171, 1570, 0178, 0180, 1034 2049 1755 1570, 1670 2855 0017 3559, 1687, 2183, 2964, 2256 MUG3220-A04 Emerson Envision Epson EQD EQD Auria ESA Favi Fisher Fluid Funai Futuretech 0180 Gateway GE GFM Gibralter Go Video Goldstar Grunpy Haier Hallmark Hannspree Harvard Hello Kitty Himitsu Hisense Hitachi Hyundai iLo Insignia Inteq iSymphony JC Penney JCM Jensen JVC KDS KEC KLH Kolin Konka KTV Legend Lexus LG LodgingStar LXI MAG Magnavox Marantz 1864, 1394, 0171, 3559, 1963, 3623, 2183, 1080 1589, 1365, 2087 2014 1122 2014, 2087 2014, 2087 0171, 1963 3382 0154, 1362 2964 1864, 0171, 0180 1394, 1963 1755, 1756 0047, 0451, 0051 0178, 0765 0171, 1963, 1864 0017 0060 0178 0180 1749, 3382, 3429, 2293, 1034, 1570 0178 1348 0180 0451 0180 2183, 3382, 1660 1314, 0748 1643, 1345 3418 1603, 1286, 1394 2049, 1641, 1564, 1326, 1423, 1892, 1517, 0171 0017 3492, 3382, 3094 0047, 0060, 0051, 0178, 0156 2256 1326 1774, 2321, 1670, 1892 1687 0180 0765 1240 1385 0180 2397 3683, 3654, 3657 1423, 0178, 2864 0017 3147 0154, 0047, 0156 0178, 0017 1687 1454, 2597, 3623, 1963, 0171, 1365 0051, 1755 1454 Matsushita Maxent Megatron Memorex MGA Midland Mintek Mitsubishi Mitsui MTC Multitech NAD Naoki Naxa NEC NetTV New Acoustic Dim. Nexus Electronics Nikko Norcent Norwood Micro NuVision Ölevia Onwa Optimus Orion Panasonic PARK Penney Philco Philips Pioneer Polaroid Portland Prima Prism Proscan Proton Proview Pulsar Quasar Radio Shack RCA 0051 1755, 1757 0178 1570, 1670, 0178, 1892, 0060, 0150, 0154, 1924, 1927 0150, 0178 0017, 0047, 0051 1603 0150, 1250, 0178 1797 3658, 3638, 3652, 3654, 3657 1867 0060 0180 0156, 0178 1540, 2357 2104, 3382 1797, 1704, 2293 1755 0156, 0178 2183 0178, 0017, 0047, 0154, 0156 1365, 1589, 0748, 1590 1286 1657 1610, 1240 0180 1927, 1924, 0154 1892 1480, 0051, 1927, 1924, 0047, 0060, 0150, 0154, 0156, 0178 2104 0047, 0060, 0051, 0178, 0156 0171, 1963, 1394 1867, 1454, 2597, 0690, 0017, 3623, 0171, 1365, 1394 1457 1769, 1538, 1276, 1385, 1767, 4035, 1687, 2121, 1762, 0765, 1314, 1565, 1286, 1326 0451 1749 0051 2256, 2183, 3577, 0047, 3382, 3332, 3895, 3717, 3636 0178 1687 0017 0051, 1927, 1924 0180, 0178, 0154, 0047 2746, 2932, 0047, 2434, 3577, 3382, 3717, 2183, 2855, 3147, 3332, 0051, 0090, 1385, 3636 Realistic Runco Sampo Samsung Sansui Sanyo Sceptre Scotch Scott Sears Seiki Seiki Epson Sens Sharp Sony Soundesign Sectroniq Speler Squareview SSS Starlite SunbriteTV Superscan Supersonic SVA Sylvania Symphonic Syntax Takai Tatung TCL Technics Techwood Teknika TMK TNCi Tosaki Toshiba TruTech US Logic Venturer Vidtech Viewsonic Viore Vizio Vuon Wards Waycon Westinghouse Wyse Xiahua Zenith 0154, 0180, 0178 0017 1755 2051, 0060, 0766, 0178 1892, 1670, 1935, 0171, 3559 1142, 0154, 1362, 0088 2337, 1217, 1360 0178 01780, 1080 0154, 0156, 0047, 0171, 0178 2964, 3559, 3560, 0178 1122 1865 2360 0810, 1685 0178, 0180 1678 4105, 4041 0171 0180 0180 2337, 1610 0864 2104 0748, 1963 1864, 0171, 1963, 1394, 1314 0171, 1394, 0180 1610, 1240 1540 1286, 1756 2434 0051, 0017, 0047 0051 0180, 0060, 0150 0178 0017 1540, 2357 1524, 0156, 1935, 1704, 0060, 0154 2066 1286 1865 0178 2014, 2087, 3706, 0864, 1627, 1755, 2049, 1330, 0885, 1564, 1742, 1365 2352, 3382, 3429, 2104, 3094 1758, 2707, 1756, 0864, 0885 3418 0178, 0017, 0156, 0047, 0051, 0060, 0154, 0180 0156 1712, 3579, 3382, 0885, 2293, 3094, 3470, 0890, 1282, 2397, 0451, 1217 1365 1749 0017, 0178, 1423 1365, 0047 TROUBLESHOOTING RESOLUCIÓN DE PROBLEMAS TV E GUID ER POW E CABL MEN PAGE EXIT MUT E LAST 1 4 2 5 7 3 6 8 Problem: Solution: The POWER button does not blink when a button is pressed. Replace batteries. Problema: Solución: El botón de encendido no parpadea cuando se pulsa un botón. Reemplace las pilas. Problem: TV does not respond when POWER or VOLUME buttons are pressed. Program remote control for your TV brand using instructions in Setup Method A, B, or C. Problema: El televisor no responde al presionar las teclas POWER (Encendido) o VOLUME (Volúmen). Programe el control remoto para su marca de TV utilizando las instruc- Tried all codes for my TV brand and none work. Try CODE SEARCH (Setup Method B) method or go to REMOTES.COX.COM for additional support and for CODE FINDER search tool. Problema: U INFO 0 9 NG LA Solution: REMOTES.COX.COM Para encontrar el código exacto para su TV, utilice nuestra función de LOCALIZADOR DE CÓDIGOS en REMOTES.COX.COM Tip/Consejo: Write the working TV code here for future use. Escriba aquí el código de TV que funciona, para uso futuro. TV code Código de TV Problem: Solution: Solución: Solución: Probé con todos los códigos que corresponden a mi marca de aparato y ninguno funciona. Método B) o visite REMOTES.COXcom para recibir ayuda adicional y para la herramienta de búsqueda LOCALIZADOR DE CÓDIGOS. REMOTES.COX.COM ©Copyright Universal Electronics 2014
