569074_Black Heavy Duty Gate Thumb
Anuncio
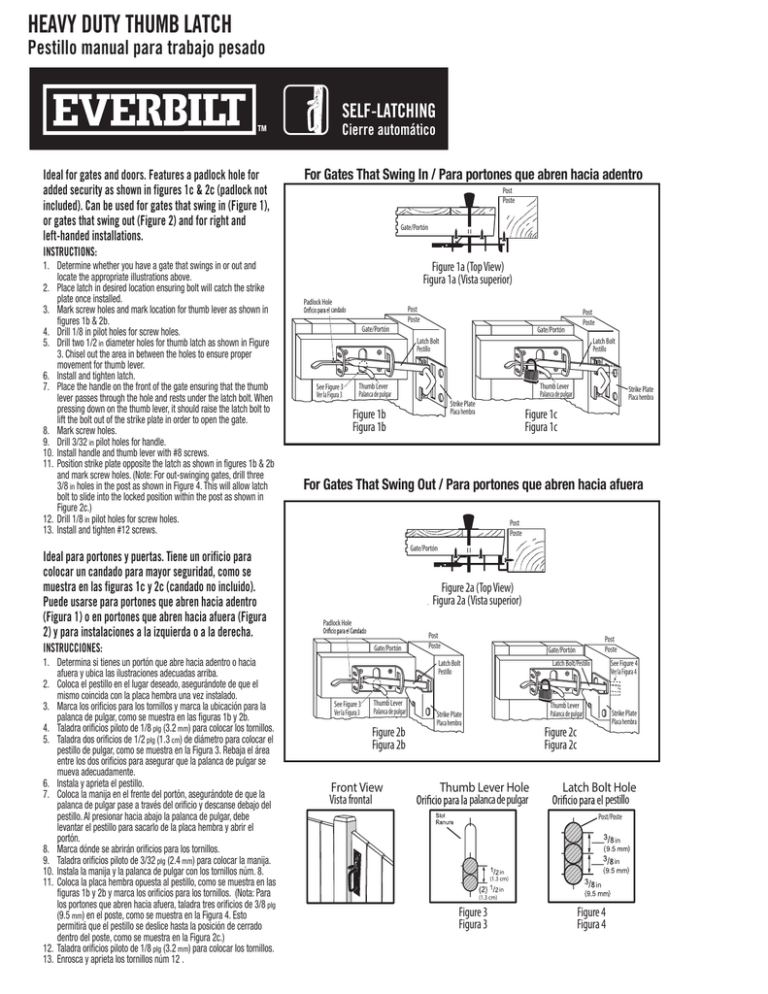
HEAVY DUTY THUMB LATCH Pestillo manual para trabajo pesado SELF-LATCHING Cierre automático Ideal for gates and doors. Features a padlock hole for added security as shown in figures 1c & 2c (padlock not included). Can be used for gates that swing in (Figure 1), or gates that swing out (Figure 2) and for right and left-handed installations. For Gates That Swing In / Para portones que abren hacia adentro Post Poste Gate/Portón INSTRUCTIONS: 1. Determine whether you have a gate that swings in or out and locate the appropriate illustrations above. 2. Place latch in desired location ensuring bolt will catch the strike plate once installed. 3. Mark screw holes and mark location for thumb lever as shown in figures 1b & 2b. 4. Drill 1/8 in pilot holes for screw holes. 5. Drill two 1/2 in diameter holes for thumb latch as shown in Figure 3. Chisel out the area in between the holes to ensure proper movement for thumb lever. 6. Install and tighten latch. 7. Place the handle on the front of the gate ensuring that the thumb lever passes through the hole and rests under the latch bolt. When pressing down on the thumb lever, it should raise the latch bolt to lift the bolt out of the strike plate in order to open the gate. 8. Mark screw holes. 9. Drill 3/32 in pilot holes for handle. 10. Install handle and thumb lever with #8 screws. 11. Position strike plate opposite the latch as shown in figures 1b & 2b and mark screw holes. (Note: For out-swinging gates, drill three 3/8 in holes in the post as shown in Figure 4. This will allow latch bolt to slide into the locked position within the post as shown in Figure 2c.) 12. Drill 1/8 in pilot holes for screw holes. 13. Install and tighten #12 screws. Ideal para portones y puertas. Tiene un orificio para colocar un candado para mayor seguridad, como se muestra en las figuras 1c y 2c (candado no incluido). Puede usarse para portones que abren hacia adentro (Figura 1) o en portones que abren hacia afuera (Figura 2) y para instalaciones a la izquierda o a la derecha. Figure 1a (Top View) Figura 1a (Vista superior) Padlock Hole candado Gate/Portón Post Poste Gate/Portón Latch Bolt Pestillo See Figure 3 Ver la Figura 3 Latch Bolt Pestillo Thumb Lever Palanca de pulgar Thumb Lever Palanca de pulgar Strike Plate Placa hembra Figure 1b Figura 1b Strike Plate Placa hembra Figure 1c Figura 1c For Gates That Swing Out / Para portones que abren hacia afuera Post Poste Gate/Portón Figure 2a (Top View) Figura 2a (Vista superior) Padlock Hole INSTRUCCIONES: 1. Determina si tienes un portón que abre hacia adentro o hacia afuera y ubica las ilustraciones adecuadas arriba. 2. Coloca el pestillo en el lugar deseado, asegurándote de que el mismo coincida con la placa hembra una vez instalado. 3. Marca los orificios para los tornillos y marca la ubicación para la palanca de pulgar, como se muestra en las figuras 1b y 2b. 4. Taladra orificios piloto de 1/8 plg (3.2 mm) para colocar los tornillos. 5. Taladra dos orificios de 1/2 plg (1.3 cm) de diámetro para colocar el pestillo de pulgar, como se muestra en la Figura 3. Rebaja el área entre los dos orificios para asegurar que la palanca de pulgar se mueva adecuadamente. 6. Instala y aprieta el pestillo. 7. Coloca la manija en el frente del portón, asegurándote de que la palanca de pulgar pase a través del orificio y descanse debajo del pestillo. Al presionar hacia abajo la palanca de pulgar, debe levantar el pestillo para sacarlo de la placa hembra y abrir el portón. 8. Marca dónde se abrirán orificios para los tornillos. 9. Taladra orificios piloto de 3/32 plg (2.4 mm) para colocar la manija. 10. Instala la manija y la palanca de pulgar con los tornillos núm. 8. 11. Coloca la placa hembra opuesta al pestillo, como se muestra en las figuras 1b y 2b y marca los orificios para los tornillos. (Nota: Para los portones que abren hacia afuera, taladra tres orificios de 3/8 plg (9.5 mm) en el poste, como se muestra en la Figura 4. Esto permitirá que el pestillo se deslice hasta la posición de cerrado dentro del poste, como se muestra en la Figura 2c.) 12. Taladra orificios piloto de 1/8 plg (3.2 mm) para colocar los tornillos. 13. Enrosca y aprieta los tornillos núm 12 . Post Poste Post Poste Gate/Portón Latch Bolt Pestillo See Figure 3 Ver la Figura 3 Thumb Lever Palanca de pulgar Latch Bolt/Pestillo Front View Vista frontal See Figure 4 Ver la Figura 4 Thumb Lever Palanca de pulgar Strike Plate Placa hembra Figure 2b Figura 2b Post Poste Gate/Portón Strike Plate Placa hembra Figure 2c Figura 2c Thumb Lever Hole palanca de pulgar Latch Bolt Hole pestillo Post/Poste in in in in (1.3 cm) in in in (1.3 cm) Figure 3 Figura 3 Figure 4 Figura 4
