1. After opening the application the screen should always look like
Anuncio
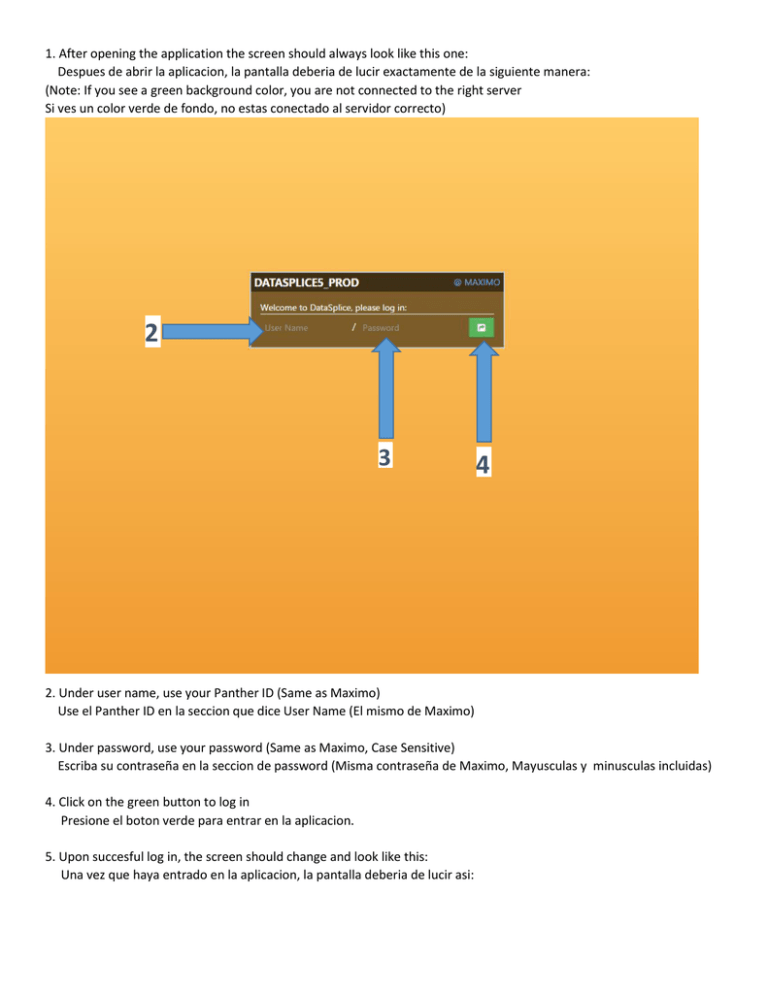
1. After opening the application the screen should always look like this one: Despues de abrir la aplicacion, la pantalla deberia de lucir exactamente de la siguiente manera: (Note: If you see a green background color, you are not connected to the right server Si ves un color verde de fondo, no estas conectado al servidor correcto) 2 3 4 2. Under user name, use your Panther ID (Same as Maximo) Use el Panther ID en la seccion que dice User Name (El mismo de Maximo) 3. Under password, use your password (Same as Maximo, Case Sensitive) Escriba su contraseña en la seccion de password (Misma contraseña de Maximo, Mayusculas y minusculas incluidas) 4. Click on the green button to log in Presione el boton verde para entrar en la aplicacion. 5. Upon succesful log in, the screen should change and look like this: Una vez que haya entrado en la aplicacion, la pantalla deberia de lucir asi: 6 6. In order to proceed to check your work orders, click on the bar that says “Assigned Work Orders” Para poder acceder a la lista de los work orders, presiona sobre la barra justo donde dice “Assigned Work orders” 7. The screen will change and will look like this: La pantalla cambiara y luciara asi: 9 8-1 8 8. This whole area allows to search for work orders using diffferent searching criterias. Esta area completa permite la busqueda de work orders usando diferentes criterios de busqueda. 8.1 If you need more fields to use during the search click on the plus sign and it will keep on adding additional fields. Si necesitas mas criterios de busqueda, presiona el boton de mas y este añadira mas campos de busqueda. 9. If no search is necessary, proceed to minimize it, to expand the window for the work orders view.To do so, touch the icon represented by a magnifying glass. Si no se va a efectuar una busqueda, proceda a cerrar el campo de busqueda tocando sobre el icono representado por una lupa. 10. Screen should now look like this: La pantalla deberia de lucir de la siguiente manera: 11 11. To close a work order, select from the list the work order you are going to close. Make sure it is highlighted in blue, and press on the three lines located to the left of the work order number. Para cerrar un work order, seleccione de la lista el work order que desea cerrar. Asegurese de que este seleccionado en azul, y presione sobre las tres lineas localizadas a la izquierda del numero de work order. 12. A new window should open up containing all the information in regards to the work order. Una nueva ventana deberia de abrirse, esta contiene toda la informacion referente al work order. 13 15 13. To change the status of the work order press on the drop down menu to the right of Status. Para cambiar el estatus del work order, presione sobre el menu de seleccion localizado a la derecha de la palabra Status. 14. This will open a selection menu from where you can select the desired status. Esta accion abrira un menu desplegable que contiene todos los estatus para el work order. Presiona el deseado. This applies to any other modification you need to do on that window. Lo anterior aplica a cualquier modificacion que tenga que hacer en la pantalla. 15. After changing the status of the work order, or adding a description, proceed to press on the x icon to close the window and go back to the work order screen. Despues de cambiar el estatus del work order, o de añadir una descripcion, proceda a presionar el icono con forma de X para cerrar la ventana y regresar a la lista de los work orders. 16. While the work order is still highlighted in blue, refer to the bottom left, where you will see the tabs you normally work on Maximo. Failure Report, Labor, Materials, Log, Attachments, Classifications. Asegurese de que el work order permanece seleccionado en azul y refierase a la parte inferior izquierda donde notara que estan las secciones que ve usualmente en Maximo. Failure Report, Labor, Materials, Log, Attachments, Classifications. 17. To add the failure report for the highlighted work order proceed to touch on failure report. A new window will open up, and you will select from the drop down menu the Failure Code, the Problem Code, the Cause Code, Remedy Code and will type any comments under remarks. 17. Para añadir el reporte de fallos (Failure Report), para el work order seleccionado, proceda a presionar sobre Failure report. Una nueva ventana deberia de abrirse, seleccione el menu desplegable a la derecha y seleccione el Failure Code, el Problem Code, el Cause Code, el Remedy Code que apliquen y añada un comentario si es necesario en la seccion de Remarks. 18 18. To add the labor simply press over labor after you have completed the failure report and the screen will change to the labor tab. You will be able to report your hours under this tab. Para cambiar para la ventana de labor, simplemente presione sobre labor y la pantalla cambiara a la ventana de labor. Aqui podra reportas las horas empleadas en el work order. 19. Initially the labor screen will look like this: Inicialmente la pantalla de labor lucira de la siguiente manera: 20 20. To proceed to report your hours, touch on the plus sign (+) located on the top area. A new window will open up where you will have to type in the amount of hours, to the right of Regular Hours. Press the ok button to confirm and return to previous screen. Para poder proceder con el reporte de las horas, presione el simbolo de mas (+) localizado en la parte superior. Una nueva ventana se abrira. A la derecha de donde dice Regular Hours, escriba el numero de horas que le haya tomado. Presione el boton de OK para confirmar y retornar a la pantalla anterior. 21. You will notice that the labor was recorded and that a new record is showing on the list, which was previously empty. Notara que su reporte de horas fue almacenado y que un nuevo record aparece en la lista que anteriormente estaba vacia. Note: If somebody else helped you with the work order and labor must be recorded for that person, repeat the same process, but remove your Panther ID from the top and add the person’s Panther ID. If you do not know the Panther ID, press on the icon to the right of the textbox to search for the person using different fields. Nota: Si alguien mas le asistio durante el work order, y es necesario reportar las horas de trabajo de esa persona, simplemente repita el mismo proceso asegurandose que cambia el Panther ID en la parte superior por el de la otra persona. Si no sabe el Panther id de la otra persona presione sobre el icono localizado a la derecha del textbox, para poder buscar a la persona utilizando diferentes campos de busqueda. 22. To save and send all the changes to Maximo, press on the top right corner where there should be a blue star followed by some numbers. This indicates that some changes were made to a record and the number represents the number of changes made. Para salvar y enviar todos los cambios a Maximo, presione sobre la ezquina superior derecha donde deberia de haber una estrella azul seguida de un numero. La estrella indica que se han producido cambios en el record, y el numero representa el numero total de cambios que hay disponibles para guardar y enviar. 23. After pressing on the icon the screen would look like this: Despues de haber presionado sobre el icono, la pantalla deberia de lucir asi: 25 24 24. If you are sure of all the changes that you made and you are ready to save those changes to Maximo, press on Commit Changes. Si esta seguro de todos los cambios realizados, y esta listo para enviar estos cambios a Maximo, presione Commit Changes. 25. If you think you made a mistake and would like to evaluate all the changes made to the work order, press on Manage Modifications. Si cree que cometio un error, o simplemente no esta seguro de los cambios que hizo al work order presione sobre Manage Modifications. 26. The screen should change into something similar to this, depending on the changes made: La pantalla deberia de cambiar a algo similar a lo que se muestra a continuacion dependiendo de los cambios realizados: Here you can preview all the changes made to the record and select individual changes and delete them if done by mistake. Simply touch on the box located to the left of the information and make sure it has a check mark on it, then click on the delete button in order to delete individual changes. Aqui le es posible realizar una vista previa de todos los cambios realizados al record y eliminar cualquier cambio que se haya hecho por error. Para eliminar un cambio simplemente, presione sobre el cuadrado localizado a la izquierda de la informacion hasta que aparezca una marca de verificacion, despues simplemente presione sobre el boton de delete para elimar todos los records que hayan sido señalados. 27. Touch again over the blue star with the number to go back to the previous screen, and touch on Commit Changes to save all changes to Maximo. Presione sobre la Estrella azul con los numeros una vez mas para regresar a la pantalla anterior, presione sobre Commit Changes para guardar todos los cambios realizados en Maximo. 28. To go back to the work order screen, press over the Datasplice icon on the top left corner and from the menu to the right of the work order, press on Assigned Work Orders. Para regresar a la pantalla de los work orders, presione sobre el icono de Datasplice localizado en la parte superior izquierda, a continuacion presione sobre Assigned Work Orders. 29. To close DataSplice touch on the top right corner Signal Bars icon, and touch on Logout. Para cerrar DataSplice presione sobre el icono de las barras de señal localizado en la parte superior derecha y presione sobre Logout.
