HoldUp - Yakima
Anuncio
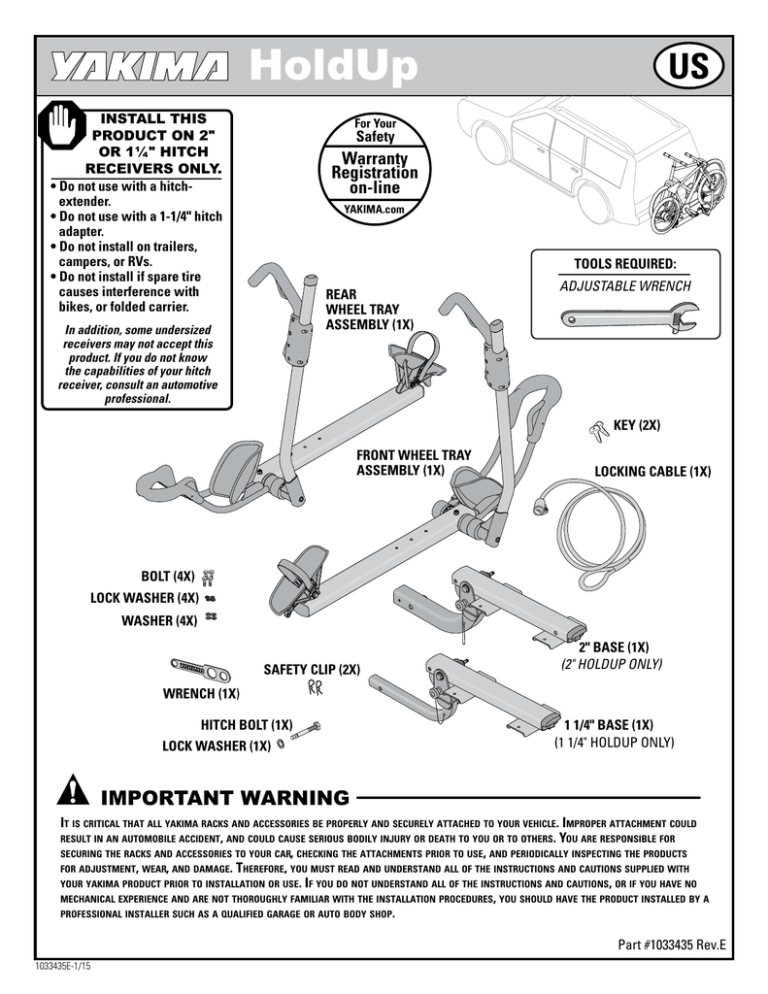
HoldUp Install This product on 2" OR 1¼" hitch receivers ONLY. • Do not use with a hitchextender. • Do not use with a 1-1/4" hitch adapter. • Do not install on trailers, campers, or RVs. • Do not install if spare tire causes interference with bikes, or folded carrier. For Your Safety Warranty Registration on-line YAKIMA.com TOOLS REQUIRED: REAR WHEEL TRAY assembly (1x) In addition, some undersized receivers may not accept this product. If you do not know the capabilities of your hitch receiver, consult an automotive professional. ADJUSTABLE Wrench KEY (2x) Front WHEEL TRAY assembly (1x) LOCKING CABLE (1x) bolt (4X) Lock washer (4X) Washer (4x) SAFETY CLIP (2x) 2" BASE (1x) (2" Holdup only) wrench (1x) HITCH BOLT (1x) lock washer (1x) 1 1/4" BASE (1x) (1 1/4" Holdup only) Important warning It is critical that all yakima racks and accessories be properly and securely attached to your vehicle. Improper attachment could result in an automobile accident, and could cause serious bodily injury or death to you or to others. You are responsible for securing the racks and accessories to your car, checking the attachments prior to use, and periodically inspecting the products for adjustment, wear, and damage. Therefore, you must read and understand all of the instructions and cautions supplied with your yakima product prior to installation or use. If you do not understand all of the instructions and cautions, or if you have no mechanical experience and are not thoroughly familiar with the installation procedures, you should have the product installed by a professional installer such as a qualified garage or auto body shop. Part #1033435 Rev.E 1033435E-/15 INSERT BASE INTO HITCH RECEIVER. FASTEN HITCH BOLT. • Insert hitch bolt and lock washer, from right to left. • Tighten with adjustable wrench. Secure hitch bolt with safety clip. The holes in the base must align to the holes in the hitch receiver. Rotate base to up position ATTACH FIRST TRAY TO BASE. Align holes in base to holes in tray. wheel strap • Remove pin and safety clip. • Lift frame. • Replace pin and safety clip. pivot arm • Insert bolt, washer, and lock-washer, in order shown. • Tighten with supplied wrench. LOWER tray: IMPORTANT: Wheel strap is to your right, and pivot arm is to your left. ATTACH second TRAY TO BASE. pivot arm Align holes in base to holes in tray. • Insert bolt, washer, and lockwasher, in order shown. • Tighten with supplied wrench. UPPER tray: wheel strap 1033435E-/15 IMPORTANT: Wheel strap is to your left, and pivot arm is to your right. Fold PIVOT ARM down. Fold holdup down. • Remove pin and safety clip. • Fold down holdup • Replace pin and safety clip. Be sure pivot arm is folded down. LOAD HEAVIEST BIKE FIRST. prepare for loading. Release wheelstrap by pressing the lever on the buckle. Make sure your tires are filled to recommended pressure found on the tire. Tuck strap into slot at rear of whelltray. SWING PIVOT ARM INTO PLACE. Rotate the pivot arm up until the hook rests on the bike tire 1" from the brakes. 1033435E-/15 Caution: If any part of your bike comes in contact with the red trigger, do not use this carrier with that bike. secure THE HOOK. Compress the hook against the wheel by applying firm pressure. SECURE REAR WHEEL STRAP. TIGHTEN REAR WHEEL STRAP. Feed the strap through the spokes of wheel. • Insert the strap end through the top of the ratchet buckle. • Be sure the pad rests on the rim. Rotate the wheel slightly, if necessary. Move the ratchet tab up and down to tighten the strap. • Push hooks against tires. CHECK the installation before driving away. • Rear wheels secured by ratchet straps. • Be sure all hardware is secured according to instructions. • always secure pivot arm when tray is empty. READ ALL WARNINGS ON NEXT PAGE BEFORE DRIVING AWAY. SECURE pivot arms when not in use. When not carrying bikes always fold holdup up. Rotate pivot arm down. Fold wheeltray inboard. Tilt wheeltray inboard. Slide the hook against the rear wheel cradle. Fold up HoldUp. 1033435E-/15 Included bottle opener. Lock up your bikes. Lock it at the mast pivot point. OR Pass the locking cable through your bike frames and quickrelease wheels. Pass lock through loop at end of cable. • Remove hitch pin and lock to the hitch bolt. • Check engagement by pulling on lock. • IMPORTANT: Hitch pin must always be used when the bike lock, or hitch lock are not used! Also availiable (sold seperately): HITCHLOCK (Yakima part number 8007235) for locking the hitchbolt to secure your HoldUp from theft. Enjoy a refreshing beverage. Your HoldUp endcap doubles as a bottle opener! IMPORTANT LOAD LIMITS: Hitch load is limited to 60 LBS. per bike. • Never drive off-road with bicycles loaded. • Do not install on trailers, campers, or RVs. • Do not position bicycle tires near vehicle’s hot exhaust. • Do not install if spare tire causes interference with bikes or folded carrier. BIKES: • Make sure your tires are filled to recommended pressure found on the tire. • Do not carry tandem or recumbent bikes. • Do not transport bicycles with attached baby seats, panniers, wheel covers, full bike covers or motors. Remove this rack before entering an automatic car wash, and when not in use. MAINTENANCE: Periodically use non-water soluble lubricant on moving metal parts. Use a soft cloth with water and mild detergent to clean rubber parts. Install This product on 2" and 1 1/4" hitch receivers ONLY. • Do not use with a hitch-extender. • Do not use with a 1-1/4" hitch adapter. • Do not install on trailers, campers, or RVs. • Do not install if spare tire causes interference with bikes, or folded carrier. In addition, some undersized receivers may not accept this product. If you do not know the capabilities of your hitch receiver, consult an automotive professional. Attachment hardware can loosen over time. Check before each use, and tighten if necessary. Failure to obey load limits can result in property damage, personal injury, or death. Technical assistance or replacement parts: Go Online: www.yakima.com Contact your dealer or call: (888) 925-4621 Monday through Friday 7:00 am to 5:00 pm PST This product is covered by YAKIMA’s “Love It Till You Leave It” Limited Lifetime Warranty To obtain a copy of this warranty, go online to www.yakima.com or email us at yakwarranty@yakima.com or call (888) 925-4621 K EEP THESE I NSTRUCT I ONS ! 1033435E-/15 HoldUp N'INSTALLER CE PRODUIT QUE SUR UN ATTELAGE DE 51 mm (2 po) ou de 32 mm (1 ¼ po) . • Ne pas employer avec une rallonge d'attelage. • Ne pas employer d'adaptateur pour attelage de 32 mm (1-1/4 po). • Ne pas poser ce porte-vélo sur une remorque, une autocaravane ou un véhicule récréatif. • Ne pas poser ce porte-vélo si la présence de la roue de secours gêne le chargement des vélos ou empêche de relever le porte-vélo. Pour votre sécurité Validation de la garantie en ligne YAKIMA.com OUTILS NÉCESSAIRES: Support arrière (x 1) Par ailleurs, il est possible que certains attelages plus petits n'acceptent pas ce produit. Si l'on ne connaît pas la solidité du tube d'attelage du véhicule, consulter un professionnel de l'automobile. clé à molette Clés (x 2) Support avant (x 1) Câble de verrouillage (x 1) Boulons (x 4) Rondelles de sécurité (x 4) Rondelles (x 4) Broche de sûreté (x 2) Base 2 po (x 1) (HoldUp 2 po seulement) Clé (x 1) Boulon d'attelage (x 1) Rondelle de sécurité (x 1) Base 1 1/4 po (x 1) (HoldUp 1 1/4 po seulement) AVERTISSEMENT IMPORTANT: IL EST IMPÉRATIF QUE LES PORTE-BAGAGES ET LES ACCESSOIRES YAKIMA SOIENT CORRECTEMENT ET SOLIDEMENT FIXÉS AU VÉHICULE. UN MONTAGE MAL RÉALISÉ POURRAIT PROVOQUER UN ACCIDENT D’AUTOMOBILE, QUI POURRAIT ENTRAÎNER DES BLESSURES GRAVES OU MÊME LA MORT, À VOUS OU À D’AUTRES PERSONNES. VOUS ÊTES RESPONSABLE DE L’INSTALLATION DU PORTE-BAGAGES ET DES ACCESSOIRES SUR VOTRE VÉHICULE, D’EN VÉRIFIER LA SOLIDITÉ AVANT DE PRENDRE LA ROUTE ET DE LES INSPECTER RÉGULIÈREMENT POUR EN CONTRÔLER L’ÉTAT, L’AJUSTEMENT ET L’USURE. VOUS DEVEZ DONC LIRE ATTENTIVEMENT TOUTES LES INSTRUCTIONS ET TOUS LES AVERTISSEMENTS ACCOMPAGNANT VOTRE PRODUIT YAKIMA AVANT DE L’INSTALLER ET DE L’UTILISER. SI VOUS NE COMPRENEZ PAS TOUTES LES INSTRUCTIONS ET TOUS LES AVERTISSEMENTS, OU SI VOUS N’AVEZ PAS DE COMPÉTENCES EN MÉCANIQUE ET NE COMPRENEZ PAS PARFAITEMENT LA MÉTHODE DE MONTAGE, VOUS DEVRIEZ FAIRE INSTALLER LE PRODUIT PAR UN PROFESSIONNEL. 1033435E-/15 ENFILER LA BASE DANS L'ATTELAGE. METTRE EN PLACE LE BOULON D'ATTELAGE. •Enfiler le boulon muni de sa rondelle DE LA DROITE VERS LA GAUCHE. • Serrer avec la clé à molette. BLOQUER le boulon avec la broche de sûreté. Le trous de la base doivent s'aligner avec les trous de l'attelage. RELEVER LA BASE EN POSITION VERTICALE. FIXER LE PREMIER SUPPORT À LA BASE. Aligner les trous du support sur ceux de la base. Courroie crantée • Enlever la broche et la goupille de la base. • Relever la base. • Remettre en place la goupille et sa broche. • Enfiler les boulons, les rondelles et les rondelles de sécurité dans l'ordre illustré. • Serrer avec la clé fournie. SUPPORT INFÉRIEUR : Bras pivotant IMPORTANT : Placer la courroie crantée à droite et le bras pivotant à gauche. FIXER LE DEUXIÈME SUPPORT À LA BASE. Aligner les trous du support sur ceux de la base. • Enfiler les boulons, les rondelles et les rondelles de sécurité dans l'ordre illustré. • Serrer avec la clé fournie. Bras pivotant SUPPORT SUPÉRIEUR : Courroie crantée 1033435E-/15 IMPORTANT : Placer la courroie crantée à gauche et le bras pivotant à droite. RABATTRE LE BRAS PIVOTANT. RABATTRE LE PORTE-VÉLO. • Enlever la broche et la goupille de la base. • Rabattre le porte-vélo. • Remettre en place la goupille et sa broche. S'assurer que le bras pivotant est rabattu vers le bas. SE PRÉPARER AU CHARGEMENT. CHARGER D'ABORD LE VÉLO LE PLUS LOURD. Libérer la courroie crantée en appuyant sur le bouton de la boucle. S'assurer que les pneus sont gonflés à la pression recommandée indiquée sur le flanc. Engager la sangle dans la fente qui se trouve derrière. BASCULER LE BRAS PIVOTANT EN PLACE. Redresser le bras pivotant de manière que le crochet porte sur le pneu à 2,5 cm (1 po) du frein. 1033435E-/15 ATTENTION: Si une partie quelconque du vélo touche au bouton rouge, ne pas utiliser ce portevélo pour transporter cette bicyclette. SERRER LE CROCHET. Appuyer le crochet contre le pneu en appliquant une bonne pression. ENFILER LA SANGLE DANS LA ROUE ARRIÈRE. Enfiler la sangle entre les rayons. SERRER LA SANGLE DE LA ROUE ARRIÈRE. • Enfiler le bout de la sangle dans le sommet du cliquet. • Vérifier que le coussinet porte sur la jante. Au besoin, tourner un peu la roue. Actionner la patte du cliquet de haut en bas pour serrer la sangle. • APPUYER LES CROCHETS CONTRE LES PNEUS. VÉRIFIER LE • VÉRIFIER QUE LES ROUES ARRIÈRE SONT BIEN RETENUES PAR LES SANGLES MONTAGE AVANT CRANTÉES. DE PRENDRE LA • S'ASSURER QUE LE MONTAGE EST SOLIDE ET CONFORME AUX INSTRUCTIONS. ROUTE. • TOUJOURS IMMOBILISER LE BRAS PIVOTANT SI UN VÉLO N'EST PAS CHARGÉ. LIRE TOUS LES AVERTISSEMENTS DE LA PAGE SUIVANTE AVANT DE PRENDRE LA ROUTE. IMMOBILISER LE BRAS PIVOTANT SI UN VÉLO N'EST PAS CHARGÉ. QUAND ON NE TRANSPORTE PAS DE VÉLO, TOUJOURS RELEVER LE PORTEVÉLO CONTRE LE VÉHICULE. Replier le bras pivotant vers l'intérieur. Replier la gouttière de roue vers l'intérieur. Faire coulisser le crochet contre la gouttière de roue arrière. 1033435E-/15 Incliner la gouttière de roue vers l'intérieur. Relever le porte-vélo. DÉCAPSULEUR INCORPORÉ. VERROUILLER LES VÉLOS. Verrouiller la serrure au pivot du mât. OU Enfiler le câble de verrouillage dans le cadre des vélos et dans les roues à démontage rapide. Enfiler la serrure dans la boucle au bout du câble. • Enlever la broche de sûreté et verrouiller la serrure au boulon d'attelage. • Vérifier en tirant que la serrure est bien engagée. • IMPORTANT : la broche de sûreté doit toujours être en place si l'on ne pose pas la serrure du câble ou la serrure d'attelage ! Autre produit (vendu séparément) : Serrure HITCHLOCK (article Yakima n° 8007235) pour verrouiller le boulon d'attelage pour protéger le porte-vélo du vol. C'est le moment de se rafraîchir avec une boisson de son choix ! Le porte-vélo HoldUp comporte même un décapsuleur incorporé ! LIMITES DE CHARGES IMPORTANTES LA CHARGE SUR L'ATTELAGE NE DOIT PAS DÉPASSER 27 kg (60 lb) PAR VÉLO. • Ne jamais rouler hors route si des vélos sont chargés. • Ne pas poser ce porte-vélo sur une remorque, une autocaravane ou un véhicule récréatif. • Éloigner les pneus des vélos de la chaleur de l'échappement du véhicule. • Ne pas poser ce porte-vélo si la présence de la roue de secours gêne le chargement des vélos ou empêche de relever le porte-vélo. VÉLOS : • S'assurer que les pneus sont gonflés à la pression recommandée indiquée sur le flanc. • Ne pas transporter de tandems ou de vélos surbaissés ("couchés"). • Ne pas transporter de bicyclettes munies d'un siège de bébé , de sacoches, de housses de roues, d'une housse de vélo complète ou d'un moteur. panniers, wheel covers, full bike covers or motors. Enlever le porte-vélo avant de passer dans un lave-auto automatique, et quand il ne sert pas. ENTRETIEN: Lubrifier de temps à autre les pièces métalliques mobiles avec un lubrifiant non soluble à l'eau. Nettoyer les pièces en caoutchouc avec un chiffon, de l'eau et un savon doux. N'INSTALLER CE PRODUIT QUE SUR UN ATTELAGE DE 51 mm (2 po) ou de 32 mm (1 ¼ po). • Ne pas employer avec une rallonge d'attelage. • Ne pas employer d'adaptateur pour attelage de 32 mm (1 ¼ po). • Ne pas poser ce porte-vélo sur une remorque, une autocaravane ou un véhicule récréatif. • Ne pas poser ce porte-vélo si la présence de la roue de secours gêne le chargement des vélos ou empêche de relever le porte-vélo. Par ailleurs, il est possible que certains attelages plus petits n'acceptent pas ce produit. Si l'on ne connaît pas la solidité du tube d'attelage du véhicule, consulter un professionnel de l'automobile. Les dispositifs de fixation peuvent se desserrer à la longue. Les inspecter avant chaque utilisation et les resserrer au besoin. Si l'on ne respecte pas les limites de charge, on risque de provoquer des dommages, des blessures ou même la mort. RENSEIGNEMENTS TECHNIQUES OU PIÈCES DE RECHANGE : ALLER EN LIGNE AU WWW.YAKIMA.COM Contacter votre dépositaire ou appeler au (888) 925-4621, du lundi au vendredi entre 7h et 17h, heure du Pacifique. Ce produit est couvert par la garantie limitée « Tant que durera notre histoire d'amour » YAKIMA. Pour se procurer une copie de cette garantie, aller en ligne à www.yakima.com ou nous envoyer un courriel à yakwarranty@yakima.com ou appeler au (888) 925-4621. CONSERVER CES I NSTRUCT I ONS ! 1033435E-10/15 HoldUp INSTALE ESTE PRODUCTO SOLAMENTE EN RECEPTORES DE ENGANCHE DE 51 mm (2") O 32 mm (1 ¼"). Para su seguridad Registro de garantía en línea • No lo use con un alargador de enganche. • No lo use con un adaptador de enganche de 32 mm (1 ¼"). • No lo instale en remolques, casas rodantes o RV. • No lo instale si la rueda de auxilio interfiere con las bicicletas o el portabicicletas plegado. YAKIMA.com CONJUNTO SOPORTE PARA RUEDA TRASERA (1X) Además, algunos receptores de menor tamaño pueden no aceptar este producto. Si usted no conoce la capacidad de su receptor de enganche, consulte un profesional en automóviles. HERRAMIENTAS NECESARIAS: llaves ajustables LLAVES (2X) CONJUNTO SOPORTE PARA RUEDA DELANTERA (1X) CABLE DE SEGURIDAD (1X) TORNILLOS (4X) ARANDELAS DE CIERRE (4X) ARANDELAS (4X) CLIP DE SEGURIDAD (2X) LLAVE (1X) PASADOR DEL ENGANCHE (1X) ARANDELA DE CIERRE (1X) BASE DE 2"(1X) (SOLAMENTE PARA HOLDUP DE 2") BASE DE 1 1/4"(1X) (SOLAMENTE PARA HOLDUP DE 1 1/4 ") AVISO IMPORTANTE ES FUNDAMENTAL QUE TODOS LOS BASTIDORES Y ACCESORIOS YAKIMA ESTÉN FIJADOS DE MANERA CORRECTA Y SEGURA AL VEHÍCULO. UNA INSTALACIÓN DEFICIENTE PODRÍA CAUSAR UN ACCIDENTE AUTOMOVILÍSTICO Y PROVOCAR HERIDAS GRAVES O LA MUERTE A USTED O A TERCEROS. USTED ES RESPONSABLE DE LA FIJACIÓN SEGURA DE LOS BASTIDORES Y ACCESORIOS AL VEHÍCULO. VERIFICANDO LAS UNIONES Y AMARRES ANTES DE UTILIZARLOS E INSPECCIONANDO PERIÓDICAMENTE EL AJUSTE DE LOS PRODUCTOS, SU DESGASTE Y POSIBLES DAÑOS. POR ELLO, DEBE LEER Y COMPRENDER TODAS LAS INSTRUCCIONES Y ADVERTENCIAS QUE VIENEN CON LOS PRODUCTOS YAKIMA ANTES DE INSTALARLOS O USARLOS. SI NO ENTIENDE TODAS LAS INSTRUCCIONES Y ADVERTENCIAS, O NO TIENE EXPERIENCIA EN MECÁNICA O NO ESTÁ FAMILIARIZADO CON LOS PROCEDIMIENTOS DE INSTALACIÓN, HAGA INSTALAR EL PRODUCTO POR UN PROFESIONAL, COMO UN MECÁNICO O UN CARROCERO CALIFICADO. 1033435E-11/15 INSERTE LA BASE EN EL RECEPTOR DEL ENGANCHE. ASEGURE EL PASADOR DEL ENGANCHE. • Inserte el pasador del enganche y la arandela de cierre, de DERECHA A IZQUIERDA. • Apriete con la llave ajustables. ASEGURE el pasador del enganche con el clip de seguridad. Los agujeros de la base deben corresponder con los agujeros del receptor del enganche. GIRE LA BASE HASTA LA POSICIÓN • Quite el perno y el clip de seguridad. • Levante el bastidor. • Coloque nuevamente el perno y el clip de seguridad. FIJE LA PRIMERA BANDEJA A LA BASE. correa de rueda Haga corresponder los agujeros de la base con los de la bandeja. • Inserte el tornillo, la arandela y la arandela de cierre en el orden indicado. • Apriete con la llave incluida. BANDEJA INFERIOR: brazo de pivote IMPORTANTE: La correa de rueda está a su derecha y el brazo de pivote a su izquierda. FIJE LA SEGUNDA BANDEJA A LA BASE. Haga corresponder los agujeros de la base con los de la bandeja. • Inserte el tornillo, la arandela y la arandela de cierre en el orden indicado. • Apriete con la llave incluida. brazo de pivote BANDEJA SUPERIOR: correa de rueda 1033435E-12/15 IMPORTANTE: La correa de rueda está a su izquierda y el brazo de pivote a su derecha. PLIEGUE EL BRAZO DE PIVOTE HACIA ABAJO. PLIEGUE EL HOLDUP HACIA ABAJO. • Quite el perno y el clip de seguridad. • Pliegue el HoldUp hacia abajo. • Coloque nuevamente el perno y el clip de seguridad. Asegúrese de que el brazo de pivote está plegado hacia abajo. PREPÁRESE PARA CARGAR. CARGUE PRIMERO LA BICICLETA MÁS PESADA. Libere la correa de rueda presionando la palanca de la hebilla. Asegúrese de que sus neumáticos están inflados con la presión indicada en los mismos. Guarde la correa en la ranura de la parte posterior del soporte de rueda. LLEVE EL BRAZO DE PIVOTE A SU POSICIÓN. Gire el brazo de pivote hasta que el gancho se apoye en el neumático de la bicicleta, a 25 mm (1") de los frenos. 1033435E-13/15 ATENCIÓN: Si alguna parte de la bicicleta toca el gatillo rojo, no use este portabicicletas con ella. ASEGURE EL GANCHO. Presione firmemente el gancho contra la rueda. ASEGURE LA CORREA DE LA RUEDA TRASERA. AJUSTE LA CORREA DE LA RUEDA TRASERA. • Inserte el extremo de la correa a través de la parte superior de la hebilla de cremallera. • Cerciórese de que la almohadilla queda sobre la llanta. Pase la correa entre los rayos de la rueda. Gire un poco la rueda, si es necesario. Tire hacia arriba y abajo de la lengüeta de la cremallera para ajustar la correa. • EMPUJE LOS GANCHOS CONTRA LOS NEUMÁTICOS. VERIFIQUE LA INSTALACIÓN ANTES DE PARTIR. • LAS RUEDAS TRASERAS DEBEN ESTAR ASEGURADAS POR CORREAS DE CREMALLERA. • CERCIÓRESE DE QUE TODO EL EQUIPO ESTÁ ASEGURADO SEGÚN LAS INSTRUCCIONES. • SIEMPRE ASEGURE EL BRAZO DE PIVOTE CUANDO LA BANDEJA ESTÁ VACÍA. LEA TODAS LAS ADVERTENCIAS DE LA PÁGINA SIGUIENTE ANTES DE PARTIR. ASEGURE LOS BRAZOS DE PIVOTE CUANDO NO SE USAN. CUANDO NO TRANSPORTA BICICLETAS, SIEMPRE MANTENGA EL HOLDUP PLEGADO HACIA ARRIBA. Gire el brazo de pivote hacia adentro. Pliegue el soporte de rueda hacia adentro. Deslice el gancho contra la cuna de la rueda trasera. 1033435E-14/15 Incline el soporte de rueda hacia adentro. Pliegue el HoldUp hacia arriba. Asegure las bicicletas. DESTAPADOR DE BOTELLAS INCLUIDO. Trábelo en el punto de pivote del mástil. O Pase el cable de seguridad a través de los cuadros de las bicicletas y de las ruedas de desmontaje rápido. Pase la cerradura a través del ojal del extremo del cable. • Retire el clip de seguridad del enganche y trábelo en el pasador del enganche. • Verifique que queda bien trabado tirando del cerrojo. • IMPORTANTE: ¡Siempre se debe usar el clip de seguridad del enganche cuando el cerrojo para bicicleta, o el cerrojo del enganche, no se están utilizando! Disfrute una bebida refrescante. También disponible (vendido por separado): HITCHLOCK (pieza Yakima número 8007235) para trabar el pasador del enganche y así evitar que se roben el HoldUp. ¡El extremo del HoldUp sirve como destapador de botellas! LÍMITES DE CARGA IMPORTANTES: LA CARGA DEL ENGANCHE SE LIMITA A 27 kg (60 LBS). POR BICICLETA. • Nunca conduzca fuera de la ruta cargado con bicicletas. • No lo instale en remolques, casas rodantes o RV. • No coloque los neumáticos de la bicicleta cerca del escape caliente del vehículo. • No lo instale si la rueda de auxilio interfiere con las bicicletas o el portabicicletas plegado. BICICLETAS: • Asegúrese de que sus neumáticos están inflados con la presión indicada en los mismos. • No transporte bicicletas en tándem o plegables. • No transporte bicicletas con asientos para bebés, cestas, guardabarros, cubrebicicletas o motores. Quite este equipo antes de entrar en un lavadero automático de vehículos y cuando no lo utilice. MANTENIMIENTO: Utilice periódicamente un lubricante no soluble en agua en las piezas móviles de metal. Utilice un paño blando con agua y detergente suave para limpiar las piezas de caucho. INSTALE ESTE PRODUCTO SOLAMENTE EN RECEPTORES DE 51 mm (2") O 32 mm (1 ¼"). • No lo use con un alargador de enganche. • No lo use con un adaptador de enganche de 1-1/4 ". • No lo instale en remolques, casas rodantes o RV. • No lo instale si la rueda de auxilio interfiere con las bicicletas o el portabicicletas plegado. Además, algunos receptores de menor tamaño pueden no aceptar este producto. Si usted no conoce la capacidad de su receptor de enganche, consulte un profesional en automóviles. Las piezas de montaje pueden aflojarse con el tiempo. Verifique antes de cada uso y ajuste si es necesario. Si no se respetan las cargas límites se pueden provocar daños materiales, heridas corporales o la muerte. SI NECESITA ASISTENCIA TÉCNICA O REPUESTOS: VISITE: WWW.YAKIMA.COM Contacte un vendedor o llame al: (888) 925-4621 De lunes a viernes, de 7:00 AM a 5:00 PM, hora del Pacífico. Este producto está cubierto por la garantía limitada a vida “mientras dure el romance” de Yakima. Para obtener una copia de esta garantía, visítenos en www.yakima.com, envíenos un correo electrónico a yakwarranty@ yakima.com o llámenos al (888) 925-4621. ¡ CONSERVE ESTAS I NSTRUCC I ONES ! 1033435E-15/15
