Chain Trouble Shooting
Anuncio
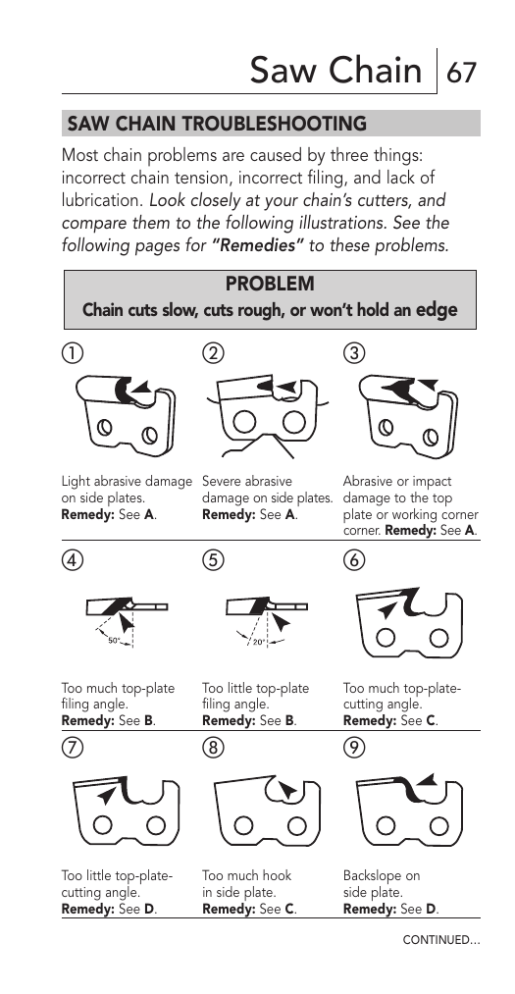
Saw Chain 67 SAW CHAIN TROUBLESHOOTING Most chain problems are caused by three things: incorrect chain tension, incorrect filing, and lack of lubrication. Look closely at your chain’s cutters, and compare them to the following illustrations. See the following pages for “Remedies” to these problems. PROBLEM Chain cuts slow, cuts rough, or won’t hold an edge 햲 햳 햴 Light abrasive damage Severe abrasive Abrasive or impact on side plates. damage on side plates. damage to the top Remedy: See A. Remedy: See A. plate or working corner corner. Remedy: See A. 햵 햶 햷 Too much top-plate filing angle. Remedy: See B. Too little top-plate filing angle. Remedy: See B. Too much top-platecutting angle. Remedy: See C. 햸 햹 햺 Too little top-platecutting angle. Remedy: See D. Too much hook in side plate. Remedy: See C. Backslope on side plate. Remedy: See D. CONTINUED… 68 Saw Chain SAW-CHAIN TROUBLESHOOTING (CONTINUED) Low depth gauges. Remedy: See E. High depth gauges. Remedy: See F. Square or blunt depth gauges. Remedy: See G. REMEDIES A. File cutters back until all damage is removed. This remedy applies to pictures , and . B. Resharpen cutters while holding your file at the correct top-plate filing angle for your chain. Be sure your file guide is stamped with your chain’s correct top-plate angle. This remedy applies to pictures and . C. Either your file was too small or it was held too low. Resharpen cutters with a file of the correct size, held in the correct position. Use the correct file guide. This remedy applies to pictures and . D. Either your file was too large or it was held too high. Resharpen cutters with a file of the correct size, held in the correct position. Use the correct file guide. This remedy applies to pictures and . E. In most cases, cutters cannot be filed back enough to correct for depth gauges that are too low. Replace the chain. This remedy applies to picture . F. File depth gauges down to their correct height. This remedy applies to picture . G. File the front corners of depth gauges parallel to their original rounded or ramped shape. This remedy applies to picture . NOTE See pages 22-30 for the proper filing techniques to use when performing the remedies above. CONTINUED… Saw Chain 69 SAW-CHAIN TROUBLESHOOTING (CONTINUED) PROBLEM Cutters and/or tie straps wear heavily or break Excessive heel wear on cutters and opposite tie straps. Remedy: See H. Cracks under rear rivet Tie straps broken holes on cutters and in the center. opposite tie straps. Remedy: See I. Remedy: See H. Bottoms of tie straps and cutters worn out of square. Remedy: See J. REMEDIES H. Replace worn or cracked cutters and/or tie straps. NOTE One or more of the following may be required to prevent future wear and/or cracks: (1) Refile cutters using the correct angles. (2) Keep more lubrication on the chain and bar. (3) Reduce the amount of depth-gauge setting (may require replacement of the chain). (4) Do not force dull chain to cut. (5) Do not force chain through frozen wood. (6) Keep cutters sharp. (7) Always maintain proper tension. This remedy applies to pictures and . I. See step 7, page 31 for the correct shaping of rivets. This remedy applies to picture . NOTE Such breakage is usually caused by incorrect field assembly of tie straps. Breakage usually occurs on the preset tie strap. CONTINUED… 70 Saw Chain SAW-CHAIN TROUBLESHOOTING (CONTINUED) REMEDIES (CONTINUED) J. Dress the tops of the guide bar’s rails square. If wear is minor, file the bottoms of tie straps and cutters square. If wear is extensive, replace the chain. This remedy applies to picture . PROBLEM Drive links wear heavily or break Straight bottoms. Remedy: See K. Concave bottoms. Remedy: See K. Battered and broken bottoms. Remedy: See L. 21 22 Peening in front or back. Remedy: See M. Drive-link tang is turned up. Remedy: See N. Worn fronts. Remedy: See O. 23 Sides worn round or thin at bottoms. Remedy: See P. CONTINUED… Saw Chain 71 SAW-CHAIN TROUBLESHOOTING (CONTINUED) REMEDIES: (K-P) K. Check your guide bar (grooves in bar’s body or nose have worn too shallow), and check your rim or spur drive sprocket (excessive wear is allowing drive links to bottom out). Replace bar, sprocket, or both. Sharpen drive-link tangs, as shown in the illustration on page 72, if possible. If not, replace the chain. This remedy applies to pictures and . L. Maintain proper tension to prevent chain from climbing out of spur drive sprocket. Replace drive links or replace entire chain if many drive links are damaged. This remedy applies to picture . M. Sprocket has worn out of pitch, replace it. Replace chain. Do not attempt to run a new chain on an old sprocket, or an old chain on a new sprocket. This remedy applies to picture . N. Drive sprocket has worn down until drive-link tangs hit bottom. Replace drive sprocket. Sharpen drive-link tangs as shown in the illustration below, if possible. If not, replace the chain. This remedy applies to picture 21 . O. Remove damage from sides of drive links with a flat file. Sharpen drive-link tangs as shown in the illustration below. Use a thin file to open the groove lead-in at the guide-bar’s tail. This remedy applies to picture 22.. P. Bar rails have spread, or one rail has worn low, allowing chain to lean over. Have bar rails serviced by a dealer, otherwise replace bar. Replace chain if wear is extensive or if problem persists. This remedy applies to picture 23 . NOTE Also check bottoms of tie straps (picture , page 69), and tops of bar rails (picture 31 page 84). CONTINUED… 72 Saw Chain SAW-CHAIN TROUBLESHOOTING (CONTINUED) SHARPENING DRIVE-LINK TANGS Pointed drive-link tangs help remove chips and debris from your bar groove. Sharpen damaged tangs back to original shape with a round file. PROBLEM Chain has tight joints Tight joints are caused by either: loose tension, or an overworn drive sprocket. Look closely at your chain’s chassis. 24 Peening on bottoms of cutters and tie straps. Remedy: See Q. 25 Peening on front corners of cutters and tie straps. Remedy: See Q. 26 Peening in notches of cutters and tie straps. Remedy: See R. CONTINUED… Saw Chain 73 SAW-CHAIN TROUBLESHOOTING (CONTINUED) REMEDIES: (Q-R) Q. Chain with tight joints cannot be repaired. Replace the chain and maintain proper tension. Replace rim sprocket if worn. This remedy applies to pictures 24 and 25 . R. Replace the spur drive sprocket. Replace the chain. Always maintain proper tension and do not run chain on a worn drive sprocket. This remedy applies to picture 26 . PROBLEM Chain cuts crooked Crooked cutting can be caused by your guide bar as well as your chain. Be sure to also check your bar’s rails (pictures 29 through 34 , pages 84-85). 27 Damage to cutters on one side of the chain. Remedy: See S. 28 Inconsistent sharpening. Remedy: See S. REMEDY S. File cutters back enough to remove all damage and incorrect angles. Keep cutter lengths and depth-gauge settings equal.This remedy applies to pictures 27 and 28..
