ac vol t age finder ac vol t age finder
Anuncio
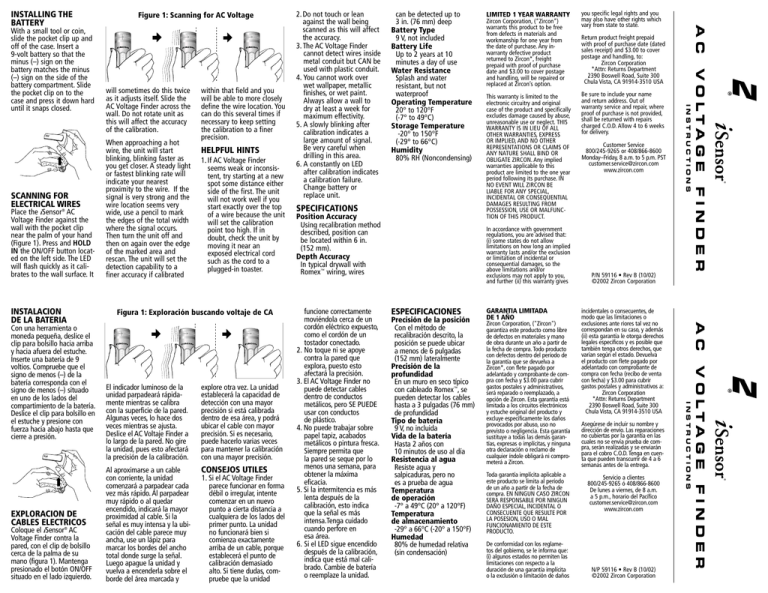
Zircon Corporation, ("Zircon") garantiza este producto como libre de defectos en materiales y mano de obra durante un año a partir de la fecha de compra. Todo producto con defectos dentro del período de la garantía que se devuelva a Zircon*, con flete pagado por adelantado y comprobante de compra con fecha y $3.00 para cubrir gastos postales y administrativos, será reparado o reemplazado, a opción de Zircon. Esta garantía está limitada a los circuitos electrónicos y estuche original del producto y excluye específicamente los daños provocados por abuso, uso no previsto o negligencia. Esta garantía sustituye a todas las demás garantías, expresas o implícitas, y ninguna otra declaración o reclamo de cualquier índole obligará ni comprometerá a Zircon. Toda garantía implícita aplicable a este producto se limita al período de un año a partir de la fecha de compra. EN NINGUN CASO ZIRCON SERA RESPONSABLE POR NINGUN DAÑO ESPECIAL, INCIDENTAL O CONSECUENTE QUE RESULTE POR LA POSESION, USO O MAL FUNCIONAMIENTO DE ESTE PRODUCTO. De conformidad con los reglametos del gobierno, se le informa que: (i) algunos estados no permiten las limitaciones con respecto a la duración de una garantía implícita o la exclusión o limitación de daños incidentales o consecuentes, de modo que las limitaciones o exclusiones ante riores tal vez no correspondan en su caso, y además (ii) esta garantía le otorga derechos legales específicos y es posible que también tenga otros derechos, que varían según el estado. Devuelva el producto con flete pagado por adelantado con comprobante de compra con fecha (recibo de venta con fecha) y $3.00 para cubrir gastos postales y administrativos a: Zircon Corporation *Attn: Returns Department 2390 Boswell Road, Suite 300 Chula Vista, CA 91914-3510 USA Asegúrese de incluir su nombre y dirección de envío. Las reparaciones no cubiertas por la garantía en las cuales no se envía prueba de compra, serán realizadas y se enviarán para el cobro C.O.D. Tenga en cuenta que pueden transcurrir de 4 a 6 semanas antes de la entrega. Servicio a clientes 800/245-9265 ó 408/866-8600 De lunes a viernes, de 8 a.m. a 5 p.m., horario del Pacífico customer.service@zircon.com www.zircon.com N/P 59116 • Rev B (10/02) ©2002 Zircon Corporation ® 1. Si el AC Voltage Finder parece funcionar en forma débil o irregular, intente comenzar en un nuevo punto a cierta distancia a cualquiera de los lados del primer punto. La unidad no funcionará bien si comienza exactamente arriba de un cable, porque establecerá el punto de calibración demasiado alto. Si tiene dudas, compruebe que la unidad GARANTIA LIMITADA DE 1 AÑO ® CONSEJOS UTILES Precisión de la posición Con el método de recalibración descrito, la posición se puede ubicar a menos de 6 pulgadas (152 mm) lateralmente Precisión de la profundidad En un muro en seco típico con cableado Romex™, se pueden detectar los cables hasta a 3 pulgadas (76 mm) de profundidad Tipo de batería 9 V, no incluida Vida de la batería Hasta 2 años con 10 minutos de uso al día Resistencia al agua Resiste agua y salpicaduras, pero no es a prueba de agua Temperatura de operación -7° a 49°C (20° a 120°F) Temperatura de almacenamiento -29° a 66°C (-20° a 150°F) Humedad 80% de humedad relativa (sin condensación) P/N 59116 • Rev B (10/02) ©2002 Zircon Corporation ® Al aproximarse a un cable con corriente, la unidad comenzará a parpadear cada vez más rápido. Al parpadear muy rápido o al quedar encendido, indicará la mayor proximidad al cable. Si la señal es muy intensa y la ubicación del cable parece muy ancha, use un lápiz para marcar los bordes del ancho total donde surge la señal. Luego apague la unidad y vuelva a encenderla sobre el borde del área marcada y ESPECIFICACIONES Customer Service 800/245-9265 or 408/866-8600 Monday–Friday, 8 a.m. to 5 p.m. PST customer.service@zircon.com www.zircon.com ® explore otra vez. La unidad establecerá la capacidad de detección con una mayor precisión si está calibrada dentro de esa área, y podrá ubicar el cable con mayor precisión. Si es necesario, puede hacerlo varias veces para mantener la calibración con una mayor precisión. funcione correctamente moviéndola cerca de un cordón eléctrico expuesto, como el cordón de un tostador conectado. 2. No toque ni se apoye contra la pared que explora, puesto esto afectará la precisión. 3. El AC Voltage Finder no puede detectar cables dentro de conductos metálicos, pero SE PUEDE usar con conductos de plástico. 4. No puede trabajar sobre papel tapiz, acabados metálicos o pintura fresca. Siempre permita que la pared se seque por lo menos una semana, para obtener la máxima eficacia. 5. Si la intermitencia es más lenta después de la calibración, esto indica que la señal es más intensa.Tenga cuidado cuando perfore en esa área. 6. Si el LED sigue encendido después de la calibración, indica que está mal calibrado. Cambie de batería o reemplaze la unidad. In accordance with government regulations, you are advised that: (i) some states do not allow limitations on how long an implied warranty lasts and/or the exclusion or limitation of incidental or consequential damages, so the above limitations and/or exclusions may not apply to you, and further (ii) this warranty gives Be sure to include your name and return address. Out of warranty service and repair, where proof of purchase is not provided, shall be returned with repairs charged C.O.D. Allow 4 to 6 weeks for delivery. FINDER Coloque el iSensor® AC Voltage Finder contra la pared, con el clip de bolsillo cerca de la palma de su mano (figura 1). Mantenga presionado el botón ON/OFF situado en el lado izquierdo. El indicador luminoso de la unidad parpadeará rápidamente mientras se calibra con la superficie de la pared. Algunas veces, lo hace dos veces mientras se ajusta. Deslice el AC Voltaje Finder a lo largo de la pared. No gire la unidad, pues esto afectará la precisión de la calibración. Position Accuracy Using recalibration method described, position can be located within 6 in. (152 mm). Depth Accuracy In typical drywall with Romex™ wiring, wires Return product freight prepaid with proof of purchase date (dated sales receipt) and $3.00 to cover postage and handling, to: Zircon Corporation *Attn: Returns Department 2390 Boswell Road, Suite 300 Chula Vista, CA 91914-3510 USA INSTRUCTIONS EXPLORACION DE CABLES ELECTRICOS Figura 1: Exploración buscando voltaje de CA SPECIFICATIONS This warranty is limited to the electronic circuitry and original case of the product and specifically excludes damage caused by abuse, unreasonable use or neglect. THIS WARRANTY IS IN LIEU OF ALL OTHER WARRANTIES, EXPRESS OR IMPLIED, AND NO OTHER REPRESENTATIONS OR CLAIMS OF ANY NATURE SHALL BIND OR OBLIGATE ZIRCON. Any implied warranties applicable to this product are limited to the one year period following its purchase. IN NO EVENT WILL ZIRCON BE LIABLE FOR ANY SPECIAL, INCIDENTAL OR CONSEQUENTIAL DAMAGES RESULTING FROM POSSESSION, USE OR MALFUNCTION OF THIS PRODUCT. you specific legal rights and you may also have other rights which vary from state to state. V O LTA G E Con una herramienta o moneda pequeña, deslice el clip para bolsillo hacia arriba y hacia afuera del estuche. Inserte una batería de 9 voltios. Compruebe que el signo de menos (–) de la batería corresponda con el signo de menos (–) situado en uno de los lados del compartimiento de la batería. Deslice el clip para bolsillo en el estuche y presione con fuerza hacia abajo hasta que cierre a presión. 1. If AC Voltage Finder seems weak or inconsistent, try starting at a new spot some distance either side of the first. The unit will not work well if you start exactly over the top of a wire because the unit will set the calibration point too high. If in doubt, check the unit by moving it near an exposed electrical cord such as the cord to a plugged-in toaster. Zircon Corporation, (“Zircon”) warrants this product to be free from defects in materials and workmanship for one year from the date of purchase. Any inwarranty defective product returned to Zircon*, freight prepaid with proof of purchase date and $3.00 to cover postage and handling, will be repaired or replaced at Zircon’s option. AC INSTALACION DE LA BATERIA HELPFUL HINTS LIMITED 1 YEAR WARRANTY FINDER Place the iSensor® AC Voltage Finder against the wall with the pocket clip near the palm of your hand (Figure 1). Press and HOLD IN the ON/OFF button located on the left side. The LED will flash quickly as it calibrates to the wall surface. It When approaching a hot wire, the unit will start blinking, blinking faster as you get closer. A steady light or fastest blinking rate will indicate your nearest proximity to the wire. If the signal is very strong and the wire location seems very wide, use a pencil to mark the edges of the total width where the signal occurs. Then turn the unit off and then on again over the edge of the marked area and rescan. The unit will set the detection capability to a finer accuracy if calibrated within that field and you will be able to more closely define the wire location. You can do this several times if necessary to keep setting the calibration to a finer precision. can be detected up to 3 in. (76 mm) deep Battery Type 9 V, not included Battery Life Up to 2 years at 10 minutes a day of use Water Resistance Splash and water resistant, but not waterproof Operating Temperature 20° to 120°F (-7° to 49°C) Storage Temperature -20° to 150°F (-29° to 66°C) Humidity 80% RH (Noncondensing) INSTRUCTIONS SCANNING FOR ELECTRICAL WIRES will sometimes do this twice as it adjusts itself. Slide the AC Voltage Finder across the wall. Do not rotate unit as this will affect the accuracy of the calibration. 2. Do not touch or lean against the wall being scanned as this will affect the accuracy. 3. The AC Voltage Finder cannot detect wires inside metal conduit but CAN be used with plastic conduit. 4. You cannot work over wet wallpaper, metallic finishes, or wet paint. Always allow a wall to dry at least a week for maximum effectivity. 5. A slowly blinking after calibration indicates a large amount of signal. Be very careful when drilling in this area. 6. A constantly on LED after calibration indicates a calibration failure. Change battery or replace unit. V O LTA G E With a small tool or coin, slide the pocket clip up and off of the case. Insert a 9-volt battery so that the minus (–) sign on the battery matches the minus (–) sign on the side of the battery compartment. Slide the pocket clip on to the case and press it down hard until it snaps closed. Figure 1: Scanning for AC Voltage AC INSTALLING THE BATTERY
