Instrucciones Instalación
Anuncio
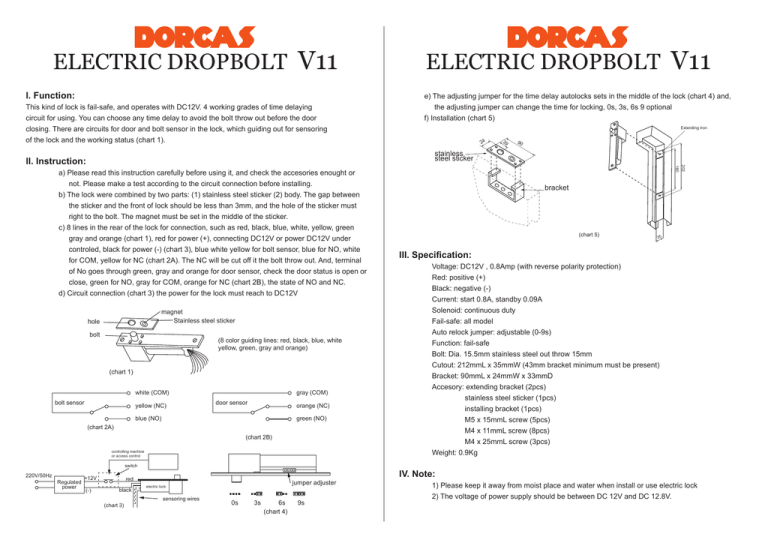
ELECTRIC DROPBOLT V11 I. Function: This kind of lock is fail-safe, and operates with DC12V. 4 working grades of time delaying circuit for using. You can choose any time delay to avoid the bolt throw out before the door closing. There are circuits for door and bolt sensor in the lock, which guiding out for sensoring of the lock and the working status (chart 1). ELECTRIC DROPBOLT V11 e) The adjusting jumper for the time delay autolocks sets in the middle of the lock (chart 4) and, the adjusting jumper can change the time for locking, 0s, 3s, 6s 9 optional f) Installation (chart 5) Extending iron 24 39 90 stainless steel sticker a) Please read this instruction carefully before using it, and check the accesories enought or not. Please make a test according to the circuit connection before installing. b) The lock were combined by two parts: (1) stainless steel sticker (2) body. The gap between the sticker and the front of lock should be less than 3mm, and the hole of the sticker must right to the bolt. The magnet must be set in the middle of the sticker. c) 8 lines in the rear of the lock for connection, such as red, black, blue, white, yellow, green gray and orange (chart 1), red for power (+), connecting DC12V or power DC12V under controled, black for power (-) (chart 3), blue white yellow for bolt sensor, blue for NO, white for COM, yellow for NC (chart 2A). The NC will be cut off it the bolt throw out. And, terminal of No goes through green, gray and orange for door sensor, check the door status is open or close, green for NO, gray for COM, orange for NC (chart 2B), the state of NO and NC. d) Circuit connection (chart 3) the power for the lock must reach to DC12V magnet Stainless steel sticker hole bolt (8 color guiding lines: red, black, blue, white yellow, green, gray and orange) (chart 1) gray (COM) white (COM) bolt sensor yellow (NC) door sensor orange (NC) blue (NO) green (NO) (chart 2A) (chart 2B) controlling machine or access control 202 180 II. Instruction: bracket (chart 5) 35 III. Specification: Voltage: DC12V , 0.8Amp (with reverse polarity protection) Red: positive (+) Black: negative (-) Current: start 0.8A, standby 0.09A Solenoid: continuous duty Fail-safe: all model Auto relock jumper: adjustable (0-9s) Function: fail-safe Bolt: Dia. 15.5mm stainless steel out throw 15mm Cutout: 212mmL x 35mmW (43mm bracket minimum must be present) Bracket: 90mmL x 24mmW x 33mmD Accesory: extending bracket (2pcs) stainless steel sticker (1pcs) installing bracket (1pcs) M5 x 15mmL screw (5pcs) M4 x 11mmL screw (8pcs) M4 x 25mmL screw (3pcs) Weight: 0.9Kg switch 220V/50Hz Regulated power +12V (-) IV. Note: red black sensoring wires (chart 3) jumper adjuster electric lock 1) Please keep it away from moist place and water when install or use electric lock 2) The voltage of power supply should be between DC 12V and DC 12.8V. 0s 3s 6s (chart 4) 9s ELECTROPISTÓN V11 ELECTROPISTÓN V11 (Figura 1) I. Función: Controladora o control de accesos El funcionamiento de este electropistón es de tipo invertido y funciona con corriente continua a 12V con la posibilidad de emplear 4 opciones de retraso en la función de bloqueo para evitar que el pistón salga antes de que la puerta se cierre. Además, el mecanismo está dotado de sensores Interruptor 220V/50Hz Regulador potencia que permiten guiar y reconocer el estado de la cerradura. +12V Jumper ajustable rojo negro (-) electropistón cableado sensor 0s 3s (Figura 3) II. Instrucciones: a) Por favor, lea este instructivo cuidadosamente antes de usarlo y revise que los accesorios están completos. Realice un test de conexión del circuito antes de instalar. Figura 1. e) El jumper de ajuste para el retraso de auto bloqueo se encuentra en el centro del electropistón (figura 4) y puede ser de 0, 3, 6 o 9 segundos. f) Detalle de instalación (figura 5) Soportes extension b) El conjunto está formado por dos piezas: una placa de acero inoxidable y el cuerpo del electropistón. La separación entre ambas piezas debe ser menos de 3 mm y el agujero 24 39 90 Adhesivo acero inoxidable 202 180 de la placa debe estar completamente enfrentado al pistón. El imán de la placa debe estar posicionado en el centro de la misma. 6s 9s (Figura 4) c) El cable de conexión tiene 8 líneas cuyos colores indican como sigue: Rojo: alimentación ( +) Negro: alimentación ( -) Soporte Blanco (COM) Sensor del pistón Sensor de pistón (figura2A) Blanco: Azul: Azul (NO) Común (COM) Normalmente abierto (NO) (Figura 5) (Figura 2A) III. Especificaciones: Amarillo: Normalmente cerrado (NC) Sensor de puerta (figura 2B) Gris: Verde: Amarillo (NC) 35 Voltaje: 12VDC, 0.8 A con diodo de protección de polaridad Gris (COM) Común (COM) Figura 2B Normalmente abierto (NO) Sensor de puerta Naranja (NC) Verde (NO) Naranja: Normalmente cerrado (NC) Cuando el pistón sale, la conexión NC se corta. (Figura 2B) Es necesario revisar el estado de la puerta cuando se realice la conexión de los cables de su sensor para conectar en la combinación correcta. Corriente de mantenimiento: 0.09 A Bobina: diseñada para alimentación permanente Tipo de funcionamiento: invertido (Fail-Safe) Jumper ajustable (0-9s) Pistón: ø15.5 mm acero inoxidable, longitud exterior 15 mm Recorte: 90mm Largo x 35 mm Ancho Placa: 90 mm Largo x 24mm Ancho x 3 mm Espesor d) La alimentación de la cerradura debe ser 12VDC. (figura 3) Accesorios: 2 Soportes de extensión imán agujero 1 recorte de acero inoxidable recorte acero inoxidable 1 placa de instalación pistón 5 tornillos M5 x 15mm (8 cables de color: rojo, negro, azul, blanco, amarillo, verde, gris y naranja) 8 tornillos M4 x 11mm 3 tornillos M4 x 225mm IV. Nota: 1) Manténgase lejos de lugares húmedos y del agua cuando instale o use el electropistón. 2) El voltaje suministrado debe estar entre 12VDC y 12.8 VDC.
