Resizing Alligator® Rivet Fasteners for Edge-Worn Belts
Anuncio
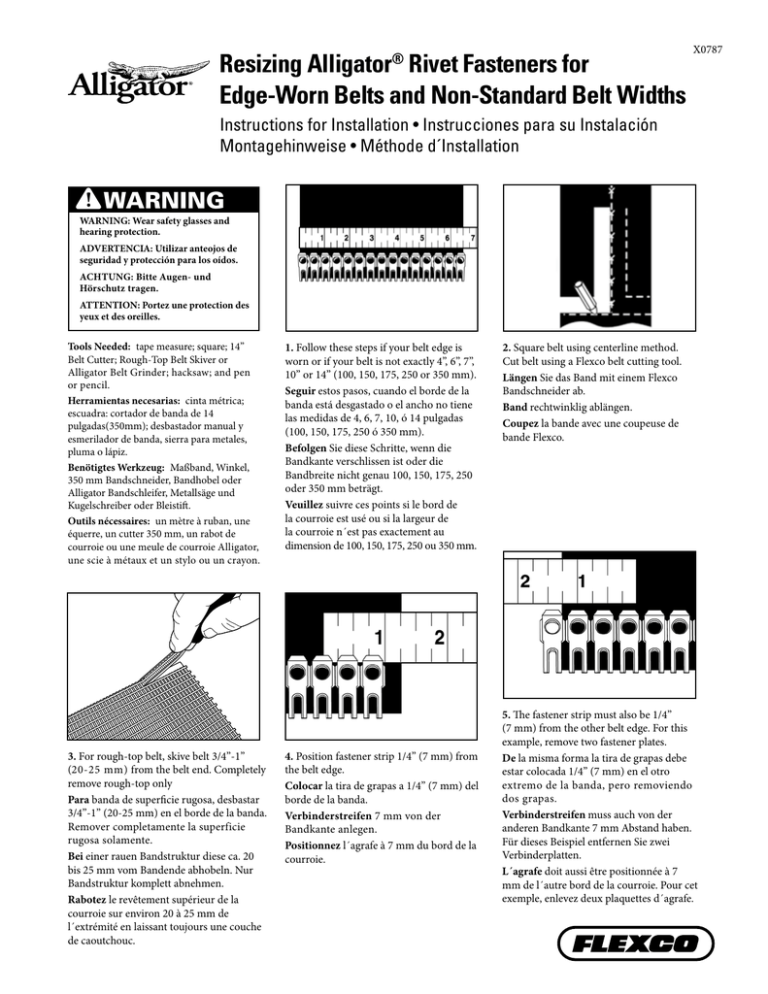
Resizing Alligator Rivet Fasteners for Edge-Worn Belts and Non-Standard Belt Widths ® X0787 Instructions for Installation • Instrucciones para su Instalación Montagehinweise • Méthode d´Installation ! WARNING WARNING: Wear safety glasses and hearing protection. ADVERTENCIA: Utilizar anteojos de seguridad y protección para los oídos. ACHTUNG: Bitte Augen- und Hörschutz tragen. ATTENTION: Portez une protection des yeux et des oreilles. Tools Needed: tape measure; square; 14” Belt Cutter; Rough-Top Belt Skiver or Alligator Belt Grinder; hacksaw; and pen or pencil. Herramientas necesarias: cinta métrica; escuadra: cortador de banda de 14 pulgadas(350mm); desbastador manual y esmerilador de banda, sierra para metales, pluma o lápiz. Benötigtes Werkzeug: Maßband, Winkel, 350 mm Bandschneider, Bandhobel oder Alligator Bandschleifer, Metallsäge und Kugelschreiber oder Bleistift. Outils nécessaires: un mètre à ruban, une équerre, un cutter 350 mm, un rabot de courroie ou une meule de courroie Alligator, une scie à métaux et un stylo ou un crayon. 3. For rough-top belt, skive belt 3/4”-1” (20-25 mm) from the belt end. Completely remove rough-top only Para banda de superficie rugosa, desbastar 3/4”-1” (20-25 mm) en el borde de la banda. Remover completamente la superficie rugosa solamente. Bei einer rauen Bandstruktur diese ca. 20 bis 25 mm vom Bandende abhobeln. Nur Bandstruktur komplett abnehmen. Rabotez le revêtement supérieur de la courroie sur environ 20 à 25 mm de l´extrémité en laissant toujours une couche de caoutchouc. 1. Follow these steps if your belt edge is worn or if your belt is not exactly 4”, 6”, 7”, 10” or 14” (100, 150, 175, 250 or 350 mm). Seguir estos pasos, cuando el borde de la banda está desgastado o el ancho no tiene las medidas de 4, 6, 7, 10, ó 14 pulgadas (100, 150, 175, 250 ó 350 mm). Befolgen Sie diese Schritte, wenn die Bandkante verschlissen ist oder die Bandbreite nicht genau 100, 150, 175, 250 oder 350 mm beträgt. Veuillez suivre ces points si le bord de la courroie est usé ou si la largeur de la courroie n´est pas exactement au dimension de 100, 150, 175, 250 ou 350 mm. 4. Position fastener strip 1/4” (7 mm) from the belt edge. Colocar la tira de grapas a 1/4” (7 mm) del borde de la banda. Verbinderstreifen 7 mm von der Bandkante anlegen. Positionnez l´agrafe à 7 mm du bord de la courroie. 2. Square belt using centerline method. Cut belt using a Flexco belt cutting tool. Längen Sie das Band mit einem Flexco Bandschneider ab. Band rechtwinklig ablängen. Coupez la bande avec une coupeuse de bande Flexco. 5. The fastener strip must also be 1/4” (7 mm) from the other belt edge. For this example, remove two fastener plates. De la misma forma la tira de grapas debe estar colocada 1/4” (7 mm) en el otro extremo de la banda, pero removiendo dos grapas. Verbinderstreifen muss auch von der anderen Bandkante 7 mm Abstand haben. Für dieses Beispiel entfernen Sie zwei Verbinderplatten. L´agrafe doit aussi être positionnée à 7 mm de l´autre bord de la courroie. Pour cet exemple, enlevez deux plaquettes d´agrafe. 6. Cut off the extra fastener plates using a hacksaw. Do this for both fastener strips. Cortar las tiras de grapas extras usando una sierra para metales. Hacerlo con ambas tiras. Übrige Verbinderplatten bei beiden Verbinderstreifen mit Metallsäge absägen. Coupez les autres plaquettes de l´agrafe à l´aide d´une scie à métaux. 7. Fit the fastener strips together. Center the fastener strips on the belt ends, this is important to ensure proper alignment. Unir las tiras de grapas. Centrarlas con los extremos de la banda, esto es importante para asegurar la alineación correcta. Verbinderstreifen zusammenführen. Beide Verbinderstreifen an den Bandenden zentrieren. Dies garantiert eine exakte Ausrichtung. Emboîtez les deux courroies d´agrafe et centrez-les sur les extrémités de la courroie, garantissant un alignement correct. 9. (a) Insert fastener strip into the tool with the Alligator logo face up. (b) Insert belt end into the fastener strip and against belt stops. (a) Insertar la tira de grapas con el logo de Alligator hacia arriba en la herramienta. (b) Insertar la tira de grapas hasta el tope del extremo de la banda. (a) Verbinderstreifen in das Montagegerät einlegen (Alligator Logo zeigt nach oben). (b)Bandende in den Verbinderstreifen bis zum Bandstopp einlegen. (a) Positionnez l´agrafe dans l´outil de montage (signe Alligator en haut). (b) Placez la courroie en butée dans l´agrafe. 10. Align the marks on the belt with the ends of the fastener strip. Begin installation, see enclosed instructions. Alinear las marcas de la banda con los extremos de la tira de grapas. Ver instrucciones adjuntas y empezar con la instalación. Markierungen auf dem Band mit den Enden des Verbinderstreifens ausrichten. Mit der Montage gemäß den beiliegenden Montagehinweisen beginnen. Alignez les marquages de la courroie avec l´agrafe, puis commencez avec le montage en suivant les instructions jointes. 2525 Wisconsin Avenue • Downers Grove, IL 60515-4200 U.S.A. Telephone: 1-630-971-0150 • Fax: 1-630-971-1180 • E-mail: info@flexco.com Visit www.flexco.com for other Flexco locations and products. ©2009 Flexible Steel Lacing Company. Alligator® is a registered trademark. 12-13. For Reorder: X0787 8. Mark both belts at the edge of the centered fastener strips. De la tira de grapas ya centrada, marcar ambos bordes de la banda. Beide Bänder an der Kante der zentrierten Verbinderstreifen markieren. Pointez au stylo la position de l´agrafe sur la courroie.
