Operation keys and LCD Teclas de operación y pantalla de
Anuncio
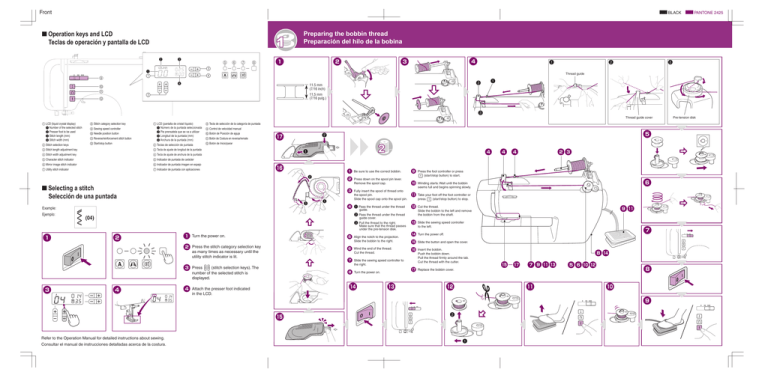
Front BLACK ■Operation keys and LCD PANTONE 2425 Preparing the bobbin thread Preparación del hilo de la bobina Teclas de operación y pantalla de LCD 2 3 5 6 7 8 1 2 4 3 1 1 2 3 Thread guide 9 4 0 A 2 11.5 mm (7/16 inch) 1 11,5 mm (7/16 pulg.) B 3 Thread guide cover 1 LCD (liquid crystal display) 1 Number of the selected stitch 2 Presser foot to be used 3 Stitch length (mm) 4 Stitch width (mm) 2 Stitch selection keys 8 Stitch category selection key 9 Sewing speed controller 0 Needle position button A Reverse/reinforcement stitch button B Start/stop button 1 LCD (pantalla de cristal líquido) 1 Número de la puntada seleccionada 2 Pie prensatela que se va a utilizar 3 Longitud de la puntada (mm) 4 Anchura de la puntada (mm) 2 Teclas de selección de puntada 3 Stitch length adjustment key 3 Tecla de ajuste de longitud de la puntada 4 Stitch width adjustment key 4 Tecla de ajuste de anchura de la puntada 5 Character stitch indicator 5 Indicador de puntada de carácter 6 Mirror image stitch indicator 6 Indicador de puntada imagen en espejo 7 Utility stitch indicator 7 Indicador de puntada con aplicaciones 8 Tecla de selección de la categoría de puntada 9 Control de velocidad manual 0 Botón de Posición de aguja A Botón de Costura en reversa/remate g B Botón de Inicio/parar 4 1 f 1 2 2 ■Selecting a stitch 3 Selección de una puntada 3 Example: Ejemplo: 5 2 1 4 Be sure to use the correct bobbin. 9 Press down on the spool pin lever. Remove the spool cap. 0 Fully insert the spool of thread onto the spool pin. Slide the spool cap onto the spool pin. a 1 Pass the thread under the thread b guide. 2 Pass the thread under the thread (04) Make sure that the thread passes under the pre-tension disk. 2 1 2 3 3 4 23 Press the foot controller or press (start/stop button) to start. 6 Winding starts. Wait until the bobbin seems full and begins spinning slowly. Take your foot off the foot controller or press (start/stop button) to stop. 9a Cut the thread. Slide the bobbin to the left and remove the bobbin from the shaft. guide cover. 3 Pull the thread to the right. 1 4 4 4 5 Turn the power on. Press the stitch category selection key as many times as necessary until the utility stitch indicator is lit. 6 7 Press (stitch selection keys). The number of the selected stitch is displayed. 8 Align the notch to the projection. Slide the bobbin to the right. Wind the end of the thread. Cut the thread. Turn the power off. e Slide the button and open the cover. f g Turn the power on. c Slide the sewing speed controller to the left. d Slide the sewing speed controller to the right. d Attach the presser foot indicated in the LCD. c Insert the bobbin. Push the bobbin down. Pull the thread firmly around the tab. Cut the thread with the cutter. 7 8d e _g 79ac 560b 8 Replace the bobbin cover. b a 0 9 e Refer to the Operation Manual for detailed instructions about sewing. Consultar el manual de instrucciones detalladas acerca de la costura. 2 1 Pre-tension disk Back BLACK Quick Reference Guide Guía de referencia rápida Upper threading Hilo superior 1 PANTONE 2425 2 4 3 5 Be sure to first read the “IMPORTANT SAFETY INSTRUCTIONS” in the Operation Manual. Refer to the Operation Manual for detailed instruction. Lea primero las “INSTRUCCIONES DE SEGURIDAD IMPORTANTES” del manual de instrucciones. Consulte el manual de instrucciones para obtener información detallada. ■List of stitches / Lista de tipos de puntadas 6 e 1 Turn the power off. 2 Raise the presser foot lever. 3 5 cm (2 inches) 5 cm (7/16 pulg.) d 4 5 6 Turn the power on. Raise the needle by pressing once or twice. Turn the power off. Mark on the wheel points up. b 2 1 While lightly holding the thread, release the needle threader lever. c Pull the loop of the thread. d Raise the presser foot lever. e Pull out about 5 cm (2 inches) of thread. 7 6 6 45 1 Thread guide Press down on the spool pin lever. Remove the spool cap. Fully insert the spool of thread onto the spool pin. Slide the spool cap onto the spool pin. 2 1 Pass the thread under the thread guide. 2 Pass the thread under the thread guide cover. 7 c 8 9 0 a b Guide the thread from right to left. 8 Lower the presser foot lever. e While lowering the needle threader lever, hook the thread onto the guide. 1 Thread guide cover 7 c _ 0 b Fully lower the needle threader lever. a 3 29d Put the thread behind the needle bar thread guide above the needle, holding the thread with your left hand. ■Useful Features / Funciones útiles 0 9 1 8 - Quick-set bobbin - Needle threader - Fast bobbin winding system Refer to the Operation Manual for detailed instruction. - Bobina rápida - Enhebrador de aguja - Sistema de devanado rápido de bobina Consulte el manual de instrucciones para obtener información detallada. 2 XF6619-001
