ksr5 - Velleman
Anuncio
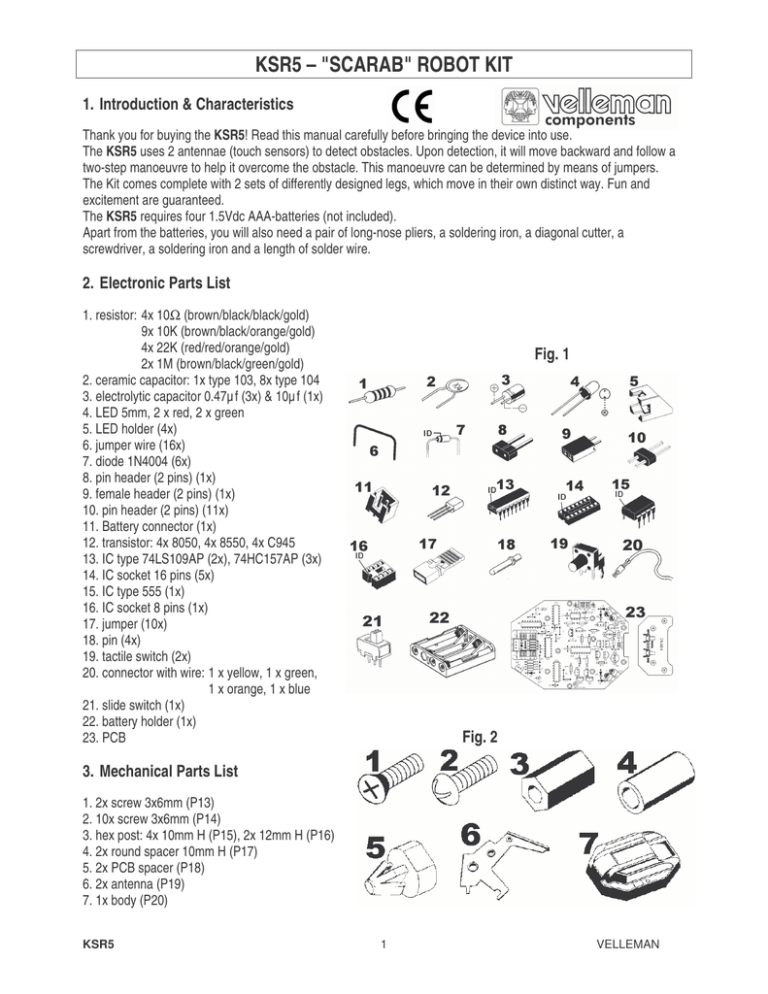
KSR5 – "SCARAB" ROBOT KIT 1. Introduction & Characteristics Thank you for buying the KSR5! Read this manual carefully before bringing the device into use. The KSR5 uses 2 antennae (touch sensors) to detect obstacles. Upon detection, it will move backward and follow a two-step manoeuvre to help it overcome the obstacle. This manoeuvre can be determined by means of jumpers. The Kit comes complete with 2 sets of differently designed legs, which move in their own distinct way. Fun and excitement are guaranteed. The KSR5 requires four 1.5Vdc AAA-batteries (not included). Apart from the batteries, you will also need a pair of long-nose pliers, a soldering iron, a diagonal cutter, a screwdriver, a soldering iron and a length of solder wire. 2. Electronic Parts List 1. resistor: 4x 10Ω (brown/black/black/gold) 9x 10K (brown/black/orange/gold) 4x 22K (red/red/orange/gold) 2x 1M (brown/black/green/gold) 2. ceramic capacitor: 1x type 103, 8x type 104 3. electrolytic capacitor 0.47µ f (3x) & 10µ f (1x) 4. LED 5mm, 2 x red, 2 x green 5. LED holder (4x) 6. jumper wire (16x) 7. diode 1N4004 (6x) 8. pin header (2 pins) (1x) 9. female header (2 pins) (1x) 10. pin header (2 pins) (11x) 11. Battery connector (1x) 12. transistor: 4x 8050, 4x 8550, 4x C945 13. IC type 74LS109AP (2x), 74HC157AP (3x) 14. IC socket 16 pins (5x) 15. IC type 555 (1x) 16. IC socket 8 pins (1x) 17. jumper (10x) 18. pin (4x) 19. tactile switch (2x) 20. connector with wire: 1 x yellow, 1 x green, 1 x orange, 1 x blue 21. slide switch (1x) 22. battery holder (1x) 23. PCB Fig. 1 Fig. 2 3. Mechanical Parts List 1. 2x screw 3x6mm (P13) 2. 10x screw 3x6mm (P14) 3. hex post: 4x 10mm H (P15), 2x 12mm H (P16) 4. 2x round spacer 10mm H (P17) 5. 2x PCB spacer (P18) 6. 2x antenna (P19) 7. 1x body (P20) KSR5 1 VELLEMAN 4. Assembly a) PCB Assembly Start the assembly by mounting the jumper wires and resistors. The components codes are printed on the PCB: Part ID Description Colour Code Quantity J1~16 jumper wire n.a. 16 R16~19 brown/black/black/gold 4 10Ω R1/4~7/12~15 10K brown/black/orange/gold 9 R8~11 22K red/red/orange/gold 4 R2/3 1M brown/black/green/gold 2 Mount the capacitors, transistors and diodes next: Part ID Description C7 ceramic capacitor 103 C1~6 ceramic capacitor 104 EC1~3 electrolytic capacitor 0.47µ f EC4 electrolytic capacitor 10µ f Q5~8 transistor C945 Q9~12 transistor 8050 Q1~4 transistor 8550 D1~4/7/8 diode 1N4004 Mount the IC sockets, the battery connector, the slide switch, the pins and the ICs. Part ID Description IC1 8 pins IC socket (fig.1 #16) IC2~6 16 pins IC socket (fig.1 #14) BAT. battery connector (fig.1 #11) SW. slide switch (fig.1 #21) M1 (+/-) pins (fig.1 #18) M2 (+/-) IC1 555 (8 pins) IC2/3 74LS109AP (16 pins) IC4~6 74HC157AP (16 pins) Quant. 1 6 3 1 4 4 4 6 Quant. 1 5 1 1 4 1 2 3 Mount the pin headers on the main PCB and a pin header and the tactile switches on the small PCB: Part ID Description Quantity TJ1~3 pin header 2 pins (fig.1 #10) 11 MOVEMENT 1/2 To down board pin header 2 pins (fig.1 #8) 1 REMARK: Fig. 3 KSR5 Touch B female header 1 SW1/2 tactile switch 2 2 VELLEMAN Mount the LEDs: Part ID D5/10 D6/9 LED 5mm (red) (A) Description Quant. 2 LED 5mm (green) (B) 2 b) Gearbox Assembly Parts P1: motor x 2 P2: motor holder x 2 Fig. 4 P3: screw (2x10mm) x 4 P4: nut (M2) x 4 P5: tapping screw (3x7mm) x 34 P6: eyelet x 6 P7: gear (44T+0) with shaft (green) x 2 P8: gear (44T+0) with shaft (orange) x 4 P9: pinion gear 8T (white) x 2 P10: gear 48/18T (white) x 2 P11: gear 44/18T (blue) x 4 P12: clear tube x 2 Fig. 5 A: gear protection plates (2) B: motor protection plates (2) C: protection plates (4) for corner wheel/leg gears D: gear brackets (2) for corner wheel/leg gears E: gear brackets (2) for corner wheel/leg gears F: motor mounting bracket (1) G: top plate (1) H: wheels (6) I: legs (6) J: rubber feet for legs (6) KSR5 3 VELLEMAN Assembly OR OF OU O ODER KSR5 4 VELLEMAN c) Mechanical Assembly 1. Mount the wires and the ceramic capacitors type 104 on the motors and fix the battery holder on the PCB. Connect the battery holder to the battery connector (BAT, see "4.a) PCB assembly"). The colour code used for the wires is: 1=green, 2=yellow, 3=orange, 4=blue wires / capacitors battery holder Fig. 7 Fig. 6 2. Fix the PCB to the gearbox and put the wires through the holes at the front of the device. Fig. 8 3. Mount the antennae (2 ways are possible): Fig. 9 KSR5 5 VELLEMAN 4. Connect the wires to the pins on the M-terminals. Fig. 10 5. Mount the body on the PCB/gearbox assembly: Fig. 11 5. Wiring Diagram Fig. 12 KSR5 6 VELLEMAN 6. Operation 1. Put the switch in the “ON”-position ; the KSR5 will move forward. When it detects an obstacle, it will move backward and execute a two-step manoeuvre according to the user's presets. After that, the KSR5 will continue its forward movement. 2. Use the jumpers to determine how the KSR5 reacts to an obstacle –the table below gives an overview. A and B determine the action of the left legs/wheels, C and D determine the action of the right legs/wheels. Make sure there is always a jumper on A or B AND C or D (always at least 2 jumpers). 3. The KSR5 time settings can also be adjusted by means of (a) jumper(s) on TJ1 and/or TJ2 and/or TJ3. Put one jumper on either of the three TJ's and the movement timing will be approximately 1 second. Put two jumpers and the timing will be approximately 2 seconds. Put three jumpers for three seconds. 7. Troubleshooting 1. Make sure all components on the PCB are in the right position. Pay particular attention to the polarity of the LEDs, ICs and diodes. 2. Ensure all wiring is correctly connected. 3. Apply a little bit of machine oil to the axles of the gears if the KSR5 isn't running smoothly. Note: The specifications and contents of this manual can be subject to change without prior notice. KSR5 7 VELLEMAN KSR5 – "SCARAB" ROBOT KIT 1. Inleiding & Kenmerken Dank u voor uw aankoop! Lees deze handleiding aandachtig voor u het toestel in gebruik neemt. De KSR5 detecteert obstakels via 2 voelhoorns (aanrakingssensoren). Na een detectie zal hij achteruit bewegen en een beweging in 2 stappen uitvoeren om het obstakel te omzeilen. Deze beweging wordt bepaald met jumpers. De Kit wordt geleverd met 2 verschillende sets poten, die elk op een verschillende manier bewegen. Plezier is dus verzekerd! De KSR5 werkt op vier AAA-batterijen van 1.5V (niet meegeleverd). Behalve de batterijen heeft u ook een bektang, een zijkniptang, een schroevendraaier, een soldeerijzer en soldeerdraad nodig. 2. Lijst van elektronische onderdelen (zie fig. 1 blz. 1) 1. weerstand: 4 x 10Ω (bruin/zwart/zwart/goud) 9 x 10K (bruin/zwart/oranje/goud) 4 x 22K (rood/rood/oranje/goud) 2 x 1M (bruin/zwart/groen/goud) 2. keramische condensator 1x type 103, 8x type 104 3. elektrolytische condensator 0.47µ f (3x) & 10µ f (1x) 4. LED 5mm, 2x rood, 2x groen 5. LED houder (4x) 6. draadbrug (16x) 7. diode 1N4004 (6x) 8. dubbele pinheader (1x) 9. vrouwelijke dubbele pinheader (1x) 10. dubbele pinheader (11x) 11. batterijconnector (1x) 12. transistor: 4x C945, 4x 8050, 4x 8550 13. IC type 74LS109AP (2x), 74HC157AP (3x) 14. 16-pins IC voet (5x) 15. IC type 555 (1x) 16. 8-pins IC voet (1x) 17. jumper (10x) 18. pin (4x) 19. tactiele schakelaar (2x) 20. connector met draad: 1 x geel, 1 x groen, 1 x oranje, 1 x blauw 21. schuifschakelaar (1x) 22. batterijhouder (1x) 23. PCB (1x) 3. Lijst van mechanische onderdelen (zie fig. 2 blz. 1) 1. 2. 3. 4. 5. 6. 7. 2 x schroef 3 x 6mm (P13) 4 x schroef 3 x 6mm (P14) hexagonale afstandsbus: 4x 10mm H (P15), 2x 12mm H (P16) 2x ronde afstandsbus 10mm H (P17) 2x PCB afstandsstuk (P18) 2x voelhoorn (P19) 1 x behuizing P20 KSR5 8 VELLEMAN 4. Montage a) Montage van de PCB Monteer eerst de draadbruggen en de weerstanden. De namen van de componenten staan op de PCB. Onderdeel J1~16 R16~19 R1/4~7/12~15 R8~11 R2/3 Beschrijving draadbrug 10Ω 10K 22K 1M Kleurcode n.a. bruin/zwart/zwart/goud bruin/zwart/oranje/goud rood/rood/oranje/goud bruin/zwart/groen/goud Hoev. 16 4 9 4 2 Monteer vervolgens de condensators, de transistors en de diodes: Onderdeel C7 C1~6 EC1~3 EC4 Q5~8 Q9~12 Q1~4 D1~4/7/8 Beschrijving keramische condensator 103 keramische condensator 104 elektrolytische condensator 0.47µ f elektrolytische condensator 10µ f transistor C945 transistor 8050 transistor 8550 1N4004 Hoev. 1 6 3 1 4 4 4 6 Monteer de IC voeten, de batterijconnector, de schuifschakelaar, de pinnen en de IC's. Onderdeel IC1 IC2~6 BAT. SW. M1 (+/-) M2 (+/-) IC1 IC2/3 IC4~6 Beschrijving 8-pins IC voet (fig.1 #16) 16-pins IC voet (fig.1 #14) batterijconnector (fig.1 #11) schuifschakelaar (fig.1 #21) Hoev. 1 5 1 1 pinnen 4 555 (8-pins) 74LS109AP (16-pins) 74HC157AP (16-pins) 1 2 3 Monteer de pinheaders op de grote PCB en een pinheader en de tactiele schakelaars op de kleine PCB: Onderdeel TJ1~3 MOVEMENT 1/2 To down board Touch B SW1/2 Beschrijving dubbele pinheader (fig.1 #10) dubbele pinheader (fig.1 #8) OPMERKING: zie figuur 3 op blz.2 vrouwelijke dubbele pinheader tactiele schakelaar Hoev. 11 1 1 2 Monteer de LEDs: KSR5 Onderdeel D5/10 Beschrijving LED 5mm (rood) (A) Hoev. 2 D6/9 LED 5mm (groen) (B) 2 9 VELLEMAN b) Montage tandwielkast Onderdelen (zie fig. 4 blz. 3) P1: motor x 2 P2: motorhouder x 2 P3: schroef (2x10mm) x 4 P4: moer (M2) x 4 P5: zelftappende schroef (3x7mm) x 34 P6: ring x 6 P7: tandwiel (44T+0) met as (groen) x 2 P8: tandwiel (44T+0) met as (oranje) x 4 P9: rondsel 8T (wit) x 2 P10: tandwiel 48/18T (wit) x 2 P11: tandwiel 44/18T (blauw) x 4 P12: doorzichtig buisje x 2 (zie fig. 5 blz. 3) A: Beschermplaatjes voor de tandwielen (2) B: Beschermplaatjes voor de motoren (2) C: Beschermplaatjes (4) voor de tandwielen van de wielen/poten op de hoeken D: Bevestigingsplaten (2) voor de tandwielen van de wielen/poten op de hoeken E: Bevestigingsplaten (2) voor de tandwielen van de wielen/poten op de hoeken F: Bevestigingsplaat voor de motoren (1) G: topplaat (1) H: wielen (6) I: poten (6) J: rubber voetjes voor de poten (6) Montage (zie figuren tabel blz. 4) c) Mechanische montage 1. Monteer de draden en de keramische condensators type 104 op de motoren (zie fig. 6 blz. 5) en bevestig de batterijhouder op de PCB (zie fig. 7 blz. 5). Sluit de batterijhouder aan op de batterijconnector (zie "4.a) Montage van de PCB"). De kleurcode voor de draden is als volgt: 1=groen, 2=geel, 3=oranje, 4=blauw 2. Bevestig de PCB op de tandwielkast en leid de draden door de openingen vooraan de robot (zie fig. 8 blz. 5). 3. Bevestig de voelhoorns (dit kan op 2 manieren - zie fig. 9 op blz. 5). 4. Verbind de draden met de pinnen op de M-aansluitingen (zie fig. 10 op blz. 6). 5. Bevestig de behuizing op de rest van het apparaat.(zie fig.11 op blz. 6). 5. Bedradingschema (zie fig.12 blz. 6) 6. Bediening 1. Plaats de schakelaar in de “ON”-stand ; de KSR5 zal vooruit bewegen. Wanneer het een obstakel detecteert, zal het achteruit bewegen en een beweging in twee stappen uitvoeren volgens de instellingen van de gebruiker. Daarna zal de KSR5 zijn voorwaartse beweging voortzetten. 2. Gebruik de jumpers om te bepalen hoe de KSR5 reageert op een obstakel – zie de tabel hieronder. A en B bepalen de actie van de linkerwielen/-poten, C en D bepalen de actie van de rechterwielen/-poten. Zorg ervoor dat er altijd een jumper op A of B én C of D zit (altijd minimum 2 jumpers). KSR5 10 VELLEMAN 3. Ook de timing van de KSR5 kan worden geregeld door (een) jumper(s) te plaatsen op TJ1 en/of TJ2 en/of TJ3. Met één jumper op een van de drie TJ's zal de beweging ongeveer 1 seconde aanhouden. Met twee jumpers zal de beweging ongeveer 2 seconden duren. Met drie jumpers duurt de beweging ongeveer drie seconden. 7. Problemen en oplossingen 1. Ga na of alle componenten op de PCB op de juiste plaats zitten. Besteed de nodige aandacht aan de polariteit van de LEDs, IC's en diodes. 2. Zorg ervoor dat alle draden correct aangesloten zijn. 3. Smeer wat fijne machineolie op de assen van de tandwielen als de KSR5 niet soepel loopt. De specificaties en de inhoud van de handleiding kunnen worden gewijzigd zonder voorafgaande kennisgeving. KSR5 – KIT ROBOT "SCARAB" 1. Introduction & caractéristiques Nous vous remercions de votre achat ! Lisez la notice présente attentivement avant la mise en service de l'appareil. Le KSR5 utilise 2 antennes (capteurs de contact) pour détecter des obstacles. Après une détection, il reculera et exécutera un mouvement à deux étapes pour contourner l'obstacle. Ce mouvement est déterminé avec 2 cavaliers. Le Kit est livré avec 2 jeux de pattes bougeant d'une façon unique. Le plaisir est garanti! Votre KSR5 marche sur 4 piles LR3 de 1.5V (non incl.). Sauf les piles vous aurez également besoin d'une pince plate, une pince coupante, un tournevis, un fer à souder et du fil d'apport. 2. Liste des pièces électroniques (voir fig. 1 à la p. 1) 1. résistance : 4 x 10Ω (brun/noir/noir/doré) 9 x 10K (brun/noir/orange/doré) 4 x 22K (rouge/rouge/orange/doré) 2 x 1K (brun/noir/vert/doré) 2. condensateur céramique 1x type 103, 8x type 104 3. condensateur électrolytique 0.47µ f (3x), 10µ f (1x) 4. LED 5mm, 2x rouge, 2x verte 5. support de LED (4x) 6. fil jarretière (16x) 7. diode 1N4004 (6x) 8. barrette double (1x) 9. barrette double femelle (1x) 10. barrette double (11x) 11. connecteur d'alimentation (1x) 12. transistor: 4x C945, 4x 8050, 4x 8550 13. CI type 74LS109AP (2x), 74HC157AP (3x) 14. support de CI 16 broches (5x) 15. CI type 555 (1x) 16. support de CI 8 broches (1x) 17. cavalier (10x) 18. broche (4x) 19. touche contact (2x) 20. connecteur avec fil : 1 x jaune, 1 x vert, 1 x orange, 1 x bleu 21. glissière (1x) 22. porte-piles (1x) 23. CI (1x) KSR5 11 VELLEMAN 3. Liste des pièces mécaniques (voir fig. 2 à la p. 1) 1. 2. 3. 4. 5. 6. 7. 2x vis 3 x 6mm (P13) 4x vis 3 x 6mm (P14) entretoise hexagonale: 4x 10mm H (P15), 2x 12mm H (P16) 2x entretoise ronde 10mm H (P17) 2x entretoise CI (P18) 2x antenne (P19) 1x boîtier (P20) 4. Montage a) Montage du CI Montez d'abord les fils jarretières et les résistances. Les noms des composants sont imprimés sur le CI. Pièce J1~16 R16~19 R1/4~7/12~15 R8~11 R2/3 Description fil jarretière 10Ω 10K 22K 1M Couleur n.a. brun/noir/noir/doré brun/noir/orange/doré rouge/rouge/orange/doré brun/noir/vert/doré Qté. 16 4 9 4 2 Montez ensuite les condensateurs, les transistors et les diodes: Pièce C7 C1~6 EC1~3 EC4 Q5~8 Q9~12 Q1~4 D1~4/7/8 Description condensateur céramique 103 condensateur céramique 104 condensateur électrolytique 0.47µ f condensateur électrolytique 10µ f transistor C945 transistor 8050 transistor 8550 diode 1N4004 Qté 1 6 3 1 4 4 4 6 Montez les supports de CI, le connecteur d'alimentation, la glissière, les broches et les CI. Pièce IC1 IC2~6 BAT. SW. M1 (+/-) M2 (+/-) IC1 IC2/3 IC4~6 Description support de CI 8 broches (fig.1 #16) support de CI 16 broches (fig.1 #14) connecteur d'alimentation (fig.1 #11) glissière (fig.1 #21) Qté 1 5 1 1 broches (fig.1 #18) 4 555 (8 broches) 74LS109AP (16 broches) 74HC157AP (16 broches) 1 2 3 Montez les barrettes sur le CI principal et une barrette et les touches contact sur le petit CI: KSR5 Pièce Description Qté TJ1~3 MOVEMENT 1/2 To down board double barrette (fig.1 #10) 11 double barrette (fig.1 #8) 1 12 VELLEMAN REMARQUE: Fig. 3 Touch B double barrette femelle 1 SW1/2 touche contact 2 Montez les LEDs: Pièce Description Qté D5/10 LED 5mm (rouge) (A) 2 D6/9 LED 5mm (verte) (B) 2 b) Montage de la boîte d'engrenages Parties (voir fig. 4 à la p. 3) P1: moteur x 2 P2: support de moteur x 2 P3: écrou (2x10mm) x 4 P4: boulon (M2) x 4 P5: vis (3x7mm) x 34 P6: oeillet x 6 P7: pignon (44T+0) avec axe (vert) x 2 P8: pignon (44T+0) avec axe (orange) x 4 P9: satellite 8T (blanc) x 2 P10: pignon 48/18T (blanc) x 2 P11: pignon 44/18T (bleu) x 4 P12: tube claire x 2 (voir fig. 5 à la p.3) A: plaques de protection pour pignons (2) B: plaques de protection pour moteur (2) C: plaques de protection (4) pour les pignons des roues/pattes sur les coins D: plaques de montage (2) pour les pignons des roues/pattes sur les coins E: plaques de montage (2) pour les pignons des roues/pattes sur les coins F: plaque de montage pour moteurs (1) G: plaque supérieure (1) H: roues (6) I: pattes (6) J: pied en caoutchouc pour pattes (6) Montage: voir les figures dans le tableau sur la page 4. c) Montage mécanique 1. Montez les fils et les condensateurs céramiques type 104 sur les moteurs (voir fig. 6 à la p. 5) et fixez le portepiles sur le CI (voir fig. 7 à la p. 5). Connectez le porte-piles au connecteur d'alimentation ("4.a) Montage du CI"). Voici le code de couleur des fils: 1=vert, 2=jaune, 3=orange, 4=bleu 2. Montez le CI sur la boîte d'engrenages et guidez les fils à travers les trous à l'avant du robot (voir fig. 8 à la p. 5). 3. Montez les antennes (il y a deux possibilités de montage) (voir fig. 9 à la p. 5) 4. Reliez les fils aux broches des connexions M (voir fig. 10 à la p. 6). 5. Montez le boîtier sur l'ensemble du CI et la boîte d'engrenages (voir fig.11 à la p. 6) KSR5 13 VELLEMAN 5. Câblage (voir fig.12 à la p. 6) 6. Opération 1. Mettez l'interrupteur dans la position “ON” ; le KSR5 commencera a aller en avant. Quand il détecte un obstacle, il ira en arrière et exécutera un manoeuvre à deux étapes selon les réglages de l'utilisateur. Après, le KSR5 continuera son mouvement en avant. 2. Utilisez les cavaliers pour déterminer comment le KSR5 réagira sur un obstacle – regardez la table ci-dessous. A et B déterminent l'action des roues/pattes gauches, C et D déterminent l'action des roues/pattes droites. Veillez à ce qu'il y a toujours un cavalier sur A ou B ET C ou D (donc toujours au moins 2 cavaliers). 3. Les réglages de temps du KSR5 peuvent également être modifiés en mettant un/des cavalier(s) sur TJ1 et/ou TJ2 et/ou TJ3. Mettez un cavalier sur n'importe quel des trois TJ et le timing sera d'environ une seconde. Mettez deux cavaliers et le timing sera d'environ 2 secondes. Avec trois cavaliers ce sera à peu près 3 secondes. 7. Problèmes et solutions 1. Vérifiez si chaque composant du CI a été monté au bon endroit. Contrôlez la polarité des LEDs, des CI et des diodes. 2. Veillez à ce que tout câblage soit correctement connecté. 3. Lubrifiez les axes des pignons avec un peu d'huile de graissage fine si les mouvements de votre KSR5 ne sont pas souples. Les spécifications et le contenu de la notice peuvent être modifiées sans notification préalable. KSR5 – KIT ROBOT "SCARAB" 1. Introducción & características ¡Gracias por haber comprado el KSR5! Lea cuidadosamente las instrucciones del manual antes de montarlo. El KSR5 utiliza 2 antenas (sensores de contacto) para detectar los obstáculos. Después de una detección, da un paso hacia atrás. Luego, hará automáticamente una maniobra de dos pasos para evitar el obstáculo. Esta maniobra se determina con dos puentes (jumper). El Kit se entrega con 2 juegos de patas que se mueven de forma única. ¡Diversión asegurada! El KSR5 funciona con 4 pilas AAA de 1.5V (no incl.). Además de las pilas necesitará también unos alicates de punta plana larga, unos alicates de corte, un destornillador, un soldador e hilo de estaño. 2. Lista de piezas electrónicas (véase fig. 1 en la p. 1) 1. resistencia : 4 x 10Ω (marrón/negro/negro/dorado) 9 x 10K (marrón/negro/naranja/dorado) 4 x 22K (rojo/rojo/naranja/dorado) 2 x 1K (marrón/negro/verde/dorado) 2. condensador cerámico 1x tipo 103, 8x tipo 104 3. condensador electrolítico 0.47µ f (3x), 10µ f (1x) 4. LED 5mm, 2x rojo, 2x verde KSR5 14 VELLEMAN 5. soporte de LED (4x) 6. puente (16x) 7. diodo 1N4004 (6x) 8. conector, 2 filas (1x) 9. conector hembra, 2 filas (1x) 10. conector, 2 filas (11x) 11. conector de alimentación (1x) 12. transistor: 4x C945, 4x 8050, 4x 8550 13. CI tipo 74LS109AP (2x), 74HC157AP (3x) 14. soporte de CI 16 polos (5x) 15. CI tipo 555 (1x) 16. soporte de CI 8 polos (1x) 17. puente (10x) 18. polo (4x) 19. interruptor táctil (2x) 20. conector con hilo: 1 x amarillo, 1 x verde, 1 x naranja, 1 x azul 21. conmutador deslizante (1x) 22. portapilas (1x) 23. CI (1x) 3. Lista de piezas mecánicas (véase fig. 2 en la p. 1) 1. 2. 3. 4. 5. 6. 7. 2x tornillo 3 x 6mm (P13) 4x tornillo 3 x 6mm (P14) separador hexagonal: 4x 10mm H (P15), 2x 12mm H (P16) 2x separador redondo 10mm H (P17) 2x separador CI (P18) 2x antena (P19) 1x caja (P20) 4. Montaje a) Montaje del CI Primero, monte los puentes y las resistencias cuyos nombres están impresos en el CI. Pieza Descripción Color Cantidad J1~16 R16~19 R1/4~7/12~15 R8~11 R2/3 puente 10Ω 10K 22K 1M n.a. marrón/negro/negro/dorado marrón/negro/naranja/dorado rojo/rojo/naranja/dorado marrón/negro/verde/dorado Luego, monte los condensadores, los transistores y los diodos: Pieza Descripción C7 condensador cerámico 103 C1~6 condensador electrolítico 104 EC1~3 condensador electrolítico 0.47µ f EC4 condensador electrolítico 10µ f Q5~8 Q9~12 Q1~4 D1~4/7/8 KSR5 transistor C945 transistor 8050 transistor 8550 diodo 1N4004 15 16 4 9 4 2 Cantidad 1 6 3 1 4 4 4 6 VELLEMAN Monte los soportes de CI, el conector de alimentación, el conmutador deslizante, los polos y los CI. Pieza Descripción Cantidad IC1 IC2~6 BAT. SW. M1 (+/-) M2 (+/-) IC1 IC2/3 IC4~6 soporte de CI 8 polos (fig.1 #16) soporte de CI 16 polos (fig.1 #14) conector de alimentación (fig.1 #11) conmutador deslizante (fig.1 #21) 1 5 1 1 polos (fig.1 #18) 4 555 (8 polos) 74LS109AP (16 polos) 74HC157AP (16 polos) 1 2 3 Monte los conectores en el CI principal y un conector y los interruptores táctiles en el pequeño CI: Pieza Descripción Cantidad TJ1~3 conector, 2 filas (fig.1 #10) 11 MOVEMENT 1/2 To down board conector, 2 filas (fig.1 #8) 1 OBSERVACIÓN: Fig. 3 TECLA B Conector hembra, 2 filas 1 SW1/2 Interruptor táctil 2 Monte los LEDs: Pieza D5/10 D6/9 LED 5mm (rojo) (A) Descripción Cantidad 2 LED 5mm (verde) (B) 2 b) Montaje de la caja de engranajes Partes (véase fig. 4 en la p. 3) P1: motor x 2 P2: soporte del motor x 2 P3: tornillo (2x10mm) x 4 P4: tuerca (M2) x 4 P5: tornillo (3x7mm) x 34 P6: anillo x 6 P7: piñón (44T+0) con eje (verde) x 2 P8: piñón (44T+0) con eje (naranja) x 4 P9: satélite 8T (blanco) x 2 P10: piñón 48/18T (blanco) x 2 P11: piñón 44/18T (azul) x 4 P12: tubo transparente x 2 (véase fig. 5 en la p.3) A: placas de protección para piñones (2) B: placas de protección para motor (2) C: placas de protección (4) para los piñones de las ruedas/patas en las esquinas D: placas de montaje (2) para los piñones de las ruedas/patas en las esquinas KSR5 16 VELLEMAN E: placas de montaje (2) para los piñones de las ruedas/patas en las esquinas F: placa de montaje para motores (1) G: placa superior (1) H: ruedas (6) I: patas (6) J: pie de goma para patas (6) Montaje: véase las figuras en la lista p. 4. c) Montaje mecánico 1. Monte los hilos y los condensadores cerámicos del tipo 104 en los motores (véase fig. 6 en la p. 5) y fije el portapilas al CI (véase fig. 7 en la p. 5). Conecte el portapilas al conector de alimentación ("4.a) Montaje del CI"). El código de colores de los hilos se indica a continuación: 1=verde, 2=amarillo, 3=naranja, 4=azul 2. Fije el CI a la caja de engranajes y dirija los hilos por los agujeros de la parte delantera del robot (véase fig. 8 en la p. 5). 3. Monte las antenas (hay dos posibilidades de montaje) (véase fig. 9 en la p. 5) 4. Conecte los hilos a los polos de las conexiones M (véase fig. 10 en la p. 6). 5. Monte la caja en el conjunto del CI y la caja de engranajes (véase fig.11 en la p. 6) 5. Cableado (véase fig.12 en la p. 6) 6. Funcionamiento 1. Coloque el interruptor en la posición “ON” ; el KSR5 empezará a avanzar. Si detecta un obstáculo, dará marcha atrás y realizará una maniobra de dos pasos según los ajustes del usuario. Luego, el KSR5 continuará avanzando. 2. Utilice los puentes para determinar cómo reaccionará el KSR5 a un obstáculo – véase la lista de abajo. A y B determinarán la acción de las ruedas/patas izquierdas, C y D determinan la acción de las ruedas/patas derechas. Asegúrese de que siempre haya un puente en A o B Y C o D (por tanto, siempre mín. 2 puentes). 3. También es posible modificar los ajustes de tiempo del KSR5 al colocar un/los puente(s) en TJ1 y/o TJ2 y/o TJ3. Coloque un puente en cualquier de los tres TJ y el movimiento durará aproximadamente un segundo. Con tres puentes el movimiento durará aproximadamente tres segundos. 7. Solución de problemas 1. Verifique si cada componente del CI se encuentra en la posición correcta. Controle la polaridad de los LEDs, los CI y los diodos. 2. Asegúrese de que los cables estén correctamente conectados. 3. Engrase los ejes de los engranajes con un poco de aceite de máquina fino si el KSR5 no se mueve con agilidad. Se pueden modificar las especificaciones y el contenido de este manual sin previo aviso. KSR5 17 VELLEMAN KSR5 – "SCARAB" ROBOTERBAUSATZ 1. Einführung & Eigenschaften Danke für den Kauf des KSR5! Bitte lesen Sie vor Inbetriebnahme diese Bedienungsanleitung sorgfältig durch. Der KSR5 verwendet 2 Fühler (Berührungssensoren) um Hindernisse zu detektieren. Bei der Detektion eines Hindernisses wird der Scarab rückwärts gehen und ein Manöver in zwei Schritten ausführen um das Hindernis zu umgehen. Dieses Manöver wird mithilfe der Jumper bestimmt. Der Bausatz wird mit 2 Sets von verschiedenen Beinen, die in ihrer Art bewegen, geliefert. Sie werden mit den verschiedenen Bewegungen endlos Spaß und Aufregung erleben ! Der KSR5 benötigt vier 1.5Vdc AAA Batterien (nicht mitgeliefert). Abgesehen von den Batterien brauchen Sie auch noch einen Lötkolben, Lötzinn, eine Spitzzange, einen Seitenschneider und einen Schraubendreher. 2. Liste der elektronischen Teile (siehe Abb. 1 Seite 1) 1. Widerstand: 4x 10Ω (braun/schwarz/schwarz/gold) 9x 10K (braun/schwarz/orange/gold) 4x 22K (rot/rot/orange/gold) 2x 1M (braun/schwarz/grün/gold) 2. Keramikkondensator: 1x Typ 103, 8x Typ 104 3. Elektrolytkondensator 0.47µ f (3x) & 10µ f (1x) 4. LED 5mm, 2 x rot, 2 x grün 5. LED-Halter (4x) 6. Drahtbrücke (16x) 7. Diode 1N4004 (6x) 8. Stiftleiste (2 Pins) (1x) 9. Buchsenleiste (2 Pins) (1x) 10.Stiftleiste (2 Pins) (11x) 11.Batterieanschluss (1x) 12.Transistor: 4x 8050, 4x 8550, 4x C945 13.IC-Typ 74LS109AP (2x), 74HC157AP (3x) 14.IC-Fassung 16-polig (5x) 15.IC-Typ 555 (1x) 16.IC-Fassung 8-polig (1x) 17.Jumper (10x) 18.Pin (4x) 19.taktiler Schalter (2x) 20.Drahtanschluss: 1 x gelb, 1 x grün, 1 x orange, 1 x blau 21. Schiebeschalter (1x) 22. Batteriehalter (1x) 23. PCB 3. Liste der mechanischen Teile 1. 2x Schraube 3x6mm (P13) 2. 10x Schraube 3x6mm (P14) 3. hexagonales Zwischenstück: 4x 10mm H (P15), 2x 12mm H (P16) 4. 2x rundes Abstandsstück 10mm H (P17) 5. 2x Leiterplattenzwischenstück (P18) 6. 2x Fühler (P19) 7. 1x Gehäuse (P20) KSR5 18 VELLEMAN 4. Montage a) Leiterplattenmontage Montieren Sie zuerst die Drahtbrücken und die Widerstände. Die Namen der Komponenten stehen auf der Leiterplatte. Teil Beschreibung Farbcode Menge J1~16 Drahtbrücke k.A. 16 R16~19 braun/schwarz/schwarz/gold 4 10Ω R1/4~7/12~15 10K braun/schwarz/orange/gold 9 R8~11 22K rot/rot/orange/gold 4 R2/3 1M braun/schwarz/grün/gold 2 Montieren Sie zunächst die Kondensatoren, die Transistoren und die Dioden: Teil Beschreibung C7 Keramikkondensator 103 C1~6 Keramikkondensator 104 EC1~3 Elektrolytkondensator 0.47µ f EC4 Elektrolytkondensator 10µ f Q5~8 Transistor C945 Q9~12 Transistor 8050 Q1~4 Transistor 8550 D1~4/7/8 Diode 1N4004 Menge 1 6 3 1 4 4 4 6 Montieren Sie die IC-Fassungen, den Batterieanschluss, den Schiebeschalter, die Pins und die ICs. Teil Beschreibung Menge IC1 8 Pins IC-Fassung (Abb.1 #16) 1 IC2~6 16 Pins IC-Fassung (Abb.1 #14) 5 BAT. Batterieanschluss (Abb.1 #11) 1 SW. Schiebeschalter (Abb.1 #21) 1 M1 (+/-) Pins (fig.1 #18) 4 M2 (+/-) IC1 555 (8 Pins) 1 IC2/3 74LS109AP (16 Pins) 2 IC4~6 74HC157AP (16 Pins) 3 Montieren Sie die Stiftleisten auf der Hauptleiterplatte und eine Buchsenleiste und den taktilen Schalter auf der kleinen Leiterplatte: Teil Beschreibung Menge TJ1~3 Stiftleiste (2 Pins) (Abb.1 #10) 11 MOVEMENT 1/2 To down board Stiftleiste (2 Pins) (Abb.1 #8) 1 REMARK: Abb. 3 KSR5 Touch B Buchsenleiste 1 SW1/2 taktiler Schalter 2 19 VELLEMAN Montieren Sie die LEDs: Teil D5/10 D6/9 LED 5mm (rod) (A) Beschreibung Menge 2 LED 5mm (grün) (B) 2 b) Montage Zahnradkasten Teile (siehe Abb. 4 auf Seite 3) P1: Motor x 2 P2: Motorhalter x 2 P3: Schraube (2x10mm) x 4 P4: Mutter (M2) x 4 P5: Blechschraube (3x7mm) x 34 P6: Ring x 6 P7: Zahnrad (44T+0) mit Achse (grün) x 2 P8: Zahnrad (44T+0) mit Achse (orange) x 4 P9: Getrieberad 8T (weiß) x 2 P10: Zahnrad 48/18T (weiß) x 2 P11: Zahnrad 44/18T (weiß) x 4 P12: transparentes Röhrchen x 2 (siehe Abb. 5 auf Seite 3) A: Zahnradschutzplatten (2) B: Motorschutzplatten (2) C: Schutzplatten für Zahnräder Außenseite/Ecken (4) D: Befestigungsplatten Zahnräder Außenseite/Ecken (2) E: Befestigungsplatten Zahnräder Außenseite/Ecken (2) F: Befestigungsbügel Motor (1) G: Hauptplatte (1) H: Räder (6) I: Beine (6) J: Gummifüße (6) Montage (siehe Abb. Seite 4) c) Mechanische Montage 1. Montieren Sie die Kabel und die keramischen Kondensatoren des Typs 104 auf den Motoren (siehe Abb. 6 auf Seite 5) und befestigen Sie den Batteriehalter auf der Leiterplatte (siehe Abb. 7 auf Seite 5). Schließen Sie den Batteriehalter an den Batterieanschluss an (siehe "4.a) Batteriemontage"). Der Farbcode für die Kabel sieht so aus: 1=grün, 2=gelb, 3=orange, 4=blau 2. Befestigen Sie die Leiterplatte am Zahnradkasten und führen Sie die Leitungen durch die Öffnungen an der Rückseite des Roboters (siehe Abb. 8 Seite 5). 3. Befestigen Sie die Fühler (es gibt zwei Methoden, siehe Abb. 9 auf Seite 5). 4. Verbinden Sie die Kabel mit den Pins auf den M-Anschlüssen (siehe Abb. 10 auf Seite 6). 5. Befestigen Sie das Gehäuse an dem Rest des Gerätes.(siehe Abb.11 auf Seite 6). KSR5 20 VELLEMAN 5. Schaltplan (siehe Abb.12 Seite 6) 6. Bedienung 1. Stellen Sie den Schalter in die “ON”-Position; der KSR5 wird vorwärts bewegen. Wenn er ein Hindernis detektiert, wird er rückwärts gehen und eine Bewegung in zwei Schritten gemäß den Anwenderseinstellungen ausführen. Nachher wird der KSR5 wieder vorwärts gehen. 2. Verwenden Sie die Jumper zum Bestimmen wie der KSR5 auf ein Hindernis reagiert: -siehe Tabelle untenA und B bestimmen die Handlung der linken Beine/Räder, C und D bestimmen die Handlung der rechten Beine/Räder. Sorgen Sie dafür, dass es immer einen Jumper auf A oder B und C oder D gibt (immer wenigstens 2 Jumper). 3. Auch das Timing des KSR5 kann bestimmt werden, indem Sie (einen) Jumper auf TJ1 und/oder TJ2 und/oder TJ3 befestigen. Mit einem Jumper auf 1 der drei TJ's wird die Bewegung ± 1 Sekunde dauern. Mit zwei Jumpern wird die Bewegung ungefähr 2 Sekunden dauern. Mit drei Jumpern dauert die Bewegung ungefähr 3 Sekunden. 7. Probleme und Lösungen 1. Überprüfen Sie, ob alle Komponenten auf der Leiterplatte sich an der richtigen Stelle befinden. Achten Sie auf die Polarität der LEDs, IC's und Dioden. 2. Sorgen Sie dafür, dass alle Kabel korrekt angeschlossen sind. 3. Schmieren Sie die Achsen der Zahnräder mit feinem Maschinenöl wenn der KSR5 nicht störungsfrei läuft. Alle Änderungen vorbehalten. KSR5 21 VELLEMAN
