FIAT 500 Bodyside Molding ALL LANGUAGES.FH11
Anuncio
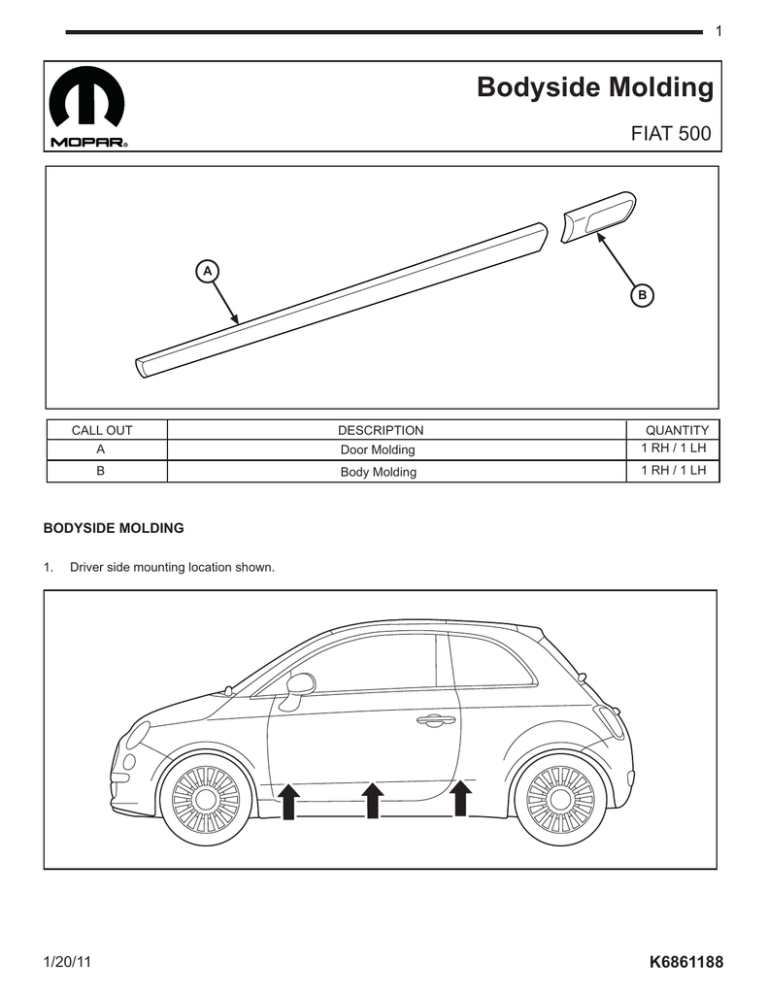
1 Bodyside Molding FIAT 500 A B CALL OUT A DESCRIPTION Door Molding QUANTITY 1 RH / 1 LH B Body Molding 1 RH / 1 LH BODYSIDE MOLDING 1. Driver side mounting location shown. 1/20/11 K6861188 2 2. Locate the body trim line along the lower portion of the door. Use alcohol to thoroughly clean the outer door surface above and just below this line from the front edge of the door to the rear wheel well. 3. Apply a low-tack masking tape to the outer door as a guide. Visually align this tape strip so the top edge touches the body trim line. Be sure to extend this tape beyond the front edge of the door and back towards the rear wheel well, maintaining a straight line all along the body. 110°F (43°C) 70°F (21°C) 1/20/11 K6861188 3 4. Carefully peel the liner from the adhesive backing on the door molding strip. Visually align the bottom edge of the molding with the top edge of the guide tape and press into place. Be sure the rear edge of the molding is aligned with the rear edge of the door. Be aware that the molding strip will not reach to the front edge of the door. A A A 5. Carefully peel the liner from the adhesive backing on the body molding strip. Visually align the bottom edge of the molding with the top edge of the guide tape and press into place. Be sure the front edge of the molding is aligned just behind the rear edge of the door. B B B 6. Using a roller or hand, apply pressure with 15 lbs force evenly all along the molding strips to insure proper adhesion. 7. Remove all masking tape from underneath molding strips. 8. REPEAT PROCEDURE FOR PASSENGER SIDE OF VEHICLE. 1/20/11 K6861188 4 Garniture latérale de carrosserie Bodyside Molding FIAT 500 A B RÉFÉRENCE A B DESCRIPTION QUANTITÉ Garniture de portière 1 droit / 1 à gauche Garniture de carrosserie 1 droit / 1 à gauche GARNITURE LATÉRALE DE CAROSSERIE 1. Côté conducteur montré. 1/20/11 K6861188 5 2. Localisez la ligne de démarcation de carrosserie le long de la partie inférieure de la portière. Nettoyez à fond la surface de la portière avec de lalcool des deux côtés de cette ligne et sur toute la longueur de la portière, à partir du rebord avant jusquau puits de roue arrière. 3. À titre de guide, appliquez un ruban à masquer à faible adhésion sur la portière. Appliquez ce ruban en alignant sa partie supérieure sous la ligne de démarcation de la carrosserie. Assurez-vous que lapplication de ce ruban se prolonge en ligne droite au-delà du bord avant de la portière et jusquau puits de roue arrière. 110°F (43°C) 70°F (21°C) 1/20/11 K6861188 6 4. Pelez délicatement le protecteur dadhésif à larrière de la garniture de portière. Alignez la bordure inférieure de la garniture au bord supérieur du ruban guide et collez-la en place. Assurez-vous que le bord arrière de la garniture arrive à égalité au bord arrière de la portière. Soyez avisé que la garniture ne rejoindra pas lextrémité avant de la portière. A A A 5. Pelez délicatement le protecteur dadhésif à larrière de la garniture de carrosserie. Alignez la bordure inférieure de la garniture au bord supérieur du ruban guide et collez-la en place. Assurez-vous que le bord avant de la garniture débute après le bord arrière de la portière. B B B 6. À laide dun roule au ou à la main, appliquez une pression ferme sur toute la longueur des garnitures pour assurer une bonne adhésion. Appliquer 15 livres de force. 7. Retirez tout le ruban guide sous les garnitures. 8. RÉPÉTEZ LA PROCÉDURE DU CÔTÉ PASSAGER. 1/20/11 K6861188 7 Bodyside Molding Moldura lateral de la carrocería FIAT 500 A B ELEMENTO DESCRIPCIÓN CANTIDAD A Moldura de la puerta 1 la izquierda / 1 la izquierda B Moldura de la carrocería 1 la izquierda / 1 la izquierda MOLDURA LATERAL DE LA CARROCERÍA 1. Se ilustra la ubicación de montaje del lado del conductor. 1/20/11 K6861188 8 2. Localice la línea de instalación de la moldura de la carrocería en la sección inferior de la puerta. Use alcohol para limpiar perfectamente la superficie exterior de la puerta y justo debajo de esta línea, desde el borde delantero de la puerta hasta el hueco del neumático trasero. 3. Aplique cinta de enmascarar con adherencia leve a la superficie exterior de la puerta a fin de que sirva como guía. Alinee visualmente esta tira de cinta de modo que el borde superior toque la línea de de instalación de la moldura en la carrocería. Cerciórese de extender la cinta más allá del borde delantero de la puerta y del hueco del neumático trasero, conservando una línea recta a lo largo de la carrocería. 110°F (43°C) 70°F (21°C) 1/20/11 K6861188 9 4. Desprenda cuidadosamente el protector del refuerzo adhesivo provisto en la moldura. Alinee visualmente el borde inferior de la moldura con el borde superior de la cinta que sirve como guía y ejerza presión para acomodarla en su lugar. Compruebe que el borde trasero de la moldura está alineado con el borde trasero de la puerta. Tenga en cuenta que la tira de la moldura no llegará hasta el borde delantero de la puerta. A A A 5. Desprenda con cuidado el protector del refuerzo adhesiva de la moldura. Alinee visualmente el borde inferior de la moldura con el borde superior de la cinta que sirve como guía y ejerza presión para acomodarla en su lugar. Compruebe que el borde superior de la moldura está alineado justo detrás del borde trasero de la puerta. B B B 6. Utilice un rodillo o la mano para ejercer presión sobre las molduras a fin de garantizar la adhesión correcta. Aplican 15 libras de fuerza. 7. Retire el residuo de cinta de enmascarar que quede debajo de la moldura. 8. REPITA EL MISMO PROCEDIMIENTO EN EL LADO DEL PASAJERO DEL VEHÍCULO. 1/20/11 K6861188
