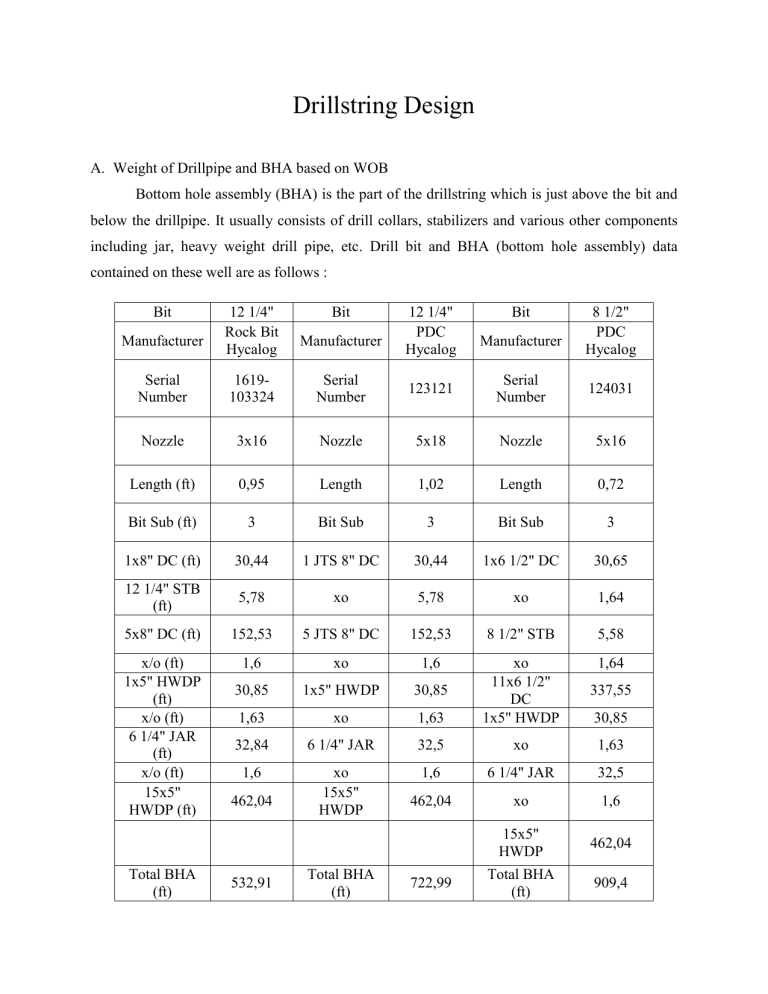
Drillstring Design A. Weight of Drillpipe and BHA based on WOB Bottom hole assembly (BHA) is the part of the drillstring which is just above the bit and below the drillpipe. It usually consists of drill collars, stabilizers and various other components including jar, heavy weight drill pipe, etc. Drill bit and BHA (bottom hole assembly) data contained on these well are as follows : Bit Manufacturer 12 1/4" Rock Bit Hycalog Bit Manufacturer 12 1/4" PDC Hycalog Bit Manufacturer 8 1/2" PDC Hycalog Serial Number 1619103324 Serial Number 123121 Serial Number 124031 Nozzle 3x16 Nozzle 5x18 Nozzle 5x16 Length (ft) 0,95 Length 1,02 Length 0,72 Bit Sub (ft) 3 Bit Sub 3 Bit Sub 3 1x8" DC (ft) 30,44 1 JTS 8" DC 30,44 1x6 1/2" DC 30,65 12 1/4" STB (ft) 5,78 xo 5,78 xo 1,64 5x8" DC (ft) 152,53 5 JTS 8" DC 152,53 8 1/2" STB 5,58 x/o (ft) 1x5" HWDP (ft) x/o (ft) 6 1/4" JAR (ft) x/o (ft) 15x5" HWDP (ft) 1,6 xo 1,6 1,64 30,85 1x5" HWDP 30,85 337,55 1,63 xo 1,63 xo 11x6 1/2" DC 1x5" HWDP 32,84 6 1/4" JAR 32,5 xo 1,63 1,6 xo 15x5" HWDP 1,6 6 1/4" JAR 32,5 462,04 xo 1,6 15x5" HWDP 462,04 Total BHA (ft) 909,4 Total BHA (ft) 462,04 532,91 Total BHA (ft) 722,99 30,85 WOB (lb/ft x 1000) 5 sampai 10 WOB (lb/ft x 4 sampai 7 1000) Table 9.1 WOB (lb/ft x 1000) 5 sampai 10 And parameters of the drill bit is used for the depth interval of the well can be seen in the table below Section 1 2 Bit Data Nozzle Depth Interval (ft) WOB (klbs) RR 12 1/4” Rock Bit S/N 1619-103324 3x16 572 – 1208 5 – 10 RR 12 1/4” PDC S/N 123121 5x18 1208 – 1874 4–7 RR 8 1/2” PDC S/N 124031 5x18 1874 – 3610 5 – 10 Table 9.2 The pendulum principle was originally used to drill vertical wells with slick (non stabilised) BHAs.The physical properties of the various downhole components of the BHA have a significant effect on how the bit will drill. The principle uses the weight of the BHA hanging below the tangent point to produce, via gravity, a force that pushes the bit to the low side of the hole. The effect of the pendulum varies with the length of the BHA below the tangent point. The fundamental pendulum assembly increases the restoring force by increasing the pendulum length with a stabiliser in the proper position. When the drillstring is lowered into the borehole, the total length of the drillstring is under tension due to its own weight which is partly counterbalanced by the buoyancy. To drill a well, the rock beneath the bit has to be destroyed. Part of this destruction force is obtained by a certain amount of weight on bit (WOB) which forces the bit against the rock. Therefore during drilling, the lower part of the drill string is set under compression, leaving the upper part of it still under tension. When drilling vertical wells, standard practice is to avoid putting ordinary drill pipe into compression (recommended by Lubinski in 1950). This is achieved by making sure that the “buoyed weight” of the drill collars and HWDP exceed the maximum WOB. The buoyed weight of the drill collars is the amount of weight that must be supported by the derrick when collars are run in the hole. This load is always less than the in-air weight if mud is used in the well. The higher the weight on bit, the more the assembly will bend. This can move the tangent point nearer to the bit and hence is detrimental to the effectiveness of the assembly. Furthermore, the side force at the bit, produced by the weight on bit, acts against the pendulum force. Weight on bit as low as possible is desirable for a pendulum assembly. WOB data are available for each type of bits from this well, we can determine the weight of BHA minimum in air using the formula below. Required air weight of BHA = Maximum WOB x safety factor buoyancy factor x cosθ ...................................................9.1 where the safety factor = 1 + percentage safety margin 100 ......................................................................9.2 and The BF (buoyancy factor), assuming that the drillstring is not lowered empty (ρsteel = 65.5 ppg), can be computed as : ρ BF = (1 − ρ mud ) ....................................................................................................................9.3 steel The normal drill string design practice aim is to avoid abrupt changes in component cross sectional areas. Abrupt changes can lead to concentrations in bending stresses which in turn can lead to a twist off (Refer to figure 9.1). The ratio I/C between the moment of inertia (I) and radius (C) of the pipe is directly related to the resistance to bending. The following are used to determine the section modulus I/C: I = Moment of inertia ...........................................................................................................9.4 𝜋 = 64 𝑥(OD4 -ID4 ) 𝜋 C = 64 Radius of the tube .....................................................................................................9.5 = OD 2 At a crossover from one tubular size to another size, the ratio (I/C large pipe)/(I/C small pipe) should be less than 5.5 for soft formations and less than 3.5 for hard formations. Ratio = I/C Drill Collars I/C Drill Pipes ............................................................................................................9.6 Drill pipe will be subjected to serious damage if run in compression. To make sure the drill pipe is always in tension, the top 10 to 15% of the drill collar or HWDP must also be in Figure 9.1 tension. This gives a safety margin and keeps the buoyancy neutral point within the collars when unforeseen forces (bounce, hole friction, deviation) move the buckling point up into the weaker drillpipe section or this will put the change over from tension to compression, or neutral zone, down in the stiff drill collar string where it is desirable and can be tolerated. According to Lubinski, the neutral point is defined as point along the drillstring where it is divided into two parts, an upper part, being suspended from the elevators and which is under tension as well as a lower part that generates the appropriate WOB and is under compression. Since the collars are under compression, they will tend to bend under the applied load. The amount of bending will depend on the material and the dimensions of the collar. The shape of the drill collar may have a circular or square cross section. A string of square collars provides good rigidity and wear resistance, but it is expensive, has high maintenance costs for certain conditions and may become stuck in key-seated dog-leg. Typically, standard and spiral drill collars with external grooves cut into their profile may be used to reduce the contact area between the BHA and the formation. Using equation 9.3 and the data of the mud used in these wells are shown in Table 9.3, the obtained BF (buoyancy factor) in Table 9.8. Depth (ft) 572 953 1190 1198 1870 1877 2569 2983 3159 3457 Mud Weight Yield Point (ppg) (lb/100ft2) 8,7 10 8,8 10 9 12 9,2 13 9,2 14 9,2 8 9,3 11 9,4 12 9,4 14 9,4 14 Table 9.3 For the portion of pendulum BHA below the tangent point or first drill string stabiliser, it is desirable to run drill collars with the largest possible outside diameter. But potential problems associated with fishing the drill collars must be considered in the design stage. Due to lack of data, the selection of drillpipe with a size of 5" OD and drillcollar 8" OD based on the table below from ENI which illustrates the possibility and acceptability for 12 1/4 “ hole of soft formations. Hole size (in) 12 1/4" Drill collar / Drill pipe I/C I/C Ratio DC 9 1/2" x 3" 83,8 1,5 55,9 5,2 10,7 1,9 5,7 - DC 8 1/4" x 2 13/16" HWDP 5" x 42.6 lb/ft DP 5" x 19.5 lb/ft Table 9.4 Remarks OK for soft formations Here is the dimensional data and performance properties of new drill pipe 5" OD from API RP7G Weight (lb/ft) OD (in) Approx. Wt. Incl. Tube & Joint (lb) Plain End ID (in) Section Wall Area Thickness Body of (in) Pipe (sq.in) 16,25 14,87 4,408 0,296 19,5 17,93 4,276 0,362 5 Grade E X-95 4,3743 G-105 S-135 E X-95 5,2746 G-105 S-135 Table 9.5 Torsional Tensile Collapse Burst Yield Yield Pressure Pressure Strength Strength (psi) (psi) (ft.lb) ** (lb) 35.040 44.390 49.060 63.080 41.170 52.140 57.600 74.100 328.070 415.560 459.300 590.530 395.600 501.090 553.830 712.070 6.940 8.110 8.620 9.830 10.000 12.030 13.000 15.670 Therefore chosen drillpipe size 5 “x 3” and drillcolar size 8 “x 3”. Proved by calculating the ratio of the I/C at a crossover from one tubular size to another size by using equation 9.6, its value is less than 5.5. Drill collar / Drill pipe (in) I/C I/C Ratio DC 8” x 3” 49,3 4,607476636 HWDP 10,7 1,877192982 DP 5” x 4.276” 5,7 - Remarks Between DC and HWDP Between HWDP and DP - Table 9.6 There is heavy weight drillpipe on bottom hole assembly, the dimensional data and performance properties of HWDP from the drilling data book of Baker Huges company can be seen in the table 9.7. 7.770 9.840 10.880 13.990 9.960 12.040 13.300 17.110 TUBE Nom. Tube Dim. Nom size (in) ID (in) Weight Upset Sec. Wall Thick. (in) Center (in) Ends (in) Perform. Prop. Tensile Torsional Yield(lb) (ft.lb) Approx. Wt. Incl. Tube & Joint (lb) Range II Range III lb/ft lb/jt 30ft lb/ft lb/jt 45 ft 3 1/2 2 1/16 0,719 4 3 5/8 345.400 19.535 26 810 - - 4 2 9/16 0,719 4 1/2 4 1/8 407.550 28.745 28 870 - - 4 1/2 2 3/4 0,875 5 4 5/8 548.075 40.625 42 1290 40 1745 5 3 1 5 1/2 5 1/8 691.185 Table 9.7 56.365 50 1550 48 2090 Using equation 9.1 and equation 9.3 with a safety margin of 10% gained weight drillpipe and BHA are shown in the following table Interval Depth (ft) MW ratarata (ppg) Max Required air WOB weight of (lbfx1000) BHA (lb) 0,862900763 10 12747,69993 LBHA (ft) LDP (ft) WDP in air (lb) 532,91 675,09 13164,255 7 8958,259325 722,99 1151,01 22444,695 10 12826,8057 909,4 2700,6 52661,7 BF 572-1208 8,98 12089,2 0,859541985 1874 18749,328571429 0,857579062 3610 Table 9.8 The length of drillpipe in the above table is obtained using the following formula LDP = Depth − LBHA ..............................................................................................................9.7 While the weight of drillpipe obtained using the formula below WDP in air = LDP x API approximate weight .........................................................................9.8 B. Chart of Tension and Compression along Drillstring The tension load is evaluated using the maximum load concept. The tension load can be evaluated after the weights, grades, and section lengths have been established from the collapse designs. Buoyancy is included in the design to represent realistic drilling conditions due to the manner in which biaxial stresses alter the collapse properties of the pipe. The tension design is established by consideration of the following: 1. Tensile Forces: These include: weight carried shock loading bending forces 2. Design factor 3. Slip Crushing Design The tension design line is established as the maximum load resulting from applying three different design considerations, including overpull, design factors,and slip crushing. Each consideration is applied separately to the load line. The design line is selected as the worst case from the three design loads. A minimum overpull factor is applied to the tension load. The difference between the maximum allowable tension and the calculated load represents the Margin of Over Pull (MOP). MOP is the minimum tension force above expected working load to account for any drag or stuck pipe. The minimum recommended value of MOP is 60.000 lb and it shall be calculated for the topmost joint of each size, weight, grade and classification of drill pipe. The anticipated total depth with next string run and expected mud weight should be considered when calculating the MOP.A typical range for the overpull value is 50.000-100.000 lb. When deciding on the magnitude of the MOP, the following should be considered: Overall drilling conditions Hole drag Likelihood of getting stuck (may require higher values of MOP) When the depth is reached where the MOP approaches the minimum recommended value, stronger drill pipe shall be added to the string. A range of tension design factors has been frequently used for drillpipe design. This range is typically from 1,1-1,5 although 1,1-1,3 seems to be most common. A design factor of 1,6 should be applied to the tension loads calculated above if shock loading is not accounted for.The primary purpose of the design factor is to ensure an overdesign of the pipe to minimize the catastrophic problem of pipe parting near the surface when the pipe is fully loaded. In addition, it is selected to account for acceleration loading of the pipe, which occurs when the slips are set. The maximum allowable tension load must also be designed to prevent slip crushing. In an analysis of the slip crushing problem, Reinhold and Spini, and also Vreeland, proposed an equation to calculate the relation between the hoop stress (SH ) caused by the action of the slips and the tensile stress in pipe (ST) resulting from the load of the pipe hanging in the slips. The equations used are as follows: S Ts = TL ( SH) ...........................................................................................................................9.9 T Where Ts = Tension load due to slip crushing Ts = Static load tension (SH /ST ) is hoop stress to tension stress ratio as derived from the equation bellow : S DK ST 2Ls ( H) = (1 + +( 0.5 DK 2 2Ls ) ) ..............................................................................................9.10 Where SH = Hoop stress (psi) ST = Tensile stress (psi) D = Outer Diameter of the pipe (in) 1 K = Later load factor on slips ( ) tan(y + z) y = Slip taper (typically 9° 27′ 45" or 9,4625 degrees) z = Arctan μ μ = Coefficient of friction, typically 0,06 − 0,14 Ls = Length of slips, usually 12 − 16 in In as much as tool joint lubricants are usually applied to the back of rotary slips, a coefficient of friction of 0.08 should be used for most calculations. To create a graph of tension and compression along the drillstring requires the following calculation. 1. Calculate the buoyancy force (BF1) acting on the bottom of the drill collars using: BF1 = −(P x A) ........................................................................................................9.11 π P = 0,052xDepth(ft)xMud Weight(ppg)x 4 (ODDC in)2 − (IDDC in) 2 ................9.12 2. Calculate the buoyancy force (BF2) acting at the top of the drillcollars. BF2 = (P x A) ...........................................................................................................9.13 Due to the well drillstring consists of drillcollar, HWDP, and drillpipe then the formula used to calculate P is as follows. π P = 0,052 x LDP x MW x 4 (ODDC )2 − (ODDP ) 2 ...................................................9.14 π + 0,052 x (Depth − LDC ) x MW x 4 (ODDC )2 − (ODHWDP ) 2 π + 0,052 x LDP x MW x 4 (IDDP )2 − (IDDC ) 2 3. Calculate the drill collar weight lb WDC in air ( ft ) = A (cross sectional area)x 1 ft x ρsteel ........................................9.15 π lb 1 = 4 x((OD in)2 − (ID in) 2 )x1 ft x (489,5 ft ) x 144 lb WDC in air (lb) = WDC in air ( ft )xLDC .....................................................................9.16 4. Calculate the shock load Shock load (lb) = 1500 x pipe weight per foot ...................................................9.17 Note : 1500 was used to represent slow running speeds. 5. Calculate the total dynamic and static load at surface Total dynamic load (lb) = BF1 + BF2 + drillcollar weight + drillpipeweight +shock load .............................................................9.18 Static load without shock load (lb) = BF1 + BF2 + drillcollar weight +drillpipe weight ..................................9.19 6. Static load at top of drillcollars (lb) = BF1 + WDC in air ...................................9.20 7. Static load at bottom of drillpipe (lb) = BF2 + Static load at top of drillcollars .......................................9.21 8. Dynamic load at bottom of drillpipe (lb) = Static load at bottom of drillpipe + shock load ..........................9.22 9. Calculate the design line for the tension load by multiplying the load on the drill pipe at surface and at the top of the collars by the 1,3 design factor (since shock loads have been included). 10. Calculate the design line for the MOP by adding the 50.000-100.000 lb overpull factor to the static tension load values calculated earlier. 11. Calculate the design line for slip crushing using equation 9.9 and equation 9.10 with TL = static load at surface without shock load. Assumes production test zone or DST (Drill Stem Test) packer depth was just above the BHA, the design factor of 1.3 for the tension. For the interval depth 572-1208 ft MOP 100.000 lb and for the interval 1208-3610 ft MOP 60.000 lb. Using equations above, obtained the following Static & dynamic loads and complete tension design graph along the drillstring for each type of bit and BHA used. The results of the calculations can be seen in the table 9.9, 9.10, and 9.11 Bit Data Tension Load Line Bouyant force Bouyant acting on the force acting top of the on the top of collars / BF1 the collars / (lb) BF2 (lb) Drill collar weight (lb) Drillpipe Weight (lb) HWDP weight (lb) Shock load (lb) RR 12 1/4" Rock Bit S/N 1619-103324 -24366,83853 26490,28689 28156,46621 13164,255 25390,08 29250 RR 12 1/4" PDC S/N 123121 -38726,95299 45532,75167 28156,47 22439,43 25450,56 29250 RR 8 1/2" PDC S/N 124031 -75644,65695 97670,91262 55807,8 56291,43 25373,76 29250 Table 9.9 Bit Data Total dynamic load at surface (lb) Static load at surface without shock load (lb) Static load at top of drillcollars (lb) RR 12 1/4” Rock Bit S/N 1619-103324 98084,24956 68834,2496 3789,627675 30279,91456 59529,91456 RR 12 1/4” PDC S/N 123121 112102,2549 82852,25488 -10570,48679 34962,26488 64212,26488 RR 8 1/2” PDC S/N 124031 188749,2503 159499,2503 -19836,85227 77834,06035 107084,0603 Static load at bottom of DP+HWDP (lb) Dynamic load at bottom of DP+HWDP (lb) Table 9.10 Design line tension load Design line for MOP Design line for slip crushing Total Dynamic load at surface (lb) Dynamic load at bottom of DP+HWDP (lb) Static load at surface without shock load (lb) Static load at bottom of DP+HWDP (lb) SH/ST Slip crushing load at surface (lb) Slip crushing load at bottom of DP+HWDP (lb) RR 12 1/4" Rock Bit S/N 1619-103324 127509,524 77388,8889 168834,25 130279,915 1,299572579 89455,10325 39350,94667 RR 12 1/4" PDC S/N 123121 145732,9314 83475,94435 142852,255 94962,2649 1,29957258 107672,5 45436,001 RR 8 1/2" PDC S/N 124031 245374,0255 139209,2785 219499,25 137834,06 1,29957258 207280,9 101151,01 Bit Data Table 9.11 Static & Dynamic Loads RR 12 1/4" Rock Bit S/N 1619-103324 Compression (lb) -50000 0 Tension (lb) 50000 100000 150000 0 200 400 Dpeth (ft) Static Load line 600 Dynamic load line Dynamic load line x 1.3 800 1000 1200 1400 Figure 9.2 Complete Tension Design RR 12 1/4" Rock Bit S/N 1619-103324 Compression (lb) -50000 0 Tension (lb) 50000 100000 150000 200000 0 200 Static Load line Depth (ft) 400 Dynamic load line 600 100,000 lb overpull load line 800 Slip crushing design line 1000 1200 1400 Figure 9.3 Static & Dynamic Loads RR 12 1/4" PDC S/N 123121 Compression (lb) Depth (ft) -50000 0 Tension (lb) 50000 100000 150000 200000 0 200 400 600 800 1000 1200 1400 1600 1800 2000 Static Load line Dynamic load line Dynamic load line x 1.3 Figure 9.4 Comple Tension Design RR 12 1/4" PDC S/N 123121 Compression (lb) Depth (ft) -50000 0 Tension (lb) 50000 100000 150000 0 200 400 600 800 1000 1200 1400 1600 1800 2000 200000 Static Load line Dynamic load line 60,000 overpull load line Slip crushing design line Figure 9.5 Static & Dynamic Loads RR 8 1/2" PDC S/N 124031 Compression (lb) -100000 0 Tension (lb) 100000 200000 300000 0 Depth (ft) 500 1000 Static Load line 1500 Dynamic load line 2000 Dynamic load line x 1.3 2500 3000 3500 4000 Figure 9.6 Complete Tension Design RR 8 1/2" PDC S/N 124031 Compression (lb) -100000 0 Tension (lb) 100000 200000 300000 0 500 Static Load line Depth (ft) 1000 Dynamic load line 1500 60,000 lb overpull load line 2000 Slip crushing design line 2500 3000 3500 4000 Figure 9.7 Rig Sizing and Selection To determine the maximum load the rig then we should know the type of casing used. That way we will know the weight of the casing so as to obtain the maximum load of the rig that will be used. The type and weight of the casing is different for different sizes. To determine the amount of the maximum load sustained by the rig used the following formula, where the total load is the heaviest load to be lifted rig. 𝑙𝑏 𝑇𝑜𝑡𝑎𝑙 𝑊𝑒𝑖𝑔ℎ𝑡 (𝑙𝑏𝑠) = 𝐶𝑎𝑠𝑖𝑛𝑔 𝑊𝑒𝑖𝑔ℎ𝑡 (𝑓𝑡) × 𝐶𝑎𝑠𝑖𝑛𝑔𝐷𝑒𝑝𝑡ℎ (𝑚) × 3.281.................. 10.1 𝑅𝑖𝑔 𝐿𝑜𝑎𝑑 = 𝑇𝑜𝑡𝑎𝑙 𝐿𝑜𝑎𝑑 𝑛 × (𝑛 + 2) ........................................................................................10.2 In the optimal drilling operations , it is important for us to support the weight of the rig during operation. This is to prevent us from losses that may result, if the rig that we have " collapse ". In the calculation of the maximum load of the rig we use the formula given above. Rig load calculation we do for every case that we will attach to the wellbore, starting from the surface casing, intermediate casing, production casing, until the liner if necessary. Based on the given data and the assumption that the surface casing is a casing with OD 13 3/8 "with a grade of C-75 in accordance with the proposed casing which has been described previously as there was no surface casing of the data used in the development well, obtained rig load calculation as follows : Rig Load Casing Casing Weight Depth Total Weight Rig Load Grade lbm/ft m lbm lbm 13 3/8" C-75 68 571 127394,668 152873,6 9 5/8" K-55 36 1874,81 221445,058 265734,1 K-55 29 681,21 64816,45029 77779,74 N-80 23 785,74 59294,29762 71153,16 K-55 23 3610 272421,43 326905,7 Casing 7" Table 10.1 Nominal weight threads and coupling / casing weight obtained from reference Burgoyne book which is a minimum performance properties of casing based API. Specifications Type Casing used in this calculation Buorgoyne obtained from reference books . In this book , has included the things you need to know to perform the calculations . It - it is the grade of the casing, casing diameter and weight of the casing. In writing grade casing , we must know what it means. For example, H-40, H indicates a casing forming material specifications that we have (marked with the letter H or C, can also be other types). 40 states the minimum yield strength, which states how strong case that we have to hold the load, until deformed and cannot return to its original size, in this case 40,000 psi. Selected Nominal weight threads and coupling C-75 at table 10.1 is the least desirable because it produces smaller rig loads. Rig with a small load will make the selection of the rig that is not too big so that the costs would be even cheaper. This also applies to the selection of casing weight on the proposed design of the casing is selected and rig loads obtained in the following table. Rig Load Casing Casing Grade 13 3/8" 9 5/8" 7" C-75 L-80 H-40 Casing Weight lbm/ft 68 40 17 Depth m 571 1874,81 681,21 Total Weight lbm 127394,668 246050,0644 37995,85017 Rig Load lbm 152873,6 295260,1 45595,02 Table 10.2 Casing with most big rig loads, will be the limit for the selection of rigs that we use in drilling operations. Load biggest rig on calculations in both tables previously obtained amounted to 326,905.7 LBM design development well casing while the casing design proposed by 295,260.1 LBM. Therefore, it can be concluded that the proposed design of the casing would result in a smaller rig and the rig will be cheaper. Selection of the casing design development wells are more than likely caused by the unavailability of a lighter casing or drilling back to do so it is necessary for further development of the larger rigs ability to withstand the loads resulting from the use of casing. Productive Time and NPT It is important to realize that each step should follow the preceding steps in drilling without delay. Each step should take the least possible time with good practice. Non-productive time is the time spent during drilling operations that are not in accordance with the operating plan that has been designed previously or any time that has been spent for routine or abnormal operations which are carried out as a result of failure. From the existing data of development well, cannot be found any day intervals from the drilling process is done. However, there is a pie chart that contains percentage of each of the process compared to the total drilling time. Well Activity Run Csg 7% WOC Work BOP Test BOP 3% 8% 5% Drill Cmt LOT 3% 1% Cementing 2% Drill Cond./Circ. Log 8% Non-productive time 0% Trip Log Run Csg WOC Work BOP Trip 19% Drill 38,00% Test BOP LOT Cementing Drill Cmt Non-productive time Cond./Circ. 6% Figure 11.1 Therefore, from the available pie chart obtained the required time for each process can be seen in table below. Process Drill Cond. / Circ. Trip Log Run Csg WOC Work BOP Test BOP LOT Cementing Drill Cmt. Days 3,8 0,6 1,9 0,8 0,7 0,3 0,5 0,8 0,07 0,2 0,3 Total days productive time 9,97 Total day non0,03 productive time Table 11.1 And a comparison can be made between productive time and the NPT as shown below Well Activity Productive time (%) 100% Non-productive time (%) 0,30% Non-productive time (%) Productive time (%) Figure 11.2 The cause of the occurrence of Non-Productive Time is diverse, it can be due to the occurrence of rig down time, also when an error occurs that requires us to do fishing, or even abandon a well, which might happen if it turns out well that we drill dry hole. Differential sticking, mechanical sticking, and lost circulation are the main events which cause NPT in the drilling industry. In operations, there are also weather down time, this is because there is the possibility of a storm that would impede the course of the operation. Simply NPT classified into three types: o Repair Time o Rectification time o Client time Details of the NPT should be recorded by the operator on a daily basis and should be checked against historical NPT in the area to obtain trends and then arrive at solutions. Repair time is the time spent on repairs on the rig and related equipment during which drilling operations is shut down. Based on drilling activity summary data, there were repair in the blind ram BOP at 14-08-2009 when drilling stopped at a depth of 1874 ft which is included in the calculation of repair time. Any operation that might be carried out to place the well in safe conditions before attempting repair and on completion returning the well to former status, waiting on spare parts, weather or personnel before normal drilling operations are carried out also part of the calculation of repair time. Rectification time is the time spent in overcoming downhole problems that delay operations. In these wells that are part of the rectification time is at a depth of 1208 ft was decided to replace the rock bit with the PDC bit, it is because the very low rate of drilling at that depth using rock bit. In addition, there are other problems which are at a depth of 1827 ft overpull of 40,000 lb while being carried POOH 12 1/4" PDC bit f / 1874 ft to 1827 ft and the overpull at a depth of 1796 ft 47,000 lb while being carried POOH 12 1/4" PDC bit f / 1874 ft to 1802 ft on 12-08-2009. Examples of other issues are freeing stuck pipe, fishing lost cones, squeeze cement, and well kill operation. The NPT time includes normal operations such as POOH, RIH, circulating etc. It is as if these operations are not part of the drilling process and they are merely carried out to get us to where we were before the problem. While the client time is the time spent on operations requested by client that was not included in the drilling program earlier. These are not NPT, but indirectly linked and might affect the AFE. Operations are plugging back extra coring, and extra logging. Based on existing data such as overpull, drill bit replacement, and repairs blind ram BOP, it can be concluded that the NPT should be greater than the actual value of the NPT which is listed on the pie chart on the data provided. In the drilling operation, which we want is the smallest of the NPT, we do not want any additional drilling time period of the plan that we have the previous design . This would increase our expenses in renting rigs, which are quite expensive. Accurate calculation of NPT is essential if the operator attempts to improve future drilling operations. Directional Well Design A. Consideration for Directional Well Design Directional drilling is the process of directing the wellbore along some trajectory to a predetermined target. It includes selecting the most appropriate survey techniques, defining the best control tools, researching applicable government regulations, and gathering pertinent geological data. In addition, the directional program may alter or affect the casing and cement program, hydraulics, centralization and completion techniques. Directional drilling is required when : 1. Reaching a target which is below inaccessible or restricted areas such as a mountain, a highly populated area, a national park, etc., 2. Multiple wells have to be drilled from one offshore platform to deplete large portions of a reservoir from one structure, 3. Side tracking has to be done around a fish, 4. Fault drilling is necessary, 5. Salt dome drilling takes place, 6. Drilling a relief well to intersect a blowout well, 7. Sidetracking from an old well to explore different horizons and/or directions. When drilling a well, formations are often encountered that are under a different pressure regime. These formations are named to be “abnormally pressured”. Abnormal pressures can be positive which means actual formation pressures are higher than hydrostatic pressure. Directional wells are drilled to avoid drilling a vertical well through a steeply inclined fault plane where abnormal pressure develop and may lead to slip and shear the casing. This fault in sedimentary rocks is caused by tectonic activities. Sedimentary beds are broken up, moved up and down or twisted. There are a variety of reasons why abnormal pressure develop due to faulting: 1. The fault plane act as a seal against a permeable formation thereby preventing further pore fluid expulsion with compaction. The permeable zone will become overpressured. 2. If the fault is non sealing, it may transmit fluids from a deeper permeable formation to a shallower zone, causing abnormal pressures in the shallow zone. 3. A zone may move down the fault plane causing the zone to be subjected to a higher overburden pressure and higher geothermal temperature. If the zone further compacts and the pore fluids cannot escape, abnormal pressure will result. 4. Rate of sedimentation usually increases on the downthrown block and this rapid sedimentation can lead to undercompaction and development of overpressure. At the beginning of the Middle Miocene is the beginning of the movement of compressible in South Sumatra Basin. History of the formation of the basin since the Middle Miocene is characterized by regression cycles reflected by Air Benakat formations, which cover Gumai formation. Air Benakat formations deposited in the marine environment to the deep sea, consisting of claystone at the bottom that changes gradually became dominant sandstone to the top. Regionally lithology penetrated by the well is included in the South Sumatra basin stratigraphic order in which zones are the prospects of Air Benakat sandstone formations. These wells are located in the south of reverse fault trending east-west relative (Thrown Down Block). Through this knowledge it is known manufacture directional drilling will turn before the indication of clay and rock layers should not lead to the south where there is a reverse fault. The study analyzes the integration of sedimentology and log data ever conducted, provides an overview of the delta depositional environment Air Benakat formation. Existing deposition system is a variation of sediment delta front which is believed deposited on the transition conditions between fluvial and marine. Sandstones in the sediment is interpreted as distributary channels and delta front of the bar mounth relatively not affected by fluvial processes or tidal processes. This is another consideration which is expected to be a lot of oil reserves that can be taken by applying directional drilling in the layer. Of course this requires further studies and surveys as well as the calculation of the economics of the directional drilling. We can use the MWD (Measurement While Drilling) which is a tool to increase the drilling efficiency (stick-slip), be applied to detect the abnormal formation pressures or any kind of hole problems that may occur on the reverse fault in Air Benakat formation that can help in designing directional drilling. B. Data for Directional Well Design The values that must be identified for directional well design are as follows: 1. lateral, or horizontal, displacement from the target to a vertical line from the rig site 2. kickoff point (KOP) 3. desired build angle rate 4. final drift angle 5. plan type: L type, S type, and J type The selection of KOP (kick-off point) and the build-up rate depends on several being hole pattern, casing program, mud program, required horizontal displacement and maximum tolerable inclination. Choice of kick-off points can be limited by requirements to keep the well path at a safe distance from existing wells. The higher in the hole the kickoff point, the lower the dogleg severity needs to be in order to minimize fatigue in the drill string through the build section. It may not always be possible to drill a directional well and not cause some fatigue in the drill string or to keep the inclination below 30°. It depends upon the target departure. With high departure targets, high inclinations will be required. The build angle rate describes the amount of angle build up below the KOP until the drift angle reaches the desired value. The build-rate can be chosen to minimize fatigue in drill pipe, minimize keyseat possibility, or help to minimize torque and drag. Build-up rates are usually in the range 1.5°/100 ft M.D. to 4.0°/100 ft M.D. for normal directional wells. The build rate is chosen trying to keep below the endurance limit of the drill string in order to minimize the possibility of fatigue damage. When drilling directional wells the Directional Contractor should be asked to provide an assessment of the required BHA changes, motor requirements and any limitations on bit operating parameters which may impact on the selection of bits. In addition bit characteristics in terms of walk, build and drop tendencies will need to be assessed for their impact on the well path. The double cone profile allows more cutters to be placed near the gauge giving better gauge protection and allowing better directional control. Diamond side tracking bits are designed to drill “sideways” making it a natural choice for “kicking off” in directional drilling situations. Window cutting through casing using diamond bits is now an effective, field-proven method for re-entering older wells to increase production, to apply directional drilling techniques, or to sidetrack. Using permanent casing whipstocks and specially designed diamond bits, wider and longer windows are cut when sidetracking. Since gravity acts vertically, only the weight of the along component of the BHA elements will contribute to the WOB. The problem this creates is that if high WOB is required when drilling a high inclination borehole, a long and expensive BHA would be needed to prevent putting the drillpipe into compression. However, for high inclination wells, it is common practice to use about the same BHA weight as used on low inclination wells. On highly deviated wells, operators have been running drillpipe in compression for years. If drilling a horizontal well, the build rate may be selected based on steerability of the bottomhole assembly. In practice, BHA weight for steerable assemblies on typical directional wells is not a problem for the following reasons : The WOB is usually fairly low, especially when a PDC bit is used. When the drillstring is not rotated, the drill pipe is not subjected to the cyclical stresses which occur during rotary drilling. Therefore, sinusoidal buckling can be tolerated when there is no rotation of the drillstring. Helical buckling however, must be avoided. Analysis of drillpipe buckling in inclined wells, by a number of researchers has shown that drillpipe can tolerate significant levels of compression in small diameter of high inclination boreholes. This is because of the support provided by the “low-side” of the borehole. Drillpipe is always run in compression in horizontal wells, without apparently causing damage to the drillpipe. Selection of the drill pipe grade is based upon predicted values of pick-up load. For a directional well, the prediction of pick-up load is best obtained using a Torque and Drag program, as well as including the capacity for overpull. Maximum permissible dogleg severity must be considered when choosing the appropriate rate. In practice, well trajectory can be calculated for several KOPs and build-up rates and the results compared. The optimum choice is one which gives a safe clearance from all existing wells, keeps the maximum inclination within desired limits and avoids unnecessarily high dogleg severities. When a number of drill collars are used in directional drilling, they produce a great amount of contact area with the low side of the hole. As the collars are rotated, this high friction contact with the hole wall causes the collars to climb the side of the wall. Rotating big, stiff collars through doglegs, developed in directional drilling, can cause very high-rotating torque and excessive bending loads at the threaded connections. HWDP (heavy weight drillpipe) bends primarily in the tube. This reduces the likelihood of tool joint fatigue failures occurring in the HWDP as it rotates through doglegs and hole angle changes. HWDP design offers less wall contact area between the pipe and hole wall which results in: Less rotary torque. Less chance of differential sticking. Less vertical drag. Better directional and hole angle control. L type wells are made up of a KOP, one buildup section and a tangent section up to the target. They are also called Build and Hold Trajectory or L Profile Wells. These wells are drilled vertically from the surface to kick-off point at a relatively shallow depth. From the kick off point, the well is steadily and smoothly deflected until a maximum angle and the desired direction are achieved (build). Then, if desired, casing is run and cemented. Further, the established angle and direction are maintained (hold) while drilling upto the target depth. Usually this method is employed when drilling shallow wells with single producing zones. Drop angle rates apply only in S plans, the S curve will drop angle prior to drilling into the target so entry is vertical. S type are made up of a vertical section, a kick- off point, a buildup section, a tangent section, a drop-off section and a hold section upto target. The S curve is selected primarily because it allows vertical entry into the target zone. Many operators believe that vertical entry may improve completion and production efficiency. And effective cement jobs may be easier to achieve in a vertical well. From the KOP, the well is steadily and smoothly deflected until a maximum angle and the desired direction are achieved (build). The angle and direction are maintained until a specified depth and horizontal departure has been reached (hold). Then, the angle is steadily and smoothly dropped (drop) until the well is near vertical. Finally the angle and direction is maintained till we reach the target depth. The S curve requires careful consideration prior to its implementation. Since the angle change will occur deeper in the well where the formations are harder, directional control may be more difficult. In addition, since angle dropping requires fewer stabilizers in the bottom-hole assembly (BHA), azimuth control problems may occur. If a high-angle hole is returned to the vertical position, keyseating may develop if a long section of vertical hole is drilled. The S curve will usually require 10-20% more drilling time than a L type. J type wells are made up of a vertical section, a deep kick off and a build up to target. They are also called Deep Kick off wells or J Profile wells (as they are J - shaped). They are similar to the Type I well except the kickoff point is at a deeper depth. The well is deflected at the kickoff point, and inclination is continually built through the target interval (build). The inclinations are usually high and the horizontal departure low. This type of well is generally used for multiple sand zones, fault drilling, salt dome drilling, and stratigraphic tests. It is not used very often.
