Teams Setup Guide
Configuring Users for Teams PSTN Calling
1 BEFORE YOU BEGIN
Before you begin the Teams admin setup you will need:
✓
✓
✓
✓
A user/login to your Office 365 account with Global Admin rights
Microsoft Phone System licence add-ons (or E5 licences) for the end users of the service
Access to the PBX to create/manage SIP credentials.
Ideally, one or two spare Office 365 user licenses such as Business Essentials/Premium or
E1/E3/E5, for a few hours during the initial setup.
2 Overview
To enable the Teams Calling service the following steps are required:
•
•
•
•
•
Gather SIP Credentials from the PBX
Purchase and assign Microsoft Phone System (or E5) licences
Set up the PBX service
Set up the Teams service
Create users in the service portal and connect them to your PBX service.
2.1 Gathering SIP credentials from the PBX
Note: All PBX systems are different, the example here is for illustration only.
Contact the PBX administrator for accessing the settings relevant to the PBX being
connected.
There are up to 5 pieces of information required to add a user:
1.
2.
3.
4.
5.
User DiD (Phone Number)
SIP Username
SIP Password
SIP Realm (sometimes called Domain)
Registrar / Proxy
This information can typically be found in the user’s PBX account settings on the
existing PBX. We recommend setting up a new device for use by AudioCodes Live on
Azure unless you are decommissioning the existing phone, or the PBX explicitly
supports multiple registrations with a single username.
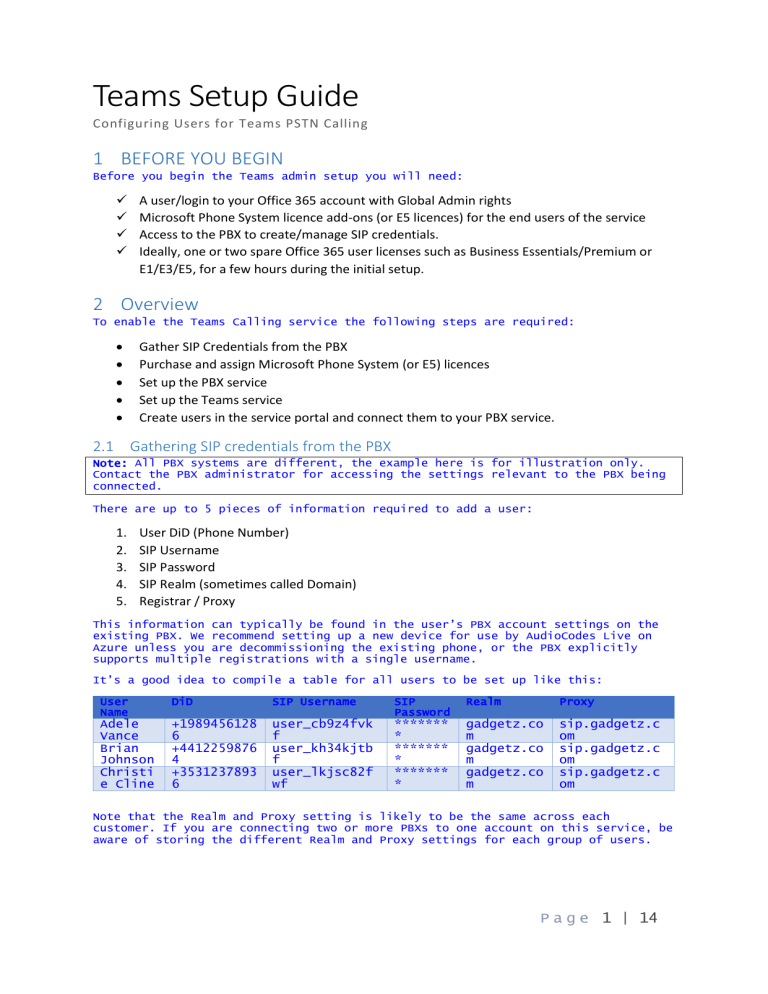
It’s a good idea to compile a table for all users to be set up like this:
User
Name
DiD
SIP Username
SIP
Password
Realm
Proxy
Adele
Vance
Brian
Johnson
Christi
e Cline
+1989456128
6
+4412259876
4
+3531237893
6
user_cb9z4fvk
f
user_kh34kjtb
f
user_lkjsc82f
wf
*******
*
*******
*
*******
*
gadgetz.co
m
gadgetz.co
m
gadgetz.co
m
sip.gadgetz.c
om
sip.gadgetz.c
om
sip.gadgetz.c
om
Note that the Realm and Proxy setting is likely to be the same across each
customer. If you are connecting two or more PBXs to one account on this service, be
aware of storing the different Realm and Proxy settings for each group of users.
P a g e 1 | 14
Teams Admin Setup Guide
2.2 Set up the PBX service
The set-up is split into two stages: Services and Users. Services are Customer-wide
settings such as the set-up of the connection to the existing PBX and the set-up of
the Office 365 tenant.
In the AudioCodes Live on Azure Portal, select the Services tab. Choose the desired
PBX from the list, or select ‘Custom’ if your PBX is not listed.
Settings appropriate to this PBX type are shown, for example:
Enter the required information into the page. The information will be shown as will
the option to add another PBX; an additional PBX entry would be used if you have
more than one PBX.
P a g e 2 | 14
Teams Admin Setup Guide
2.3 Set up the Teams service
In the Services area, the Teams tab will allow the creation of the Teams
configuration. The service automatically allocates endpoints based on the location
of the PBXs or SIP trunks. The Enable Sync function allows the portal to
automatically configure the service and set phone numbers directly into your Office
365 tenant.
Customers wishing to configure their tenant manually should untick the Enable Sync
option. Information for manual config is available in section 0.
Setup of Office 365 works best if you have two spare licenses such as Business
Essentials/Premium or E1/E3/E5. These spare licences are only required for a few
hours during the setup process and can be removed or re-assigned afterwards. If you
only have one spare license, then the set-up process also works but may take
longer. If you don't have any spare licenses, then additional manual activation
steps will be required.
At the point the service is enabled, the portal will request permission to make
changes to the voice configuration in Office 365
A request to log-in and two separate permissions windows will appear.
IT IS IMPORTANT TO LOGIN WITH THE CREDENTIALS FOR THE OFFICE 365 ACCOUNT BEING SETUP.
LOGGING IN WITH THE CREDENTIALS TO A DIFFERENT OFFICE 365 ACCOUNT WILL AUTHORIZE
CHANGES TO AN OFFICE 365 TENANT OTHER THAN THE ONE THAT SHOULD BE CONFIGURED.
The user account used must have Global Admin rights to the Customer’s Office 365
tenant for the initial setup and any changes to regions, and at least Skype for
Business admin rights for subsequent user provisioning.
P a g e 3 | 14
Teams Admin Setup Guide
There will be two or three pop ups requesting permission to enable the
administration activities to configure the Office 365 account.
P a g e 4 | 14
Teams Admin Setup Guide
Part of the sync adds special domains to the Office 365 account and activates them
for voice. This requires that a licensed user has their sign-in address changed to
each of these domains in turn for long enough for Microsoft to activate that domain
in the voice subsystem. The sync will do this automatically using the first of
these three methods that applies:
1. Use a spare license to create a user, then delete the user when done.
2. Change the sign-in address of the user whose credentials were specified for the sync if it has
an appropriate license, changing it back once done.
3. Change the sign-in address of an arbitrary user who has an appropriate license, changing it
back once done.
NOTE: the sync will wait up to 20 minutes for Microsoft to activate the domain
before giving up and restoring the sign-in address. In most cases this is more than
enough times, but occasionally the Microsoft subsystem that activates domains for
voice seems to stop working and it may be necessary to wait for a day before trying
again.
When the initial configuration is complete, the Sync button with show a green
checkmark.
Note: the portal normally requires authorization to an Office 365 account just
once, and this access authority is stored in Office 365. Access can be revoked at
any time (see section 0 to revoke access if needed).
P a g e 5 | 14
Teams Admin Setup Guide
Occasionally through the configuration process, the Sync Now button will change to
the blue button, this means that there are updates pending to be applied to the
Office 365 tenant.
2.3.1 Completing setup if there are no spare licenses
The sync will automatically detect if there are any spare licenses and will
complete without any further steps.
However, if you do not have a spare license then it will prompt for manual
intervention to complete activating the domains for voice. Section 0 shows this in
more detail.
2.4 Create the Users in the service portal
Selecting the Users tab will display the list of configured users along with their
Registration status.
In this section, new users can be created using the Add User function.
P a g e 6 | 14
Teams Admin Setup Guide
There are some important features of the Add User function to note:
A list of users will be displayed that are applicable for PBX Voice calls that will
have at least one of the following:
•
•
A phone system license
An E5 license
If a user has a phone number assigned in Office 365, this will show when the user
is selected:
Note: The padlock symbol above the phone number. If a user has a number already
assigned in Office 365 then the number will be sown here with the padlock closed.
If it is necessary to change the user’s phone number, then click the padlock to
unlock the field to enter a new phone number.
When this is unlocked, a new phone number can be added or edited for the user.
This will also be the behavior for users being set-up that do not have phone
numbers set in Office 365.
A phone number entered for a user will be pushed into the customer’s Office 365
configuration by the next Sync Now activity.
The remaining information to be entered for each user is the SIP Username and
Password as set in the PBX portal for the user’s device.
P a g e 7 | 14
Teams Admin Setup Guide
Remember to start a Sync Now activity after updating users, the Sync Now button
will show blue to alert that a sync is required.
2.5 Editing Users
In the user list, the user detail can be expanded using the small arrowhead next to
the username:
Click this element to expand the user detail:
At this stage the user information can be amended, or the user deleted. After
changes to a user, a Sync Now activity is required.
P a g e 8 | 14
Teams Admin Setup Guide
This completes the set-up process.
3 Configuration delays
Some elements of the configuration within Microsoft Office365 can be subject to
delays as information propagates between different parts of the Microsoft system.
This can vary from day to day, so we recommend that you aim to carry out these
steps at least 48 hours prior to your go-live date to allow for this. If you get an
unexpected error on any step, then we suggest waiting 24 hours and trying again
before reporting a problem to Microsoft.
4 Troubleshooting
If you encounter problems with these set-up steps for DNS or Teams dial-pad, please
refer to the separate Troubleshooting guide in the Downloads area of the portal.
P a g e 9 | 14
Teams Admin Setup Guide
5 Configuring Office 365 without the Sync Now feature
The Sync Now feature automates a complex setup process into a single click. Some
customers prefer not to delegate access rights to the AudioCodes Live on Azure
portal to do this for them, even though it only uses a temporary token that expires
after each sync, and wish to undertake the setup process manually.
This manual setup process should be undertaken by a competent Office 365
administrator who has good PowerShell experience. If there is already some PSTN
integration set up on the tenant, then these instructions will need to be modified
by an Office 365 PSTN voice expert to ensure they do not impact the existing
configuration.
The configuration is split into two sections: Tenant Configuration, which is
performed once on initial setup and again whenever a new region is required, and
User Configuration, which is performed for each user as they need to be enabled for
voice.
5.1 Tenant Configuration
Setting up the Office 365 tenant requires several actions to be performed:
•
•
•
Add 2 or more domains to the Office 365 tenant and validate them
Activate those domains for voice
Set up Teams Direct Routing using PowerShell
5.1.1 Add the domains and validate them
Make sure you have at least one PBX or Trunk created in the portal as this is used
to determine which region to allocate for the Teams service. Enable the teams
service, without the Enable Sync option.
The AudioCodes Live on Azure portal will show a list of domains. This is usually
two but may be more if you have PBXs or Trunks in many global regions. You need to
add these domains to your Office 365 tenant in the Office 365 admin portal.
As each domain is added, Microsoft will prompt you to validate it:
•
•
•
If given a choice of methods to validate the domains, pick the DNS TXT method
Copy the code provided by Microsoft into the AudioCodes Live on Azure portal for each
domain and click Save
In the Office 365 admin portal click to validate each domain.
5.1.2 Activate the domains for voice
For each domain that is added you need to trigger Office 365 to activate it for
voice. Microsoft’s documented method for achieving this is to set up a user a sign
in address using the new domain and wait a while. For each domain you need:
•
•
A user with a sign-in address in that domain
A license assigned which includes Skype for Business Online Plan 2 (e.g. Business Basic, E1,
etc)
If you have spare licenses then you can create new users, otherwise you will need
to pick existing users to disrupt for the duration of the activation.
It usually takes 5 minutes for the activation to occur but can occasionally take
several hours or days. See the next step for how to determine when activation has
completed.
Once the domain is activated for voice you can release the users; if you created
them using spare licenses then they can be deleted.
5.1.3 Set up Teams Direct Routing using PowerShell
Make sure you have the latest Teams PowerShell module installed.
https://docs.microsoft.com/en-us/microsoftteams/teams-powershell-install
Start a PowerShell session and sign in with a user who has the Global Admin or
Skype for Business Admin role:
P a g e 10 | 14
Teams Admin Setup Guide
Connect-MicrosoftTeams
Check that the domains have been activated for voice. Run this command and they
will appear in the list of domains once they are activated:
Get-CsTenant | Select-Object -ExpandProperty DomainUrlMap
Do not proceed until all the necessary domains are showing as activated.
Note: If you are familiar with Teams Direct routing then you might expect to be
configuring PSTN Gateways. However this is not necessary as these are defined in
the AudioCodes Live on Azure carrier tenant.
Edit the following PowerShell to replace the highlighted yellow parts with the real
domain names.
Set-CsOnlinePstnUsage `
-Identity Global `
-Usage @{add='PBX'}
New-CsOnlineVoiceRoutingPolicy `
-Identity PBX `
-OnlinePstnUsages PBX
New-CsOnlineVoiceRoute `
-Name Domain1 `
-Description PBX `
-Priority 0 `
-OnlinePstnGatewayList Domain1 `
-OnlinePstnUsages PBX `
-NumberPattern .*
New-CsOnlineVoiceRoute `
-Name Domain2 `
-Description PBX `
-Priority 1 `
-OnlinePstnGatewayList Domain2 `
-OnlinePstnUsages PBX `
-NumberPattern .*
$rule = New-CsVoiceNormalizationRule `
-Parent Global `
-Name PBX `
-Description PBX `
-InMemory `
-Pattern '^(\*[\*\d]+|[1-9]\d{0,5})$' `
-Translation ‘$1’ `
-IsInternalExtension $false
Set-CsTenantDialPlan `
-Identity Global `
-NormalizationRules @{ "add" = $rule }
P a g e 11 | 14
Teams Admin Setup Guide
5.2 User Configuration
Connect to Skype for Business PowerShell as per the tenant setup, then run the
following for each user, editing the highlighted yellow parts to match the user’s
UPN and telephone number. The telephone number must be in E164 format and begin
with a ‘+’, and the country code must match the country that is specified on the
license screen in the Office 365 admin portal.
Grant-CsOnlineVoiceRoutingPolicy `
-Identity mary@gadgetgloves.uk `
-PolicyName PBX
Set-CsUserPstnSettings `
-Identity mary@gadgetgloves.uk `
-AllowInternationalCalls $true
Set-CsUser `
-Identity mary@gadgetgloves.uk `
-OnPremLineURI 'tel:+441234567890' `
-EnterpriseVoiceEnabled $true `
-AudioVideoDisabled $false
P a g e 12 | 14
Teams Admin Setup Guide
6 Activating Domains for Voice without spare licenses
If you do not have a spare license, then the sync process will prompt for manual
intervention to complete activating the domains for voice:
Clicking on View Advice shows this:
Go to the Office 365 admin portal. The new domains have already been added and
validated automatically, so the only manual step is to assign each domain to a
licensed user to trigger Office365 to activate it for voice. This can either be
done by assigning each domain to a different user, or by using one user to activate
each domain in sequence.
P a g e 13 | 14
Teams Admin Setup Guide
After a few minutes click sync again, and once the sync completes successfully the
users can be changed back to their original domain in the Office365 admin portal.
If activating in sequence using a single Office 365 user, then keep checking the
View Advice link and when the current domain disappears move on to the next until
all are done.
P a g e 14 | 14
