figure a/figura a figure b/figura b
Anuncio
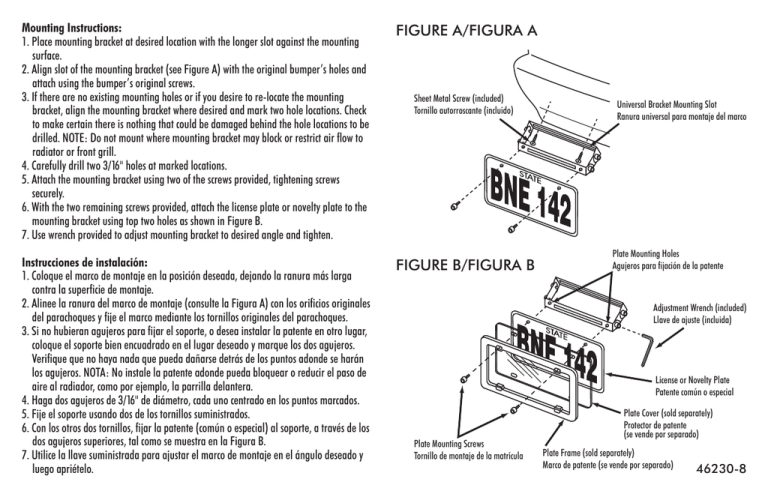
Mounting Instructions: 1. Place mounting bracket at desired location with the longer slot against the mounting surface. 2. Align slot of the mounting bracket (see Figure A) with the original bumper’s holes and attach using the bumper’s original screws. 3. If there are no existing mounting holes or if you desire to re-locate the mounting bracket, align the mounting bracket where desired and mark two hole locations. Check to make certain there is nothing that could be damaged behind the hole locations to be drilled. NOTE: Do not mount where mounting bracket may block or restrict air flow to radiator or front grill. 4. Carefully drill two 3/16" holes at marked locations. 5. Attach the mounting bracket using two of the screws provided, tightening screws securely. 6. With the two remaining screws provided, attach the license plate or novelty plate to the mounting bracket using top two holes as shown in Figure B. 7. Use wrench provided to adjust mounting bracket to desired angle and tighten. FIGURE A/FIGURA A Instrucciones de instalación: 1. Coloque el marco de montaje en la posición deseada, dejando la ranura más larga contra la superficie de montaje. 2. Alinee la ranura del marco de montaje (consulte la Figura A) con los orificios originales del parachoques y fije el marco mediante los tornillos originales del parachoques. 3. Si no hubieran agujeros para fijar el soporte, o desea instalar la patente en otro lugar, coloque el soporte bien encuadrado en el lugar deseado y marque los dos agujeros. Verifique que no haya nada que pueda dañarse detrás de los puntos adonde se harán los agujeros. NOTA: No instale la patente adonde pueda bloquear o reducir el paso de aire al radiador, como por ejemplo, la parrilla delantera. 4. Haga dos agujeros de 3/16" de diámetro, cada uno centrado en los puntos marcados. 5. Fije el soporte usando dos de los tornillos suministrados. 6. Con los otros dos tornillos, fijar la patente (común o especial) al soporte, a través de los dos agujeros superiores, tal como se muestra en la Figura B. 7. Utilice la llave suministrada para ajustar el marco de montaje en el ángulo deseado y luego apriételo. FIGURE B/FIGURA B Sheet Metal Screw (included) Tornillo autorroscante (incluido) Universal Bracket Mounting Slot Ranura universal para montaje del marco Plate Mounting Holes Agujeros para fijación de la patente Adjustment Wrench (included) Llave de ajuste (incluida) License or Novelty Plate Patente común o especial Plate Mounting Screws Tornillo de montaje de la matrícula Plate Cover (sold separately) Protector de patente (se vende por separado) Plate Frame (sold separately) Marco de patente (se vende por separado) 46230-8
