6a 6b 6c
Anuncio
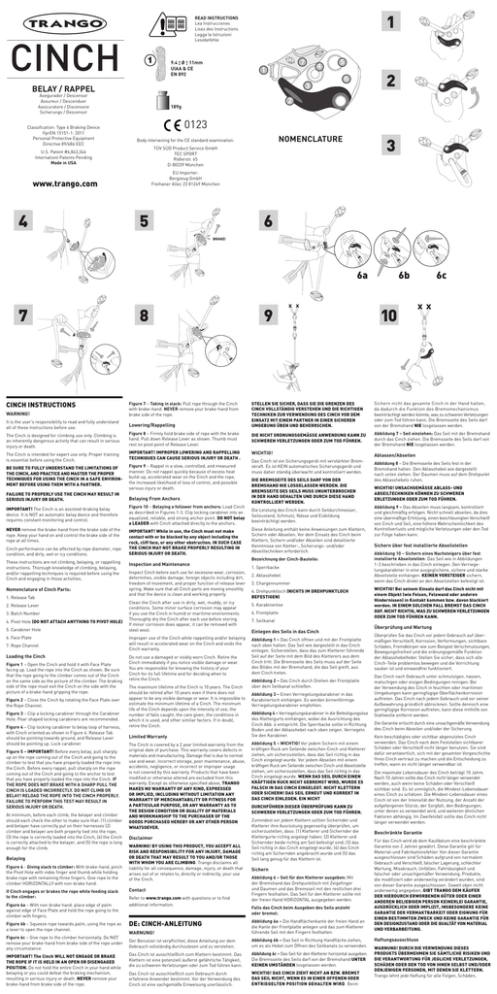
1 READ INSTRUCTIONS Lea Instrucciones Lisez des Instructions Legga le Istruzioni Lesebefehle CINCH 9.4 ‹ Ø ‹ 11mm UIAA & CE EN 892 7 1 Asegurador / Descensor Assureur / Descenduer Assicuratore / Discensore Sicherungs / Descensor 2 189g BRAKE! 0123 NOMENCLATURE Body intervening for the CE standard examination: EU Importer: Bergzeug GmbH Freihaner Allec 23 81249 München www.trango.com 5 6 BRAKE! BRAKE! BRAKE! BRAKE! X X X X BRAKE! X X X X 6a 7 1 7 3 TÜV SÜD Product Service GmbH TEC SPORT Ridlerstr. 65 D-80339 München U.S. Patent #6,843,346 Internationl Patents Pending Made in USA 4 2 6 3 BELAY / RAPPEL Classification: Type 6 Braking Device FprEN 15151-1: 2011 Personal Protective Equipment Directive 89/686 EEC 5 4 8 9 X X 4 3 2 6b 5 61 X X 7 X X 3 2 4 6c 5 6 10 X X 7 1 4 7 51 3 6 4 3 2 2 BRAKE! BRAKE! CINCH INSTRUCTIONS Figure 7 – Taking in slack: Pull rope through the Cinch with brake-hand. NEVER remove your brake-hand from brake side of the rope. STELLEN SIE SICHER, DASS SIE DIE GRENZEN DES CINCH VOLLSTÄNDIG VERSTEHEN UND DIE RICHTIGEN TECHNIKEN ZUR VERWENDUNG DES CINCH VOR DEM EINSATZ MIT EINEM PARTNER IN EINER SICHEREN UMGEBUNG ÜBEN UND BEHERRSCHEN. Sichern nicht das gesamte Cinch in der Hand halten, da dadurch die Funktion des Bremsmechanismus beeinträchtigt werden könnte, was zu schweren Verletzungen oder zum Tod führen kann. Die Bremsseite des Seils darf von der Bremshand NIE losgelassen werden. The Cinch is designed for climbing use only. Climbing is an inherently dangerous activity that can result in serious injury or death. Figure 8 – Firmly hold brake side of rope with the brake hand. Pull down Release Lever as shown. Thumb must rest on pivot point of Release Lever. DIE NICHT ORDNUNGSGEMÄSSE ANWENDUNG KANN ZU SCHWEREN VERLETZUNGEN ODER ZUM TOD FÜHREN. Abbildung 7 – Seil einziehen: Das Seil mit der Bremshand durch das Cinch ziehen. Die Bremsseite des Seils darf von der Bremshand NIE losgelassen werden. The Cinch is intended for expert use only. Proper training is essential before using the Cinch. IMPORTANT! IMPROPER LOWERING AND 5 7 RAPPELLING 4 5 7 1 4 TECHNIQUES CAN CAUSE SERIOUS INJURY OR DEATH . 1 WICHTIG! BE SURE TO FULLY UNDERSTAND THE LIMITATIONS OF THE CINCH, AND PRACTICE AND MASTER THE PROPER TECHNIQUES FOR USING THE CINCH IN A SAFE ENVIRONMENT BEFORE USING THEM WITH A PARTNER. Figure 9 – Rappel in a slow, controlled, and measured 3 2 of excess heat manner. Do not rappel quickly because 2 build-up, accelerated wear on the Cinch and the rope, the increased likelihood of loss of control, and possible serious injury or death. FAILURE TO PROPERLY USE THE CINCH MAY RESULT IN SERIOUS INJURY OR DEATH. Belaying From Anchors IMPORTANT! The Cinch is an assisted-braking belay device. It is NOT an automatic belay device and therefore requires constant monitoring and control. Figure 10 – Belaying a follower from anchors: Load Cinch as described in Figures 1-3. Clip locking carabiner into an equalized, reliable, and strong anchor point. DO NOT belay a LEADER with Cinch attached directly to the anchors. NEVER remove the brake-hand from the brake side of the rope. Keep your hand on and control the brake side of the rope at all times. IMPORTANT! While in use, the Cinch must not make contact with or be blocked by any object including the rock, cliff face, or any other obstruction. IN SUCH CASE THE CINCH MAY NOT BRAKE PROPERLY RESULTING IN SERIOUS INJURY OR DEATH. WARNING! X X It is the user’s responsibility to read and fully understand X X all of these instructions before use. Cinch performance can be affected by rope diameter, rope condition, and dirty, wet or icy conditions. These instructions are not climbing, belaying, or rappelling instructions. Thorough knowledge of climbing, belaying, and/or rappelling techniques is required before using the Cinch and engaging in those activities. Nomenclature of Cinch Parts: 1. Release Tab 2. Release Lever 3. Batch Number 4. Pivot Hole (DO NOT ATTACH ANYTHING TO PIVOT HOLE) 5. Carabiner Hole 6. Face Plate 7. Rope Channel Loading the Cinch Figure 1 – Open the Cinch and hold it with Face Plate facing up. Load the rope into the Cinch as shown. Be sure that the rope going to the climber comes out of the Cinch on the same side as the picture of the climber. The braking side of the rope must exit the Cinch on the side with the picture of a brake-hand gripping the rope. Figure 2 – Close the Cinch by rotating the Face Plate over the Rope Channel. Figure 3 – Clip a locking carabiner through the Carabiner Hole. Pear shaped locking carabiners are recommended. Figure 4 – Clip locking carabiner to belay loop of harness, with Cinch oriented as shown in Figure 4. Release Tab should be pointing towards ground, and Release Lever should be pointing up. Lock carabiner. Figure 5 – IMPORTANT! Before every belay, pull sharply up on the rope coming out of the Cinch and going to the climber to test that you have properly loaded the rope into the Cinch. Before every rappel, pull sharply on the rope coming out of the Cinch and going to the anchor to test that you have properly loaded the rope into the Cinch. IF THE ROPE DOES NOT BRAKE WITH A SHARP PULL THE CINCH IS LOADED INCORRECTLY. DO NOT CLIMB OR BELAY! RELOAD THE ROPE INTO THE CINCH PROPERLY. FAILURE TO PERFORM THIS TEST MAY RESULT IN SERIOUS INJURY OR DEATH. At minimum, before each climb, the belayer and climber should each check the other to make sure that: (1) climber and belayer have correctly put on their harnesses (2) climber and belayer are both properly tied into the rope, (3) the rope is correctly loaded into the Cinch, (4) the Cinch is correctly attached to the belayer, and (5) the rope is long enough for the climb. Belaying Figure 6 - Giving slack to climber: With brake-hand, pinch the Pivot Hole with index finger and thumb while holding brake rope with remaining three fingers. Give rope to the climber HORIZONTALLY with non-brake hand. If Cinch engages or brakes the rope while feeding slack to the climber: Figure 6a – With non-brake hand: place edge of palm against edge of Face Plate and hold the rope going to the climber with fingers. Figure 6b – Squeeze rope towards palm, using the rope as a lever to open the rope channel. Figure 6c – Give rope to the climber horizontally. Do NOT remove your brake-hand from brake side of the rope under any circumstance. IMPORTANT! The Cinch WILL NOT ENGAGE OR BRAKE THE ROPE IF IT IS HELD IN AN OPEN OR DISENGAGED POSITION. Do not hold the entire Cinch in your hand while belaying or you could defeat the braking mechanism, resulting in serious injury or death. NEVER remove your brake-hand from brake side of the rope. X X X Lowering/Rappelling X 6 3 6 Inspection and Maintenance Inspect Cinch before each use for excessive wear, corrosion, deformities, visible damage, foreign objects including dirt, freedom of movement, and proper function of release lever spring. Make sure that all Cinch parts are moving smoothly and that the device is clean and working properly. Clean the Cinch after use in dirty, wet, muddy, or icy conditions. Some minor surface corrosion may appear if you use the Cinch in humid or maritime environments. Thoroughly dry the Cinch after each use before storing. If minor corrosion does appear, it can be removed with steel wool. Improper use of the Cinch while rappelling and/or belaying will result in accelerated wear on the Cinch and voids the Cinch warranty. Do not use a damaged or visibly worn Cinch. Retire the Cinch immediately if you notice visible damage or wear. You are responsible for knowing the history of your Cinch for its full lifetime and for deciding when to retire the Cinch. The maximum lifetime of the Cinch is 10 years. The Cinch should be retired after 10 years even if there does not appear to be any visible damage or wear. It is impossible to estimate the minimum lifetime of a Cinch. The minimum life of the Cinch depends upon the intensity of use, the number of falls caught, the care given, the conditions in which it is used, and other similar factors. If in doubt, retire the Cinch. Limited Warranty The Cinch is covered by a 2 year limited warranty from the original date of purchase. This warranty covers defects in materials and manufacturing. Damage that is due to normal use and wear, incorrect storage, poor maintenance, abuse, accidents, negligence, or incorrect or improper usage is not covered by this warranty. Products that have been modified or otherwise altered are excluded from this warranty. Except as otherwise specified above, TRANGO MAKES NO WARRANTY OF ANY KIND, EXPRESSED OR IMPLIED, INCLUDING WITHOUT LIMITATION ANY WARRANTY OF MERCHANTABILITY OR FITNESS FOR A PARTICULAR PURPOSE, OR ANY WARRANTY AS TO THE DESIGN CONDITION OR QUALITY OF MATERIALS AND WORKMANSHIP TO THE PURCHASER OF THE GOODS PURCHASED HEREBY OR ANY OTHER PERSON WHATSOEVER. Disclaimer WARNING! BY USING THIS PRODUCT, YOU ACCEPT ALL RISK AND RESPONSIBILITY FOR ANY INJURY, DAMAGE OR DEATH THAT MAY RESULT TO YOU AND/OR THOSE WITH WHOM YOU ARE CLIMBING. Trango disclaims all liability for all consequence, damage, injury, or death that arises out of or relates to, directly or indirectly, your use of the Cinch. Contact Refer to www.trango.com with questions or to find additional information. Das Cinch ist ein Sicherungsgerät mit verstärkter Bremskraft. Es ist KEIN automatisches Sicherungsgerät und muss daher ständig überwacht und kontrolliert werden. DIE BREMSSEITE DES SEILS DARF VON DER BREMSHAND NIE LOSGELASSEN WERDEN. DIE BREMSSEITE DES SEILS MUSS UNUNTERBROCHEN IN DER HAND GEHALTEN UND DURCH DIESE HAND KONTROLLIERT WERDEN. Die Leistung des Cinch kann durch Seildurchmesser, Seilzustand, Schmutz, Nässe und Eisbildung beeinträchtigt werden. Diese Anleitung enthält keine Anweisungen zum Klettern, Sichern oder Abseilen. Vor dem Einsatz des Cinch beim Klettern, Sichern und/oder Abseilen sind detaillierte Kenntnisse von Kletter-, Sicherungs- und/oder Abseiltechniken erforderlich. Bezeichnung der Cinch-Bauteile: 1. Sperrbacke 2. Ablasshebel 3. Chargennummer 4. Drehpunktloch (NICHTS IM DREHPUNKTLOCH BEFESTIGEN) 5. Karabineröse 6. Frontplatte 7. Seilkanal Einlegen des Seils in das Cinch Abbildung 1 – Das Cinch öffnen und mit der Frontplatte nach oben halten. Das Seil wie dargestellt in das Cinch einlegen. Sicherstellen, dass das zum Kletterer führende Seil auf der Seite mit dem Bild des Kletterers aus dem Cinch tritt. Die Bremsseite des Seils muss auf der Seite des Bildes mit der Bremshand, die das Seil greift, aus dem Cinch treten. Abbildung 2 – Das Cinch durch Drehen der Frontplatte über dem Seilkanal schließen. Abbildung 3 – Einen Verriegelungskarabiner in das Karabinerloch einhängen. Es werden birnenförmige Verriegelungskarabiner empfohlen. Abbildung 4 – Verriegelungskarabiner in die Befestigungsöse des Klettergurts einhängen, wobei die Ausrichtung des Cinch Abb. 4 entspricht. Die Sperrbacke sollte in Richtung Boden und der Ablasshebel nach oben zeigen. Verriegeln Sie den Karabiner. Abbildung 5 – WICHTIG! Vor jedem Sichern mit einem kräftigen Ruck am Seilende zwischen Cinch und Kletterer ziehen, um sicherzustellen, dass das Seil richtig in das Cinch eingelegt wurde. Vor jedem Abseilen mit einem kräftigen Ruck am Seilende zwischen Cinch und Abseilstelle ziehen, um sicherzustellen, dass das Seil richtig in das Cinch eingelegt wurde. WENN DAS SEIL DURCH EINEN KRÄFTIGEN RUCK NICHT GEBREMST WIRD, WURDE ES FALSCH IN DAS CINCH EINGELEGT. NICHT KLETTERN ODER SICHERN! DAS SEIL ERNEUT UND KORREKT IN DAS CINCH EINLEGEN. EIN NICHT DURCHFÜHREN DIESER ÜBERPRÜFUNG KANN ZU SCHWEREN VERLETZUNGEN ODER ZUM TOD FÜHREN. Zumindest vor jedem Klettern sollten Sichernder und Kletterer ihre Ausrüstung gegenseitig überprüfen, um sicherzustellen, dass: (1) Kletterer und Sichernder die Klettergurte richtig angelegt haben; (2) Kletterer und Sichernder beide richtig am Seil befestigt sind; (3) das Seil richtig in das Cinch eingelegt wurde; (4) das Cinch richtig am Sichernden angebracht wurde und (5) das Seil lang genug für das Klettern ist. Sichern Abbildung 6 – Seil für den Kletterer ausgeben: Mit der Bremshand das Drehpunktloch mit Zeigefinger und Daumen und das Bremsseil mit den restlichen drei Fingern festhalten. Das Seil für den Kletterer sollte mit der freien Hand HORIZONTAL ausgegeben werden. Falls das Cinch beim Ausgeben des Seils anzieht oder bremst: WARNUNG! Abbildung 6a – Die Handflächenkante der freien Hand an die Kante der Frontplatte anlegen und das zum Kletterer führende Seil mit den Fingern festhalten. Der Benutzer ist verpflichtet, diese Anleitung vor dem Gebrauch vollständig durchzulesen und zu verstehen. Abbildung 6b – Das Seil in Richtung Handfläche ziehen, um es als Hebel zum Öffnen des Seilkanals zu verwenden. Das Cinch ist ausschließlich zum Klettern bestimmt. Das Klettern ist eine potenziell äußerst gefährliche Tätigkeit, die zu schweren Verletzungen oder zum Tod führen kann. Abbildung 6c – Das Seil für den Kletterer horizontal ausgeben. Die Bremsseite des Seils darf von der Bremshand UNTER KEINEN UMSTÄNDEN losgelassen werden. Das Cinch ist ausschließlich zum Gebrauch durch erfahrene Anwender bestimmt. Vor der Verwendung des Cinch ist eine sachgemäße Einweisung unerlässlich. WICHTIG! DAS CINCH ZIEHT NICHT AN BZW. BREMST DAS SEIL NICHT, WENN ES IN EINER OFFENEN ODER ENTRIEGELTEN POSITION GEHALTEN WIRD. Beim DE: CINCH-ANLEITUNG Ablassen/Abseilen Abbildung 8 – Die Bremsseite des Seils fest in der Bremshand halten. Den Ablasshebel wie dargestellt nach unten ziehen. Der Daumen muss auf dem Drehpunkt des Ablasshebels ruhen. WICHTIG! UNSACHGEMÄSSE ABLASS- UND ABSEILTECHNIKEN KÖNNEN ZU SCHWEREN ERLETZUNGEN ODER ZUM TOD FÜHREN. Abbildung 9 – Das Abseilen muss langsam, kontrolliert und gleichmäßig erfolgen. Nicht schnell abseilen, da dies eine übermäßige Erhitzung, einen beschleunigten Verschleiß von Cinch und Seil, eine höhere Wahrscheinlichkeit des Kontrollverlusts und mögliche Verletzungen oder den Tod zur Folge haben kann. Sichern über fest installierte Abseilstellen Abbildung 10 – Sichern eines Nachsteigers über fest installierte Abseilstellen: Das Seil wie in Abbildungen 1-3 beschrieben in das Cinch einlegen. Den Verriegelungskarabiner in eine ausgeglichene, sichere und starke Abseilstelle einhängen. KEINEN VORSTEIGER sichern, wenn das Cinch direkt an den Abseilstellen befestigt ist. WICHTIG! Bei seinem Einsatz darf das Cinch nicht mit einem Objekt (wie Felsen, Felswand oder anderen Hindernissen) in Kontakt kommen bzw. davon blockiert werden. IN EINEM SOLCHEN FALL BREMST DAS CINCH GGF. NICHT RICHTIG, WAS ZU SCHWEREN VERLETZUNGEN ODER ZUM TOD FÜHREN KANN. Überprüfung und Wartung Überprüfen Sie das Cinch vor jedem Gebrauch auf übermäßigen Verschleiß, Korrosion, Verformungen, sichtbare Schäden, Fremdkörper wie zum Beispiel Verschmutzungen, Bewegungsfreiheit und die ordnungsgemäße Funktion der Ablasshebelfeder. Stellen Sie sicher, dass sich alle Cinch-Teile problemlos bewegen und die Vorrichtung sauber ist und einwandfrei funktioniert. Das Cinch nach Gebrauch unter schmutzigen, nassen, matschigen oder eisigen Bedingungen reinigen. Bei der Verwendung des Cinch in feuchten oder maritimen Umgebungen kann geringfügige Oberflächenkorrosion auftreten. Das Cinch nach jedem Gebrauch und vor seiner Aufbewahrung gründlich abtrocknen. Sollte dennoch eine geringfügige Korrosion auftreten, kann diese mithilfe von Stahlwolle entfernt werden. Die Garantie erlischt durch eine unsachgemäße Verwendung des Cinch beim Abseilen und/oder der Sicherung. Kein beschädigtes oder sichtbar abgenutztes Cinch verwenden. Das Cinch nach dem Feststellen sichtbarer Schäden oder Verschleiß nicht länger benutzen. Sie sind dafür verantwortlich, sich mit der gesamten Vorgeschichte Ihres Cinch vertraut zu machen und die Entscheidung zu treffen, wann es nicht länger verwendbar ist. Die maximale Lebensdauer des Cinch beträgt 10 Jahre. Nach 10 Jahren sollte das Cinch nicht länger verwendet werden, auch wenn keine Schäden oder Verschleiß sichtbar sind. Es ist unmöglich, die Mindest-Lebensdauer eines Cinch zu schätzen. Die Mindest-Lebensdauer eines Cinch ist von der Intensität der Nutzung, der Anzahl der aufgefangenen Stürze, der Sorgfalt, den Bedingungen, unter denen es verwendet wird, und weiteren ähnlichen Faktoren abhängig. Im Zweifelsfall sollte das Cinch nicht länger verwendet werden. Beschränkte Garantie Für das Cinch wird ab dem Kaufdatum eine beschränkte Garantie von 2 Jahren gewährt. Diese Garantie gilt für Material-und Fabrikationsfehler. Von dieser Garantie ausgeschlossen sind Schäden aufgrund von normalem Gebrauch und Verschleiß, falscher Lagerung, schlechter Wartung, Missbrauch, Unfällen, Fahrlässigkeit und falscher oder unsachgemäßer Verwendung. Produkte, die modifiziert oder anderweitig verändert wurden, sind von dieser Garantie ausgeschlossen. Soweit oben nicht anderweitig angegeben, GIBT TRANGO DEM KÄUFER DER HIERDURCH ERWORBENEN GÜTER ODER EINER ANDEREN BELIEBIGEN PERSON KEINERLEI GARANTIE, AUSDRÜCKLICH ODER IMPLIZIT, INSBESONDERE KEINE GARANTIE DER VERMAKTBARKEIT ODER EIGNUNG FÜR EINEN BESTIMMTEN ZWECK UND KEINE GARANTIE FÜR DEN DESIGNZUSTAND ODER DIE QUALTÄT VON MATERIAL UND VERBARBEITUNG. Haftungsausschluss WARNUNG! DURCH DIE VERWENDUNG DIESES PRODUKTS ÜBERMEHMEN SIE SÄMTLICHE RISIKEN UND DIE VERANTWORTUNG FÜR JEGLICHE VERLETZUNGEN, SCHÄDEN ODER DEN TOD VON IHNEN SELBST UND/ODER DENJENIGEN PERSONEN, MIT DENEN SIE KLETTERN. Trango lehnt jede Haftung für alle Folgen, Schäden, Verletzungen oder Tod ab, die/der sich direkt oder indirekt aus Ihrem Gebrauch des Cinch ergeben. Kontakt Bei Fragen oder für weitere Informationen steht Ihnen die Website www.trango.com zur Verfügung. ISTRUZIONI PER L’USO DEL CINCH ATTENZIONE! L’utilizzatore è tenuto a leggere e a comprendere appieno tutte le istruzioni prima dell’uso. Il Cinch è progettato unicamente per arrampicare. L’arrampicata è un’attività di per sé pericolosa che può causare gravi infortuni o la morte. Il Cinch deve essere usato unicamente da esperti. Prima di usare il Cinch è fondamentale una preparazione adeguata. FARE IN MODO DI COMPRENDERE APPIENO LE LIMITAZIONI DEL CINCH PRATICANDO E PADRONEGGIANDO LE TECNICHE CORRETTE PER IL SUO UTILIZZO IN UN AMBIENTE SICURO PRIMA DI APPLICARLE CON UN COMPAGNO. L’USO SCORRETTO DEL CINCH PUÒ CAUSARE GRAVI LESIONI O LA MORTE. IMPORTANTE! Il Cinch è un assicuratore con frenata assistita. NON è un bloccante automatico, pertanto richiede monitoraggio e controllo costanti. NON togliere MAI la mano frenante dal lato frenaggio della corda. Tenere sempre la mano sul lato frenaggio della corda e controllarlo. Le prestazioni del Cinch possono essere influenzate da diametro e usura della corda e condizioni di sporcizia, umidità o ghiaccio. Queste istruzioni non sono istruzioni per arrampicare, assicurarsi o scendere in corda doppia. Prima di utilizzare il Cinch e di intraprendere tali attività è necessaria una conoscenza approfondita delle tecniche di scalata, assicurazione e/o discesa in corda doppia. Nomenclatura delle parti del Cinch: 1. Levetta di sgancio 2. Leva di calata corrosioni di minima entità, esse possono essere eliminate impiegando lana d’acciaio. L’uso scorretto del Cinch durante la discesa in corda doppia e/o l’assicurazione può comportare l’usura accelerata del Cinch e invalidarne la garanzia. Non utilizzare il Cinch se è danneggiato o visibilmente usurato. Smettere immediatamente di utilizzare il Cinch se si notano segni di danni o usura. L’utilizzatore è tenuto a conoscere la storia del proprio Cinch per tutta la sua vita di utilizzo e per stabilire quando è il momento di smettere di utilizzarlo. La durata massima del Cinch è di 10 anni. Dopo 10 anni è necessario smettere di utilizzare il Cinch, anche se esso non presenta danni visibili o usura. È impossibile stimare la durata minima di un Cinch. La vita utile minima del Cinch dipende dall’intensità del suo utilizzo, dal numero di cadute evitate, dalla cura con cui è stato conservato, dalle condizioni in cui è stato utilizzato e da altri fattori simili. Nel dubbio, smettere di utilizzare il Cinch. Garanzia limitata Il Cinch è coperto da una garanzia limitata di 2 anni a partire dalla data originale di acquisto. Tale garanzia copre i difetti di materiali e di fabbricazione. I danni provocati da normale uso e deterioramento, conservazione scorretta, manutenzione carente, abuso, incidenti, negligenza o utilizzo scorretto o improprio non sono coperti dalla presente garanzia. I prodotti che sono stati modificati o in altro modo alterati sono esclusi da questa garanzia. Tranne come altrimenti specificato in precedenza, TRANGO NON RILASCIA ALL’ACQUIRENTE DEI PRODOTTI QUI ACQUISTATI O AD ALTRA PERSONA GARANZIE DI ALCUN TIPO, ESPLICITE O IMPLICITE, IVI COMPRESE, A TITOLO ESEMPLIFICATIVO E NON LIMITATIVO, GARANZIE SULLA COMMERCIABILITÀ O SULL’IDONEITÀ AD UN PARTICOLARE SCOPO, OVVERO GARANZIE SULLE LORO CONDIZIONI D’USO O SULLA QUALITÀ DEI MATERIALI E SULLA FABBRICAZIONE. Limitazione di responsabilità ATTENZIONE! USANDO QUESTO PRODOTTO SI ACCETTANO TUTTI I RISCHI E LE RESPONSABILITÀ DI EVENTUALI LESIONI, DANNI O DECESSI CHE POTREBBERO ESSERE CAUSATI ALL’UTILIZZATORE E/O AI COMPAGNI DI ARRAMPICATA. Trango declina la totale responsabilità di tutte le conseguenze, i danni, gli infortuni o i decessi che possano essere causati dall’utilizzo del Cinch o essere connessi ad esso, direttamente o indirettamente. 3. Numero di serie Contatti 4. Foro del perno (NON ATTACCARE NIENTE AL FORO DEL PERNO) Per eventuali domande o per ulteriori informazioni, visitare il sito www.trango.com. 5. Foro per il moschettone 6. Pannello frontale 7. Asola passafune Caricamento del Cinch Figura 1 – Aprire il Cinch e tenerlo con il pannello frontale rivolto verso l’alto. Inserire la corda nel Cinch come illustrato. Assicurarsi che la corda che va all’arrampicatore esca dal Cinch dal lato indicato nella figura dell’arrampicatore. Il lato frenaggio della corda deve uscire dal Cinch dal lato con la figura di una mano frenante che assicura la corda. Figura 2 – Chiudere il Cinch facendo ruotare il pannello frontale oltre l’asola passafune. Figura 3 – Agganciare un moschettone di bloccaggio nel foro del moschettone. Si consiglia di utilizzare i moschettoni a pera. Figura 4 – Agganciare il moschettone per assicurare l’anello dell’imbrago, orientando il Cinch come illustrato nella Figura 4. La levetta di sgancio deve essere rivolta verso il basso, mentre la leva di calata deve essere rivolta verso l’alto. Bloccare il moschettone. Figura 5 – IMPORTANTE! Prima di ogni assicurazione, tirare con decisione la corda che esce dal Cinch e che va all’arrampicatore per controllare di averla inserita correttamente nel Cinch. Prima di ogni discesa in corda doppia, tirare con decisione la corda che esce dal Cinch e che va all’ancoraggio per controllare di aver inserito correttamente la stessa nel Cinch. SE, TIRANDO CON DECISIONE, LA CORDA NON FRENA, IL CINCH È CARICATO IN MODO ERRATO. NON INTRAPRENDERE UNA SCALATA NÉ ASSICURARSI! REINSERIRE CORRETTAMENTE LA CORDA NEL CINCH. LA MANCATA EFFETTUAZIONE DI QUESTA VERIFICA POTREBBE PROVOCARE INFORTUNI O MORTE. Come misura minima di sicurezza, prima di ogni scalata il belayer e l’arrampicatore devono controllarsi reciprocamente per essere certi che: (1) arrampicatore e belayer hanno indossato correttamente i rispettivi imbraghi; (2) arrampicatore e belayer sono entrambi correttamente legati alla corda, (3) la corda è correttamente inserita nel Cinch, (4) il Cinch è correttamente attaccato al belayer e (5) la corda è di lunghezza sufficiente per l’arrampicata. INSTRUCTIONS POUR LE CINCH AVERTISSEMENT ! Il est de l’entière responsabilité de l’utilisateur de lire et de comprendre toutes les instructions avant de commencer à utiliser cet article. Le Cinch a été conçu uniquement pour l’escalade. L’escalade est une activité à risque qui peut entraîner des blessures graves ou même la mort. Le Cinch est destiné à être employé uniquement par des experts. Un entraînement en bonne et due forme est nécessaire avant d’utiliser le Cinch. ASSUREZ-VOUS D’AVOIR BIEN COMPRIS TOUTES LES LIMITATIONS DU CINCH, ENTRAÎNEZ-VOUS ET MAÎTRISEZ LES TECHNIQUES APPROPRIÉES À L’UTILISATION DU CINCH DANS UN ENVIRONNEMENT SANS RISQUE AVANT DE LES EMPLOYER AVEC UN PARTENAIRE. L’UTILISATION INCORRECTE DU CINCH PEUT ÉVENTUELLEMENT ÊTRE LA CAUSE DE BLESSURES GRAVES, VOIRE D’UN DÉCÈS. IMPORTANT! Le Cinch est un appareil d’assurage autobloquant. Ce N’est PAS un appareil d’assurage automatique; il requiert donc de rester en permanence sous surveillance et sous contrôle. Ne retirez JAMAIS la main qui freine du côté freinage de la corde. Gardez la corde dans la main et contrôlez constamment le côté freinage. Le bon fonctionnement du Cinch dépend du diamètre de la corde, de son état, de sa propreté et des conditions climatiques (humidité ou froid). Ces instructions ne sont pas des instructions pour l’escalade, l’assurage ou le rappel. Il est nécessaire d’avoir une connaissance approfondie des techniques d’escalade, d’assurage et de rappel avant d’utiliser le Cinch et de se lancer dans de telles activités. Nomenclature des pièces du Cinch: 1. Ergot de déblocage 2. Levier de déblocage Assicurazione 3. Numéro de lot Figura 6 – Dare corda all’arrampicatore: Con la mano frenante, pinzare il foro del perno con l’indice e il pollice tenendo contemporaneamente la corda di frenaggio con le altre tre dita. Dare corda all’arrampicatore ORIZZONTALMENTE con la mano non frenante. 4. Trou du pivot (N’ATTACHEZ RIEN AU TROU DU PIVOT) Se il Cinch blocca o frena la corda mentre si dà corda all’arrampicatore: Figura 6a – Con la mano non frenante: mettere l’estremità del palmo contro l’estremità del pannello frontale e tenere con le dita la corda che va all’arrampicatore. Figura 6b – Premere la corda verso il palmo, usando la corda come una leva per aprire l’asola passafune. Figura 6c – Dare corda all’arrampicatore orizzontalmente. NON togliere in nessun caso la mano frenante dal lato frenaggio della corda. IMPORTANTE! SE VIENE TENUTO IN POSIZIONE APERTA O NON CHIUSA, il Cinch NON BLOCCA NÉ FRENA LA CORDA. Non tenere nella mano tutto il Cinch mentre ci si assicura, altrimenti si potrebbe interferire con il meccanismo di bloccaggio, con il rischio di gravi infortuni o morte. NON togliere MAI la mano frenante dal lato frenaggio della corda. Figura 7 – Dare corda a se stessi: Tirare la corda attraverso il Cinch con la mano frenante. NON togliere MAI la mano frenante dal lato frenaggio della corda. Calata/discesa in corda doppia Figura 8 – Tenere saldamente il lato frenaggio della corda con la mano frenante. Abbassare la leva di calata come illustrato. Il pollice deve appoggiare sul punto di perno della leva di calata. IMPORTANTE! L’ESECUZIONE SCORRETTA DI TECNICHE DI CALATA E DISCESA IN CORDA DOPPIA PUÒ PROVOCARE GRAVI INFORTUNI O MORTE. Figura 9 – Scendere in corda doppia lentamente, in modo controllato e misurato. Se la discesa in corda doppia avviene rapidamente, è possibile provocare l’accumulo eccessivo di calore, l’usura accelerata del Cinch e della corda, l’aumento della probabilità di perdita del controllo e gravi infortuni o morte. Assicurazione dagli ancoraggi Figura 10 – Assicurare un secondo di cordata dagli ancoraggi: Caricare il Cinch come illustrato nelle Figure dalla 1 alla 3. Agganciare il moschettone di bloccaggio ad un punto di anco raggio sicuro, affidabile e solido. NON assicurare un CAPOCORDATA con il Cinch attaccato direttamente agli ancoraggi. IMPORTANTE! durante l’uso, il Cinch non deve entrare in contatto con nessun oggetto, né essere bloccato da nulla, comprese rocce, superficie di scalata o altre ostruzioni. IN SIMILI CIRCOSTANZE IL CINCH PUÒ NON FRENARE CORRETTAMENTE, CON CONSEGUENTI INFORTUNI GRAVI O MORTE. Controllo e manutenzione Controllare il Cinch prima di ogni utilizzo per verificare l’eventuale eccesso di usura, corrosione, deformazioni, danni visibili, corpi estranei (sporcizia), e per provare la libertà di movimento e il funzionamento corretto della molla della leva di calata. Verificare che tutte le parti del Cinch si muovano in modo scorrevole e che il dispositivo sia pulito e correttamente funzionante. Pulire il Cinch dopo l’uso in condizioni di sporcizia, umidità, fango o ghiaccio. Se il Cinch viene usato in ambienti umidi o marini, possono comparire sulla sua superficie corrosioni di minor entità. Asciugare con cura il Cinch dopo ogni utilizzo prima di riporlo. Se effettivamente compaiono 5. Trou du mousqueton 6. Face avant 7. Goulotte de corde Installation du Cinch Figure 7 – Reprendre du mou: Tirez la corde par le Cinch avec la main qui freine. Ne retirez JAMAIS la main qui freine du côté freinage de la corde. Descente/Rappel Figure 8 – Tenez fermement le côté freinage de la corde avec la main qui freine. Tirez vers le bas et débloquez le levier en suivant l’illustration. Le pouce doit reposer sur le point pivotant du levier de déblocage. IMPORTANT! DES TECHNIQUES DE DESCENTE ET DE RAPPEL INCORRECTES PEUVENT ENTRAÎNER DES BLESSURES GRAVES OU LA MORT. Figure 9 – Effectuez un rappel lent, contrôlé et mesuré. Le rappel ne doit pas être trop rapide, car il en résulterait une production de chaleur, une usure prématurée du Cinch et de la corde, et une augmentation des risques de perte de contrôle entraînant d’éventuelles blessures graves ou la mort. Technique de rappel à partir d’ancrages Figure 10 – Rappel d’un second à partir d’ancrages: Installez le Cinch en suivant les instructions des Figures 1 à 3. Attachez le mousqueton bloquant dans un point d’ancrage solide, égalisé et fiable. N’EFFECTUEZ PAS de rappel avec un LEADER avec le Cinch attaché directement aux ancrages. IMPORTANT! En cours d’utilisation, le Cinch ne doit pas entrer en contact ou être bloqué par un quelconque objet, y compris la roche, la surface de la falaise ou tout autre obstacle. DANS UN TEL CAS, LE CINCH POURRAIT NE PAS FREINER CORRECTEMENT ET ENTRAÎNER DES BLESSURES GRAVES OU LA MORT. Inspection et entretien Inspectez le Cinch avant chaque utilisation afin de détecter toute usure excessive, tout dommage visible, tous objets extérieurs, y compris les poussières, et vérifiez la liberté de mouvement et le bon fonctionnement du ressort du levier de déblocage. Assurez-vous que toutes les pièces du Cinch s’articulent en douceur et que l’appareil est propre et fonctionne bien. Nettoyez le Cinch après utilisation dans des environnements poussiéreux, humides, boueux ou glacés. Certaines traces de corrosion peuvent apparaître si vous utilisez le Cinch dans un milieu humide ou marin. Séchez soigneusement le Cinch après chaque usage avant de le ranger. Si une trace de corrosion bénigne apparaît, faites-la disparaître en frottant à la laine de fer. Une utilisation inappropriée du Cinch en technique de rappel et/ou d’assurage entraînera une usure prématurée du Cinch et annulerait sa garantie. N’utilisez pas un Cinch endommagé ou visiblement usé. N’utilisez plus un Cinch dès que vous remarquez un dommage ou une marque d’usure. C’est vous qui connaissez et êtes responsable de l’histoire de votre Cinch sur toute sa durée de vie et qui décidez de mettre le Cinch au rebut. La durée de vie maximale est de 10 ans. Le Cinch doit être mis au rebut au bout de 10 ans même s’il ne présente aucune trace visible de dommage ou d’usure. Il est impossible d’évaluer la durée de vie minimale d’un Cinch. La vie minimale d’un Cinch dépend de l’intensité de son emploi, du nombre de chutes subies, du soin apporté, des conditions d’utilisation et d’autres facteurs similaires. En cas de doute, mettez-le au rebut. Garantie limitée Le Cinch est couvert par une garantie limitée de 2 ans à partir de la date d’achat. Cette garantie couvre les défauts matériels et de fabrication. Les dommages causés par une usure normale, une conservation inappropriée, un mauvais entretien, une utilisation exagérée, des accidents, la négligence ou un usage impropre ou incorrect ne sont pas couverts par cette garantie. Les produits ayant été modifiés ou altérés d’une manière ou d’une autre sont exclus de cette garantie. À l’exception de ce qui est spécifié ci-dessus, TRANGO NE DONNE AUCUNE GARANTIE EXPRIMÉE OU IMPLICITE AVEC OU SANS LIMITATION SUR LA VENDABILITÉ OU LA CONFORMITÉ À UN OBJECTIF PARTICULIER, NI AUCUNE GARANTIE SUR LES CONDITIONS DE LA CONCEPTION OU LA QUALITÉ DES MATÉRIAUX ET DE LA MAIN D’OEUVRE À L’ACHETEUR DES BIENS ACQUIS OU À TOUT AUTRE PEPRSONNE. Avis de non-responsabilité AVERTISSEMENT ! EN UTILISANT CE PRODUIT, VOUS ACCEPTEZ TOUS LES RISQUES ET LA RESPONSABILITÉ POUR TOUTE BLESSURE, TOUT DOMMAGE OU DÉCÈS DONT VOUS OU LES PERSONNES PRATIQUANT L’ESCALADE AVEC VOUS POUVEZ ÊTRE VICTIMES. Trango se dégage de toute responsabilité pour toutes les conséquences, blessures, toute mort ou tous les dommages causés par ou liés directement ou indirectement à l’utilisation du Cinch. Contact Consultez www.trango.com pour toute question ou information complémentaire. INSTRUCCIONES DE CINCH ¡ADVERTENCIA! Es responsabilidad del usuario leer y entender completamente todas las instrucciones antes de utilizar el producto. Figure 1 – Ouvrez le Cinch et tenez-le avec la face avant vous faisant face. Placez la corde dans le Cinch en suivant les instructions. Assurez-vous que la corde allant vers le grimpeur sort du Cinch du côté de l’image du grimpeur. Le côté freinage de la corde doit sortir du Cinch sur le côté où se trouve l’image de la main qui freine en tenant la corde. El Cinch está diseñado exclusivamente para uso en la escalada. La escalada es una actividad intrínsecamente peligrosa que puede resultar en lesiones graves o la muerte. Figure 2 – Fermez le Cinch en faisant pivoter la face avant sur la goulotte. ASEGÚRESE DE QUE ENTIENDE COMPLETAMENTE LAS LIMITACIONES DEL CINCH, Y DE QUE DOMINA Y APLICA LAS TÉCNICAS PARA EL USO DEL CINCH EN UN ENTORNO SEGURO ANTES DE USARLO CON UN COMPAÑERO. Figure 3 – Attachez un mousqueton bloquant dans le trou du mousqueton. Il est conseillé d’utiliser des mousquetons bloquants en poire. Figure 4 – Attachez le mousqueton bloquant à la boucle d’assurage du harnais avec le Cinch positionné conformément à la Figure 4. L’ergot de déblocage doit être dirigé vers le sol et le levier de déblocage doit être pointé vers le haut. Mousqueton bloquant. Figure 5 – IMPORTANT! Avant chaque assurage, tirez vigoureusement sur la corde sortant du Cinch et allant vers le grimpeur pour tester qu’elle est bien en place dans le Cinch. Avant chaque rappel, tirez vigoureusement sur la corde sortant du Cinch et allant vers le grimpeur pour tester qu’elle est bien en place dans le Cinch. SI LA CORDE NE FREINE PAS APRÈS UN À-COUP SEC, LE CINCH N’EST PAS INSTALLÉ CORRECTEMENT. NE GRIMPEZ PAS, N’ASSUREZ PAS ! RÉINSTALLEZ LA CORDE CORRECTEMENT DANS LE CINCH. SI CE TEST A ÉCHOUÉ, VOUS RISQUEZ UNE BLESSURE GRAVE OU MÊME LA MORT. L’assureur et le grimpeur doivent vérifier mutuellement leur équipement au moins une fois avant chaque escalade et s’assurer que: (1) le grimpeur et l’assureur ont bien mis leurs baudriers; (2) le grimpeur et l’assureur sont bien attachés correctement à la corde; (3) la corde est correctement installée dans le Cinch; (4) le Cinch est correctement fixé à l’assureur; et (5) la corde est assez longue pour l’escalade. El Cinch está concebido solo para uso por expertos. Es necesario una formación adecuada antes de usar el Cinch. EL USO INAPROPIADO DEL CINCH PUEDE RESULTAR EN LESIONES GRAVES O LA MUERTE. ¡IMPORTANTE! El Cinch es un dispositivo de seguro con frenado asistido. No es un dispositivo de seguro automático, por lo que requiere una supervisión y control constantes. No quite NUNCA el freno de mano del lado del freno de la soga. Ponga la mano encima y controle el lado del freno de la soga en todo momento. El rendimiento del Cinch puede verse afectado por el diámetro y las condiciones de la soga, así como por las condiciones de suciedad, humedad o hielo. Estas instrucciones no son de escalada, aseguramiento o rápel. Se requiere un profundo conocimiento de las técnicas de escalada, aseguramiento y/o rápel antes de utilizar el Cinch y participar en esas actividades. Nomenclatura de los componentes del Cinch: IMPORTANT! Le Cinch NE VA PAS S’ENCLENCHER OU FREINER LA CORDE S’IL EST TENU EN POSITION OUVERTE OU DÉBLOQUÉE. Ne tenez pas le Cinch entièrement dans votre main pendant l’assurage, car vous pourriez rendre le mécanisme de freinage inopérant et entraîner une blessure grave ou la mort. Ne retirez JAMAIS la main qui freine du côté freinage de la corde. Si el Cinch engancha o frena la soga a la vez que afloja la soga del escalador: Figura 6a – Sin el freno de mano: coloque el extremo de la palma contra el extremo de la placa frontal y sujete la soga con los dedos orientándola hacia el escalador. Figura 6b – Apriete la soga hacia la palma, utilizando la soga como palanca para abrir el canal de soga. Figura 6c – Proporcione soga al escalador horizontalmente. NO quite el freno de mano del lado del freno de la soga bajo ninguna circunstancia. ¡IMPORTANTE! El Cinch NO ENGANCHARÁ NI FRENARÁ LA SOGA SI SE SUJETA EN POSICIÓN ABIERTA O DE DESBLOQUEO. No sujete todo el Cinch en la mano durante el aseguramiento, ya que podría estropear el mecanismo de freno y ocasionar lesiones graves o la muerte. No quite NUNCA el freno de mano del lado del freno de la soga. Figura 7 – Tensar la soga: Tire de la soga a través del Cinch con el freno de mano. No quite NUNCA el freno de mano del lado del freno de la soga. Descenso/rápel Figura 8 – Sujete bien el lado del freno de la soga con el freno de mano. Tire hacia abajo de la palanca de desbloqueo tal como se muestra. El pulgar debe descansar en el punto de giro de la palanca de liberación. ¡IMPORTANTE! LAS TÉCNICAS DE DESCENSO Y RÁPEL INCORRECTAS PUEDEN PROVOCAR LESIONES GRAVES O LA MUERTE. Figura 9 – Rápel de manera lenta, controlada y cauta. No realice el rápel rápidamente, ya que un exceso de acumulación de calor, desgaste acelerado del Cinch y de la soga aumentan el riesgo de pérdida de control y posibles lesiones graves o la muerte. Aseguramiento desde anclajes Figura 10 – Aseguramiento de un seguidor desde anclajes: Cargue el Cinch tal como se detalla en las Figuras 1-3. Sujete el mosquetón de seguridad en un punto de anclaje igualado, fiable y fuerte. NO asegure la soga de un LÍDER con el Cinch atado directamente a los anclajes. ¡IMPORTANTE! Durante el uso, el Cinch no debe entrar en contacto ni ser bloqueado por ningún objeto, por ejemplo, la roca, el acantilado o cualquier otra obstrucción. EN TAL CASO EL CINCH PODRÍA NO FRENAR CORRECTAMENTE Y OCASIONAR LESIONES GRAVES O LA MUERTE. Inspección y mantenimiento Examine el Cinch antes de cada uso para comprobar la presencia de desgaste excesivo, corrosión, deformidades, daños visibles, objetos extraños como por ejemplo suciedad, libertad de movimiento y funcionamiento correcto del muelle de la palanca de desbloqueo. Asegúrese de que todos los componentes del Cinch se muevan fácilmente y de que el dispositivo esté limpio y funcione correctamente. Limpie el Cinch después de su uso en condiciones de suciedad, humedad o con barro o hielo. Podría aparecer corrosión parcial de la superficie si usa el Cinch en entornos húmedos o marítimos. Después de cada uso, seque completamente el Cinch antes de guardarlo. Si aparece corrosión parcial, ésta puede eliminarse con lana de acero. El manejo inadecuado del Cinch durante el rápel y/o aseguramiento provocará desgaste acelerado del Cinch y anulará la garantía. No use un Cinch que esté dañado o visiblemente desgastado. Deseche inmediatamente el Cinch si observa daños visibles o desgaste. Usted es responsable de conocer el historial del Cinch durante toda su vida útil y de decidir cuándo desecharlo. La vida útil máxima del Cinch son 10 años. El Cinch debe desecharse transcurridos 10 años incluso si no hay presencia aparente de daños visibles o desgaste. Es imposible estimar la vida útil mínima de un Cinch. La vida útil mínima del Cinch depende de la intensidad del uso, el número de caídas capturadas, el cuidado que se tenga, las condiciones de uso y otros factores similares. En caso de duda, deseche el Cinch. Garantía limitada El Cinch está cubierto por una garantía limitada de 2 años a partir de la fecha original de compra. Esta garantía cubre defectos de materiales y fabricación. Los daños derivados del uso en condiciones normales, almacenamiento incorrecto, mantenimiento inadecuado, uso indebido, accidentes, negligencia, uso incorrecto o inadecuado no están cubiertos por esta garantía. Quedan excluidos de esta garantía los productos que hayan sido sometidos a modificación o alterados de alguna otra forma. Con excepción de lo indicado anteriormente, TRANGO NO OFRECE GARANTÍAS DE NINGÚN TIPO, EXPLÍCITAS O IMPLÍCITAS, INCLUYENDO SIN LIMITACIÓN CUALQUIER GARANTÍA DE COMERCIABILIDAD O APTITUD PARA FINES PARTICULARES, O CUALQUIER GARANTÍA EN CUANTO A CONDICIONES DE DISEÑO O CALIDAD DE LOS MATERIALES Y FABRICACIÓN AL COMPRADOR DE MERCANCÍA ADQUIRIDA POR EL PRESENTE O CUALQUIER OTRA PERSONA. Renuncia de responsabilidad ¡ADVERTENCIA! MEDIANTE EL USO DE ESTE PRODUCTO, USTED ACEPTA TODO RIESGO Y RESPONSABILIDAD POR CUALQUIER LESIÓN, DAÑO O MUERTE DE QUE USTED O LAS PERSONAS CON LAS QUE USTED PRACTIQUE ALPINISMO PUEDAN SER OBJETO. Trango no es responsable de cualquier consecuencia, daño, lesión o muerte derivados, directa o indirectamente, del uso del Cinch o relacionados con el mismo. Contrato Visite la página www.trango.com para hacer cualquier consulta u obtener más información. 4. Rangua (NO ADHIERA NADA A LA RANGUA) 6. Placa frontal Figure 6c – Passez la corde au grimpeur horizontalement. Ne retirez votre main qui freine du côté du freinage de la corde À AUCUN PRIX. Figura 6 – Aflojar la soga del escalador: Con el freno de mano, apriete la rangua con el dedo índice y el pulgar manteniendo a la vez la soga de freno con los otros tres dedos. Proporcione soga al escalador HORIZONTALMENTE sin el freno de mano. 3. Número de lote 5. Orificio para el mosquetón Figure 6b – Faites avancer la corde en direction de la paume en l’utilisant comme un levier pour ouvrir la goulotte. Aseguramiento 2. Palanca de desbloqueo Figure 6 – Donnez du mou au grimpeur: Avec la main qui freine, pincez le trou de pivot entre le pouce et l’index pendant que vous freinez la corde avec les trois doigts restants. Passez la corde au grimpeur HORIZONTALEMENT avec la main qui ne freine pas. Figure 6a – Avec la main libre : placez le bord de la paume contre le bord de la face avant et tenez la corde qui va vers le grimpeur avec les doigts. Como mínimo, antes de cada escalada, el sujetador y el escalador deberían hacer comprobaciones entre sí para asegurarse de que: (1) el escalador y el sujetador se hayan colocado sus arneses correctamente, (2) el escalador y el sujetador estén correctamente amarrados a la soga, (3) la soga esté correctamente cargada en el Cinch, (4) el Cinch esté correctamente amarrado al sujetador, y (5) la soga sea suficientemente larga para la escalada. 1. Lengüeta de desbloqueo Assurage Si le Cinch s’enclenche ou freine la corde alors que vous donnez du mou au grimpeur: el escalador para probar si ha cargado correctamente la soga en el Cinch. Antes de cada rápel, tire fuertemente de la soga que sale del Cinch y va hacia el ancla para probar si ha cargado correctamente la soga en el Cinch. SI LA SOGA NO FRENA CON UN TIRÓN FUERTE, EL CINCH NO SE HA CARGADO CORRECTAMENTE. ¡NO ESCALE NI EFECTÚE ASEGURAMIENTO! RECARGUE LA SOGA EN EL CINCH CORRECTAMENTE. NO REALIZAR ESTA PRUEBA PUEDE RESULTAR EN LESIONES GRAVES O LA MUERTE. 7. Canal de soga Cargar el Cinch Figura 1 – Abra el Cinch y sujételo con la placa frontal orientada hacia arriba. Cargue la soga en el Cinch tal como se muestra en la figura. Asegúrese de que la soga que va hacia el escalador salga del Cinch por el mismo lado que la ilustración del escalador. El lado del freno de la soga debe salir del Cinch por el lado con la imagen de un freno de mano sujetando la soga. Figura 2 – Cierre el Cinch girando la placa frontal sobre el canal de soga. Figura 3 – Pase un mosquetón de seguridad a través del orificio para el mosquetón. Se recomiendan mosquetones de seguridad en forma de pera. Figura 4 – Sujete el mosquetón de seguridad para asegurar el lazo del arnés, con el Cinch orientado tal como se muestra en la Figura 4. La lengüeta de desbloqueo debe estar orientada hacia el suelo, y la palanca de liberación debe estar orientada hacia arriba. Mosquetón de seguridad. Figura 5 – ¡IMPORTANTE! Antes de cada aseguramiento, tire fuertemente de la soga que sale del Cinch y va hacia www.trango.com
